Table of Contents >> Show >> Hide
- What Is a CNC-Telescope With Semi-Nasmyth Mount?
- Why the Semi-Nasmyth Idea Matters
- The Optical Concept: Folding Light Without Folding Your Brain
- Why CNC Fabrication Is So Useful for Telescope Building
- Core Components of a CNC Semi-Nasmyth Telescope
- Design Advantages
- Design Challenges
- Motorization and Computer Control
- Best Uses for a CNC Semi-Nasmyth Telescope
- Practical Build Considerations
- Maintenance and Tuning
- Experience Notes: Living With a CNC-Telescope With Semi-Nasmyth Mount
- Conclusion
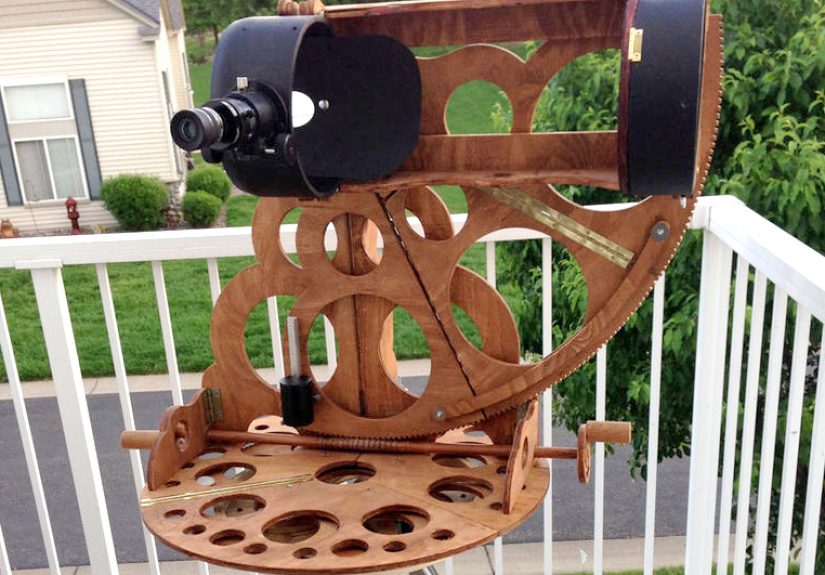
A CNC-telescope with a semi-Nasmyth mount sounds like the kind of machine that might require a lab coat, a secret observatory, and at least one dramatic lightning storm. In reality, it sits in a much friendlier corner of astronomy: the place where amateur telescope making, computer-aided fabrication, woodworking, optics, and stubborn curiosity all shake hands. It is not just a telescope. It is a carefully designed mechanical system that tries to solve a classic problem: how do you build a serious reflector that is stable, ergonomic, portable, and precise without needing a forklift, a grant committee, or a garage the size of a planetarium?
The phrase “CNC-telescope with semi-Nasmyth mount” brings together three important ideas. First, it is a telescope, usually based on a reflector design such as a Newtonian or folded optical system. Second, it is CNC-built, meaning many parts are cut by a computer-controlled router or mill for repeatability and accuracy. Third, it uses a semi-Nasmyth-style mounting concept, borrowing from professional observatory designs where the viewing position or instrument location can remain more convenient than on a traditional moving-tube telescope.
For backyard astronomers, makers, and engineering-minded sky watchers, this combination is wonderfully practical. CNC fabrication helps parts fit together cleanly. A reflector optical tube keeps aperture affordable. A semi-Nasmyth layout improves comfort by redirecting the light path toward a more accessible viewing position. The result is a telescope that feels less like a wobbly science fair project and more like a compact observatory instrument that happens to live in your workshop.
What Is a CNC-Telescope With Semi-Nasmyth Mount?
A CNC-telescope is not a separate optical category like refractor, Newtonian, or Cassegrain. Instead, “CNC” describes how the structure is manufactured. CNC stands for computer numerical control, a process where a digital design is converted into toolpaths that guide a router, mill, or cutter. For telescope building, this is extremely useful because mounts need symmetry, repeatable bearing surfaces, accurate holes, square assemblies, and enough stiffness to hold optics in alignment.
A semi-Nasmyth mount is a more specialized idea. A true Nasmyth telescope is usually a Cassegrain-style reflector that uses a tertiary flat mirror to send light out through the altitude axis. This lets the eyepiece, camera, or scientific instrument sit at a relatively fixed position while the telescope moves. Large professional telescopes use Nasmyth platforms because heavy cameras and spectrographs are much happier when they are not being swung around like a backpack on a roller coaster.
A semi-Nasmyth amateur design adapts the spirit of that idea rather than copying every professional detail. In many DIY examples, the optical path is folded so the observer can look from a convenient side position while the structure remains compact. It may not be a textbook Nasmyth-Cassegrain, but it uses a similar ergonomic philosophy: bring the light to the user instead of forcing the user to chase the eyepiece around the telescope.
Why the Semi-Nasmyth Idea Matters
Anyone who has used a large Newtonian reflector knows the eyepiece can end up in awkward places. Sometimes it is too low. Sometimes it is too high. Sometimes it appears to have moved into a yoga position no human neck was designed to maintain. A semi-Nasmyth layout helps reduce that problem by redirecting the optical path toward a more predictable viewing location.
This is especially valuable when the telescope is mounted in an alt-azimuth configuration. An alt-az mount moves in altitude, meaning up and down, and azimuth, meaning left and right. This motion is intuitive and mechanically simple, which is why Dobsonian telescopes became so popular among amateur astronomers. However, with a conventional tube, the eyepiece moves along with the telescope. A semi-Nasmyth design can make observing more comfortable by keeping the viewing area closer to one side of the mount.
The design also helps with accessories. Cameras, filter wheels, focusers, and eyepieces add weight. When those accessories hang off the side of a normal tube, balance can become fussy. A semi-Nasmyth-inspired layout can move that load closer to the mount’s structural center, reducing the need for awkward counterweights. In telescope terms, fewer counterweights means fewer opportunities to drop something expensive on your foot.
The Optical Concept: Folding Light Without Folding Your Brain
At the heart of most reflector telescopes is a primary mirror. In a Newtonian reflector, incoming light travels down the tube, reflects from the curved primary mirror, and then bounces off a smaller flat secondary mirror toward the focuser. This design is popular because it gives generous aperture for the money and is approachable for amateur telescope makers.
A semi-Nasmyth telescope adds another layer of thinking. Instead of accepting the standard side-of-tube viewing position, the builder arranges mirrors and structure so the light exits at a more ergonomic location. Depending on the exact design, this may involve a folded Newtonian path or a Cassegrain-like layout with an additional flat mirror. The goal is not optical magic. It is mechanical convenience.
Every fold in an optical path must be treated seriously. Mirror angles, secondary size, focuser position, and tube baffling all affect performance. A poorly placed mirror can vignette the image, reduce contrast, or make collimation miserable. A well-designed folded path, however, can deliver sharp views while making the telescope easier to use. The trick is to remember that light is obedient but unforgiving. It will go exactly where the mirrors send it, even if that place is half an inch away from where you wanted it.
Why CNC Fabrication Is So Useful for Telescope Building
Traditional amateur telescope making often involves hand tools, plywood, patience, and the occasional muttered sentence that should not be repeated near polite company. CNC fabrication does not remove craftsmanship, but it changes the workflow. Instead of drawing parts directly on wood and cutting them by hand, the builder creates digital files and lets the machine produce consistent parts.
This is ideal for telescope mounts because many components must match. Altitude bearings should be identical. Side panels should align. Holes for shafts, bolts, and braces must land in the right place. A CNC router can cut circular bearing arcs, nested ribs, mirror-cell plates, focuser supports, and structural gussets with a level of repeatability that is difficult to achieve by hand.
Materials often include Baltic birch plywood, standard cabinet-grade plywood, aluminum plate, PVC, or composite panels. Plywood remains popular because it is affordable, stiff for its weight, and easy to machine. A well-sealed plywood telescope can be surprisingly durable. It also has a warm, maker-built beauty that aluminum sometimes lacks. Aluminum says “precision instrument.” Plywood says “precision instrument, but I also know where the clamps are.”
Core Components of a CNC Semi-Nasmyth Telescope
1. Optical Tube Assembly
The optical tube assembly, or OTA, holds the mirrors in alignment. In a CNC-built telescope, the OTA may be round, square, hexagonal, or built as a ribbed frame. A square or polygonal tube can be easier to fabricate from sheet goods than a perfectly round tube. Internal baffles can be added to reduce stray light, and removable panels make maintenance easier.
2. Primary Mirror Cell
The primary mirror cell supports the main mirror without pinching it. This is more delicate than it sounds. A mirror must be held securely, but not squeezed. If the support points are poorly placed, the mirror can flex slightly and damage image quality. For an 8-inch reflector, a simple but well-made cell can work well, provided it allows collimation and keeps the mirror ventilated.
3. Secondary and Fold Mirrors
The secondary mirror redirects light from the primary. In a semi-Nasmyth or folded design, an additional flat mirror may be used to direct the beam toward the side of the mount. These mirrors need accurate alignment and stable holders. Even small shifts can affect collimation, especially at faster focal ratios.
4. Mount Structure
The mount is where the semi-Nasmyth concept becomes visible. A rigid base, side supports, altitude bearings, and azimuth bearing surfaces work together to let the telescope move smoothly. If the structure flexes, the image shakes. If the bearings are sticky, tracking becomes frustrating. If the balance is wrong, the telescope behaves like a sleepy giraffe trying to sit down.
5. Focuser Platform
The focuser platform should be stiff, square to the optical path, and placed where the observer can comfortably use it. This is one of the big advantages of the semi-Nasmyth approach. Instead of climbing, crouching, or rotating the tube, the user can observe from a more consistent position.
Design Advantages
Better Ergonomics
The biggest appeal is comfort. A telescope that is enjoyable to use will be used more often. A semi-Nasmyth viewing position can make long observing sessions less tiring, especially for lunar, planetary, and public outreach viewing.
Compact and Portable Structure
Compared with a heavy commercial GoTo telescope, a CNC plywood reflector can be lighter and easier to transport. Builders can design parts to nest, bolt together, or break down into manageable sections.
Repeatable Fabrication
CNC cutting makes it easier to reproduce parts or revise a design. If a bearing needs to be larger, a brace needs another pocket, or the focuser board needs a new pattern, the digital file can be updated and recut.
Great for Experimentation
A semi-Nasmyth telescope invites experimentation. Builders can test eyepiece height, mirror placement, balance points, motorization, and accessory mounting. It is a project for people who enjoy both seeing Saturn’s rings and arguing with CAD software until midnight.
Design Challenges
Collimation Can Be More Demanding
Every reflecting telescope needs collimation, but folded optical paths add more surfaces to align. A standard Newtonian already requires careful primary and secondary alignment. Add another fold mirror, and the builder must be even more patient. The reward is a more comfortable design, but the payment is precision.
Light Path Planning Is Critical
The optical path must clear the structure without clipping the light cone. The focuser must reach focus with the eyepieces or cameras intended for use. The secondary and tertiary mirrors must be large enough to illuminate the field but not so large that they create unnecessary obstruction.
Balance Requires Thought
Even with a clever mount, balance matters. Heavy eyepieces, cameras, finder scopes, and motors can shift the center of gravity. The best designs allow some adjustment, either through sliding components, movable counterweights, or flexible accessory placement.
CNC Accuracy Does Not Fix Bad Design
A CNC router can cut a wrong part beautifully. That is both impressive and annoying. Before cutting expensive material, builders should prototype in cardboard, foam board, or cheap plywood. Digital simulation helps, but a physical mock-up often reveals human-scale problems such as “my head goes exactly where that support brace is.”
Motorization and Computer Control
A CNC-built semi-Nasmyth telescope can be manual, motorized, or fully computerized. Manual movement is simple and satisfying, especially for visual observing. Smooth bearings and good balance can make hand tracking pleasant even at moderate magnification.
For GoTo and tracking, builders often explore stepper motors, belt drives, worm gears, encoders, and open-source telescope-control systems. A computerized alt-az mount can point to objects and track them by moving both axes together. For visual observing, this can be excellent. For long-exposure astrophotography, alt-az systems face field rotation unless a derotator, equatorial platform, or image-processing strategy is used.
This does not make the design unsuitable for imaging. It simply means expectations matter. Lunar and planetary imaging can work well because exposures are short. Deep-sky imaging is more demanding. A semi-Nasmyth telescope can become a capable imaging platform, but it needs accurate tracking, a rigid structure, good collimation, and careful field-rotation management.
Best Uses for a CNC Semi-Nasmyth Telescope
Lunar Observing
The Moon is a fantastic target for this type of telescope. Its brightness, detail, and forgiving exposure requirements make it ideal for testing optics and mount smoothness. Craters, rilles, mountain shadows, and terminator detail can look stunning in an 8-inch reflector.
Planetary Viewing
Jupiter, Saturn, and Mars reward stable optics and careful collimation. A comfortable eyepiece position helps because planetary observing often involves waiting for brief moments of steady atmosphere. When the air steadies and Jupiter’s belts snap into view, the hours of sanding plywood suddenly feel very reasonable.
Public Outreach
A semi-Nasmyth layout can be excellent for outreach because the viewing position is more predictable. Children, adults, and first-time observers do not have to climb ladders or twist around the tube. The telescope itself also becomes a conversation piece, which is useful because people love asking, “Did you build that?”
Mechanical Learning
This project teaches CAD design, material selection, structural stiffness, optical alignment, motion control, and problem solving. It is as much an engineering education as an astronomy instrument.
Practical Build Considerations
Before building, define the telescope’s purpose. A visual lunar and planetary scope can be optimized differently from an imaging platform. Choose aperture, focal ratio, eyepiece height, transport size, and mount type before cutting parts. The more decisions made on paper, the fewer surprises appear in plywood.
Use strong joints and avoid unnecessary flexure. Triangulated braces, box structures, and layered plywood can increase stiffness without excessive weight. Seal wood surfaces against moisture. Blacken internal surfaces near the light path to improve contrast. Keep the mirror cell accessible. Design the focuser area so it can be adjusted later, because focus position is one of those details that enjoys embarrassing builders.
Safety matters as well. CNC routers, saws, adhesives, dust, and heavy mirrors all deserve respect. Anyone using machine tools should have proper training, eye protection, dust control, and experienced supervision when needed. A beautiful telescope is not improved by a preventable workshop accident.
Maintenance and Tuning
After assembly, the telescope enters the tuning stage. This is where the project becomes real. Motions may need smoothing. Bearings may need different materials. The optical path may need small adjustments. Collimation tools become regular companions. The first night under the stars should be treated as a test session, not a final exam.
Check whether the telescope holds collimation at different elevations. If the image shifts as the tube moves, something is flexing. Inspect mirror supports, fold-mirror mounts, and focuser stiffness. Test balance with the heaviest eyepiece or camera you plan to use. A design that works with a small Plössl may behave differently when a large wide-field eyepiece enters the chat like it owns the place.
Experience Notes: Living With a CNC-Telescope With Semi-Nasmyth Mount
The first experience many builders have with a CNC semi-Nasmyth telescope is not astronomical at all. It is emotional. You watch the CNC router cut the first side panel, and suddenly the telescope stops being an idea and becomes a pile of parts with ambition. The tabs are trimmed, the edges are sanded, and the dry fit begins. This is the moment when you discover whether your CAD model was brilliant or merely confident.
A good experience starts with patience. Rushing a telescope build usually creates extra work later. The mount should be assembled square. Bearing surfaces should be smooth. Mirror mounts should be adjusted gently. If the telescope uses a folded light path, each mirror should be aligned in sequence. It helps to think of the system as a relay race for photons. The primary mirror gathers the light, the secondary redirects it, the fold mirror sends it to the observing position, and the eyepiece magnifies the final image. If one runner drops the baton, the whole race gets weird.
One of the most satisfying parts of using this design is the viewing comfort. With a conventional Newtonian, the eyepiece may wander into awkward positions as the telescope points around the sky. With a semi-Nasmyth-inspired layout, the observer can often remain in a more natural posture. That matters more than beginners expect. Comfort improves concentration. Concentration improves observing. Observing improves skill. Skill improves what you can see. Astronomy is not only about aperture; it is also about staying relaxed long enough for your eye and brain to notice subtle detail.
Another memorable experience is the reaction from other people. A CNC-cut telescope looks different from a commercial tube. The exposed structure, layered plywood, carefully arranged mirrors, and side viewing position make people curious. During outreach, that curiosity becomes part of the fun. Before anyone sees the Moon, they want to know how the telescope works. After they see the Moon, they usually ask again, but louder.
There are frustrations too. Collimation may take longer than expected. A fold mirror may need a stiffer bracket. The focuser may need extra reinforcement. A cable may snag. A bearing may feel perfect indoors but sticky outside in cold weather. These problems are not signs of failure. They are the normal personality traits of a custom telescope. Every handmade instrument has a period where it negotiates with its builder.
The best long-term experience comes from treating the telescope as an evolving instrument. Keep notes after each observing session. Record what worked, what shifted, what vibrated, and what was annoying in the dark. Add small upgrades instead of rebuilding everything at once. A handle here, a better baffle there, a smoother azimuth pad, a more secure finder bracketthese small improvements slowly turn a clever project into a dependable observing companion.
In the end, a CNC-telescope with semi-Nasmyth mount is rewarding because it connects the sky to the shop. You are not only looking at Jupiter; you are looking through decisions you made, parts you cut, surfaces you aligned, and mistakes you corrected. The telescope becomes personal. It carries the fingerprints of its builder, even if the CNC machine did most of the cutting. And when Saturn floats into view, sharp and steady, all the sawdust suddenly feels like stardust with better marketing.
Conclusion
A CNC-telescope with semi-Nasmyth mount is one of the most fascinating intersections of amateur astronomy and maker engineering. It borrows the ergonomic wisdom of Nasmyth-style instruments, the affordability of reflector optics, and the precision of CNC fabrication. The result can be a compact, comfortable, and highly personal telescope that performs well for visual observing, lunar and planetary work, outreach, and mechanical experimentation.
This is not the easiest telescope design for a first-time builder, but it is a deeply educational one. It demands planning, alignment, patience, and respect for both optics and structure. For the right maker, those demands are not drawbacks. They are the point. A semi-Nasmyth CNC telescope is not just a tool for seeing the universe. It is proof that curiosity can become hardware, and hardware can become a doorway to the stars.
Note: This article is written for educational and editorial use. Anyone building a CNC telescope should follow proper workshop safety practices, use suitable protective equipment, and seek experienced guidance when using power tools, optics, electronics, or heavy components.