Table of Contents >> Show >> Hide
- Quick Answer: Minecraft Sword Recipe
- What You Need Before Crafting a Sword
- How to Make Each Sword in Minecraft
- Best Sword Material: Which One Should You Use?
- How to Use a Sword Effectively
- Best Sword Enchantments in Minecraft
- Common Mistakes When Making a Sword
- Extra Experience: Practical Lessons from Making Swords in Minecraft
- Conclusion
Learning how to make a sword in Minecraft is one of those tiny survival milestones that feels much bigger than it looks. One minute you are punching trees with your bare square hands like a very determined beaver, and the next minute you are holding a sword, staring down zombies, spiders, and that one creeper who acts like it pays rent near your starter base.
A sword is one of the most useful early-game weapons in Minecraft because it is simple to craft, easy to upgrade, and reliable when night falls. Whether you are playing Java Edition, Bedrock Edition, Survival, Hardcore, or a friendly multiplayer world where “friendly” sometimes means “someone stole your iron again,” knowing the sword recipe saves time and keeps you alive.
In this guide, you will learn the exact Minecraft sword recipe, which materials work, how to make wooden, stone, copper, iron, golden, diamond, and netherite swords, and how to choose the best sword for each stage of the game.
Quick Answer: Minecraft Sword Recipe
To make a sword in Minecraft, open a crafting table and place one stick in the bottom-middle slot. Then place two matching sword materials directly above it in the same center column. The basic layout looks like this:
The “material” can be wooden planks, cobblestone or another stone-tier block, copper ingots, iron ingots, gold ingots, or diamonds. A netherite sword is different: you do not craft it directly in a crafting table. Instead, you upgrade a diamond sword at a smithing table using a netherite ingot and a netherite upgrade smithing template.
What You Need Before Crafting a Sword
Before you start crafting, you need two simple things: a crafting table and the right ingredients. Technically, the sword pattern is only three slots tall, but you still need the 3×3 crafting grid from a crafting table. Your inventory’s small 2×2 grid is great for making planks and sticks, but it is too tiny for a sword. Think of it as trying to cook a full Thanksgiving dinner in a toaster. Admirable, but no.
1. Make a Crafting Table
Start by collecting wood from any tree. Turn one log into wooden planks, then place four planks in your 2×2 inventory crafting grid. This creates a crafting table. Place the crafting table on the ground and open it to access the full 3×3 grid.
2. Make Sticks
To craft sticks, place two wooden planks vertically in any crafting grid. Two planks create four sticks. Since every normally crafted sword uses one stick, this recipe gives you enough handles for several weapons. Congratulations, you are now the proud owner of Minecraft’s most underrated object: the humble stick.
3. Choose Your Sword Material
The sword material determines durability, damage, and how useful the weapon feels in combat. Early on, wooden and stone swords are enough to survive the first night. Later, copper, iron, diamond, and netherite swords become better choices for mining trips, Nether travel, and boss fights.
How to Make Each Sword in Minecraft
The recipe pattern is almost always the same: two matching materials above one stick. What changes is the material. Here is how each sword works.
How to Make a Wooden Sword
A wooden sword is the easiest sword to craft in Minecraft. You need two wooden planks and one stick. Open the crafting table, place one plank in the top-middle slot, one plank in the center slot, and one stick in the bottom-middle slot.
A wooden sword is not powerful, but it is much better than fighting with your fist. It is ideal during your first few minutes in a new world, especially if the sun is already setting and your shelter is currently “a hole in a hill with emotional support dirt.”
How to Make a Stone Sword
To make a stone sword, use two cobblestone blocks and one stick. Place the two cobblestone blocks vertically above the stick in the crafting table. You can get cobblestone by mining stone with a pickaxe.
The stone sword is one of the best early-game upgrades because cobblestone is easy to find and the weapon is more dependable than wood. In many survival worlds, your first real adventure should involve making a stone pickaxe, mining a little cobblestone, and crafting a stone sword before night arrives.
How to Make a Copper Sword
With Minecraft’s Copper Age update, copper became a proper equipment tier. To make a copper sword, use two copper ingots and one stick in the same vertical sword recipe. Copper tools and weapons sit between stone and iron in usefulness: they offer a practical early-game step when you have copper but not enough iron.
This is especially helpful because copper is common in many worlds. Instead of letting stacks of copper ingots sit in a chest like shiny orange paperweights, you can turn them into usable gear. A copper sword is not your forever weapon, but it is a smart upgrade before you have a steady iron supply.
How to Make an Iron Sword
To craft an iron sword, place two iron ingots above one stick in the crafting table. Iron ingots come from smelting raw iron in a furnace or blast furnace. Once you have an iron sword, you are ready for more serious cave exploration, mob farming, and general survival confidence.
For most players, the iron sword is the first “real” weapon. It is strong enough to handle common hostile mobs and affordable enough to replace if you lose it. And yes, you will eventually lose one. Probably in lava. Minecraft has a very strict lava tax.
How to Make a Golden Sword
A golden sword uses two gold ingots and one stick. It follows the same crafting layout as wooden, stone, copper, iron, and diamond swords.
Golden swords are fast to enchant and look fancy, but they have low durability. In practical survival gameplay, gold is usually better saved for golden apples, powered rails, bartering with piglins, or crafting netherite ingots. Still, if your goal is to look like a royal knight who makes questionable equipment decisions, a golden sword absolutely delivers.
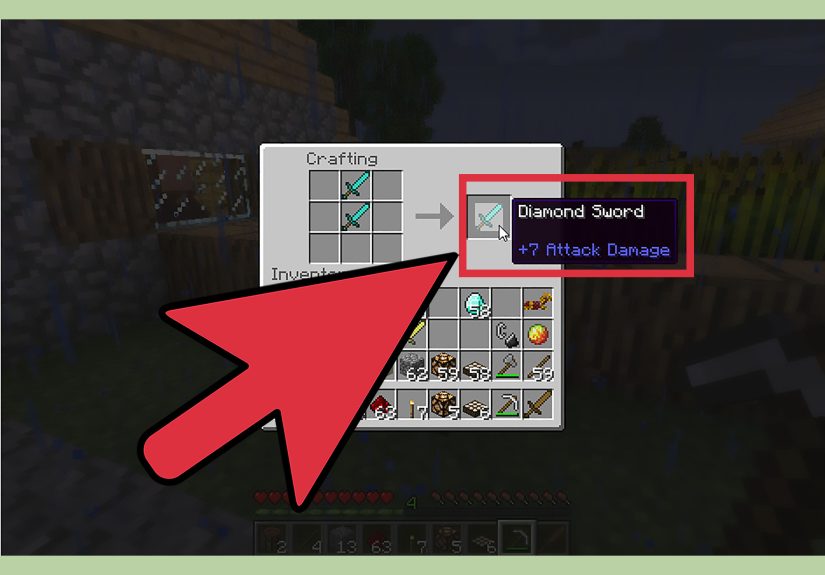
How to Make a Diamond Sword
To make a diamond sword, place two diamonds above one stick in the crafting table. Diamonds are found deep underground and may also appear in loot chests in certain structures. A diamond sword is powerful, durable, and worth enchanting.
Many players treat the diamond sword as the point where survival begins to feel comfortable. Once you have one, add useful enchantments such as Sharpness, Unbreaking, Mending, Looting, Fire Aspect, or Knockback depending on your play style. A plain diamond sword is good; an enchanted diamond sword is when mobs start reconsidering their career choices.
How to Make a Netherite Sword
You cannot craft a netherite sword directly in a crafting table. To make one, first craft a diamond sword. Then use a smithing table with three items: the diamond sword, a netherite ingot, and a netherite upgrade smithing template.
Netherite is an endgame upgrade. To get it, you typically mine ancient debris in the Nether, smelt it into netherite scraps, combine scraps with gold ingots to make a netherite ingot, and then upgrade your diamond gear. You also need the netherite upgrade smithing template, which is found in bastion remnants. Because the process is more demanding, a netherite sword feels like a trophy as much as a weapon.
Best Sword Material: Which One Should You Use?
The best sword depends on where you are in the game. A wooden sword is fine for your first night, but it should be replaced quickly. A stone sword is the best emergency weapon because cobblestone is everywhere. A copper sword is useful if you have copper early and want a better bridge between stone and iron. An iron sword is the everyday workhorse. A diamond sword is a major upgrade for long-term survival. A netherite sword is the premium option for players preparing for dangerous Nether trips, raids, the End, or serious multiplayer combat.
Golden swords are the odd ones out. They are craftable, shiny, and enchantable, but their durability makes them less practical for routine fighting. Use one for fun, style, or specific enchantment experiments, but do not rely on it as your main survival weapon unless you enjoy dramatic emergencies.
How to Use a Sword Effectively
Crafting the sword is step one. Using it well is step two. In Minecraft, swords are designed for close-range combat. They are especially useful against zombies, skeletons, spiders, creepers, pillagers, and many other hostile mobs.
Keep Your Sword on the Hotbar
Always place your sword in an easy-to-reach hotbar slot. Many players keep it in slot one so they can switch to it instantly. When a creeper drops into your mining tunnel uninvited, you do not want to scroll past bread, torches, granite, and three suspicious flowers before finding your weapon.
Watch Durability
Swords lose durability when used to damage mobs or players. If your sword is close to breaking, repair it, replace it, or carry a backup. A sword breaking mid-fight is a very Minecraft way to learn humility.
Use Critical Hits
In Java Edition, timing and movement matter. Falling slightly while attacking can create a critical hit, which deals extra damage. This is useful in tougher fights, but do not get so focused on critical hits that you jump directly into lava, off a cliff, or into a creeper’s personal space.
Pair Your Sword with a Shield
A shield is one of the best partners for a sword. Use the shield to block arrows, creeper blasts, and melee attacks, then strike when it is safe. A sword-and-shield setup is excellent for caves, raids, and Nether exploration.
Best Sword Enchantments in Minecraft
Once you have an iron, diamond, or netherite sword, enchanting makes it dramatically better. The best sword enchantments depend on your goals, but several are popular for good reason.
Sharpness
Sharpness increases general melee damage. It is one of the most reliable sword enchantments because it helps against many enemies instead of specializing in only one type of mob.
Smite
Smite increases damage against undead mobs such as zombies, skeletons, wither skeletons, drowned, husks, and the Wither. If you spend a lot of time fighting undead enemies, Smite can be excellent.
Bane of Arthropods
Bane of Arthropods increases damage against spiders, cave spiders, silverfish, bees, and endermites. It is more specialized, so most players prefer Sharpness unless they are building a spider-focused farm or really, really hate cave spiders. Understandable.
Unbreaking
Unbreaking helps your sword last longer. This is useful on any good weapon, especially diamond and netherite swords that you do not want to replace often.
Mending
Mending repairs your sword using experience orbs. A netherite sword with Mending and Unbreaking can last an extremely long time when cared for properly.
Looting
Looting increases mob drops. This is great for collecting ender pearls, bones, rotten flesh, blaze rods, gunpowder, and other useful items. If you are farming materials, Looting can turn your sword into a tiny business strategy.
Fire Aspect
Fire Aspect sets targets on fire. It is useful for extra damage and can cook food drops from animals, but be careful around Endermen, tight caves, and situations where fire creates more chaos than control.
Common Mistakes When Making a Sword
The most common mistake is using the wrong crafting grid. If you try to make a sword in the 2×2 inventory grid, it will not work. Use a crafting table.
Another mistake is placing the materials horizontally instead of vertically. A sword recipe is a straight vertical line: material, material, stick. Keep everything in the same column.
Players also sometimes mix materials, such as one iron ingot and one diamond. Minecraft does not accept mixed sword recipes. The two blade materials must match.
Finally, remember that netherite swords are upgraded, not crafted from scratch. If you put netherite ingots above a stick, the crafting table will simply stare back at you in silence.
Extra Experience: Practical Lessons from Making Swords in Minecraft
After many survival worlds, one lesson becomes clear: the best sword is not always the rarest sword. It is the sword you can afford to use confidently. Early in a world, I would rather carry two stone swords than one precious iron sword that I am afraid to damage. Minecraft rewards preparation more than flexing. A player with backup tools, food, torches, blocks, and a simple stone sword often survives longer than a player waving a fancy weapon while forgetting bread.
One of the smartest habits is upgrading in stages. Start with wood only long enough to survive your first few minutes. Move to stone as soon as you mine cobblestone. If copper is available in your version and you have ingots before iron becomes plentiful, a copper sword is a comfortable stepping stone. Then switch to iron for daily use. Save diamond for when you have enough resources to enchant and protect it. Finally, upgrade to netherite when you are ready for serious late-game adventures.
Another useful experience is to craft swords before you need them. Many beginners wait until nightfall, hear zombie groans, panic-open the crafting table, and suddenly forget where sticks go. Do not negotiate with darkness. Make your sword while the sun is still up. Keep it in the same hotbar slot every time so muscle memory can save you when a skeleton starts treating you like target practice.
For mining trips, always bring a sword that matches the risk. A stone sword is fine for shallow coal runs. An iron sword is better for caves, ravines, and abandoned mineshafts. A diamond or netherite sword is ideal when you are exploring ancient cities, strongholds, bastions, or the End. Also bring a shield, because even the best sword cannot block every bad decision.
In multiplayer, swords become part of your identity. Some players name their sword something dramatic like “Dragonfang.” Others choose comedy and call it “Bonk Stick Deluxe.” Naming your sword at an anvil does not make it stronger, but it does make losing it about 400% more heartbreaking. If you enchant a sword heavily, consider adding Mending before you become too attached.
The biggest practical tip is this: do not waste your best sword on everything. If you have a fully enchanted diamond or netherite sword, use it for important fights and farming valuable drops. For casual animal gathering or weak mobs near home, an iron sword may be enough. This saves durability and keeps your premium weapon ready for moments that matter.
Finally, respect lava. Every Minecraft player eventually learns that lava is not just a liquid; it is a customer service department for removing your favorite items. When carrying a valuable sword in the Nether or deep underground, bring fire resistance potions if possible, bridge carefully, crouch near edges, and never mine straight down. The sword you spent hours upgrading deserves better than becoming a glowing memory at the bottom of a lava lake.
Conclusion
Knowing how to make a sword in Minecraft is a core survival skill. The recipe is simple: use a crafting table, place two matching materials vertically above one stick, and move the finished sword into your hotbar. Start with wood or stone, upgrade through copper or iron, aim for diamond, and eventually turn that diamond sword into netherite with a smithing table, netherite ingot, and netherite upgrade smithing template.
A sword will not build your house, mine your diamonds, or stop you from naming a chicken “Sir Clucks-a-Lot,” but it will help you survive the monsters that come out at night. Craft one early, upgrade it wisely, enchant it when you can, and keep a backup. In Minecraft, confidence is good, but a spare sword is better.