Table of Contents >> Show >> Hide
- What Is Shutter Speed?
- How Shutter Speed Fits Into the Exposure Triangle
- Fast vs. Slow Shutter Speed: What Is the Difference?
- Best Shutter Speed Settings by Photography Type
- Portrait Photography: 1/125 to 1/250
- Street Photography: 1/250 to 1/500
- Sports Photography: 1/500 to 1/2000
- Wildlife Photography: 1/500 to 1/4000
- Landscape Photography: 1/60 to Several Seconds
- Night Photography: 1 Second to 30 Seconds
- Waterfalls and Rivers: 1/250, 1/15, or 1 Second
- Kids and Pets: 1/500 or Faster
- The Handheld Shutter Speed Rule
- When to Use Shutter Priority Mode
- When to Use Manual Mode
- Shutter Speed and Flash: The Sync Speed Trap
- Shutter Speed for Video
- Creative Shutter Speed Tricks
- Common Shutter Speed Mistakes
- A Practical Shutter Speed Cheat Sheet
- How to Choose the Right Shutter Speed in the Field
- Real-World Experience: What Shutter Speed Teaches You After Many Missed Shots
- Conclusion
Choosing the right camera shutter speed can feel a little like ordering coffee in a city you have never visited. Everyone seems to know exactly what they want, the menu is full of mysterious numbers, and somehow “faster” does not always mean “better.” But once shutter speed clicks, photography becomes much less guesswork and much more creative control.
Shutter speed controls how long your camera’s sensor is exposed to light. More importantly, it controls how motion appears in your image. A fast shutter speed can freeze a soccer player mid-kick, a bird in flight, or your dog performing the world’s least graceful leap for a tennis ball. A slow shutter speed can turn waterfalls into silk, city traffic into glowing ribbons, and ordinary movement into something dreamy and cinematic.
This guide explains how to choose a camera shutter speed for portraits, sports, wildlife, landscapes, street photography, night scenes, video, and creative motion blur. You will learn the practical numbers, the creative logic behind them, and the little field-tested tricks that help you stop missing great shots by one blurry fraction of a second.
What Is Shutter Speed?
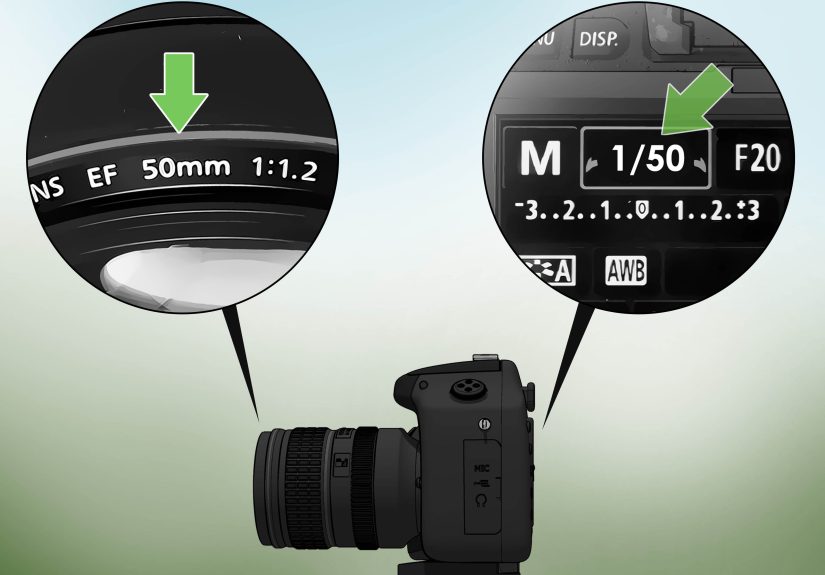
Shutter speed is the length of time your camera’s shutter stays open during an exposure. It is measured in seconds or fractions of a second, such as 1/1000, 1/250, 1/60, 1 second, or 30 seconds. On many cameras, 1/250 may simply appear as “250,” while a two-second exposure may appear as “2".”
A faster shutter speed, such as 1/2000, keeps the shutter open for a very short time. This lets in less light and freezes motion more effectively. A slower shutter speed, such as 1/15 or 2 seconds, keeps the shutter open longer. This lets in more light but also records movement as blur unless the subject and camera remain still.
The Two Jobs of Shutter Speed
Shutter speed has two main jobs: exposure and motion control. Exposure is about brightness. Motion control is about sharpness, blur, and the feeling of movement. Beginners often think shutter speed is only there to “make photos brighter or darker,” but experienced photographers use it as a storytelling tool.
For example, photographing a dancer at 1/1000 may freeze every strand of hair and every fold of fabric. Shooting the same dancer at 1/30 while panning with the movement may create a sweeping, energetic image that feels alive. Neither setting is automatically correct. The best shutter speed depends on what you want the viewer to feel.
How Shutter Speed Fits Into the Exposure Triangle
Shutter speed works with aperture and ISO. Together, these three settings form the exposure triangle. Aperture controls how much light enters through the lens and affects depth of field. ISO controls how sensitive the sensor is to light and affects image noise. Shutter speed controls how long light hits the sensor and affects motion.
When you change one setting, you often need to adjust another. If you use a very fast shutter speed for sports, your photo may become too dark. To compensate, you can open the aperture, raise the ISO, or add light. If you use a slow shutter speed for a waterfall, your photo may become too bright. To fix that, you can lower the ISO, use a smaller aperture, shoot in dimmer light, or add a neutral-density filter.
A Simple Exposure Example
Imagine you are shooting a portrait outdoors at 1/250, f/4, ISO 100. The exposure looks good. Then your subject starts running toward you, and 1/250 is no longer fast enough. You switch to 1/1000 to freeze the action. That is two stops faster, so the image becomes darker. You might open the aperture to f/2, raise ISO to 400, or do a little of both. This is the practical dance of photography: adjust, check, adjust again, pretend you meant to do it all along.
Fast vs. Slow Shutter Speed: What Is the Difference?
A fast shutter speed freezes motion. A slow shutter speed shows motion. That is the cleanest way to remember it.
Fast shutter speeds include settings like 1/500, 1/1000, 1/2000, and beyond. They are useful for sports, wildlife, children, pets, splashing water, handheld telephoto shots, and any scene where movement needs to look crisp.
Slow shutter speeds include settings like 1/30, 1/15, 1 second, 10 seconds, or longer. They are useful for low-light photography, night scenes, light trails, waterfalls, intentional camera movement, panning, and artistic blur. Slow shutter speeds often require a tripod, stable surface, or excellent camera stabilization.
Best Shutter Speed Settings by Photography Type
There is no universal magic number, but there are reliable starting points. Use these as launch pads, not prison sentences. Photography rewards experimentation, especially when the first test shot looks like it was taken during an earthquake.
Portrait Photography: 1/125 to 1/250
For still portraits, start around 1/125 or 1/250. This is usually fast enough to avoid small movements from the subject, such as blinking, breathing, shifting weight, or laughing because you said, “Act natural,” which instantly makes everyone act like a confused statue.
If you are using a longer lens, such as 135mm or 200mm, choose a faster shutter speed to reduce camera shake. If your subject is walking, dancing, or playing with kids, move closer to 1/500 or faster.
Street Photography: 1/250 to 1/500
Street scenes are unpredictable. People walk, cyclists pass, buses appear, and pigeons behave like tiny feathered criminals. A shutter speed of 1/250 is a good starting point for general street photography. Use 1/500 when people are moving quickly or when you want extra sharpness.
If you want motion blur for a more artistic street image, try 1/30 or 1/15 and pan with your subject. Expect misses. The keepers will feel much more dynamic than a standard frozen frame.
Sports Photography: 1/500 to 1/2000
For youth sports, running, soccer, basketball, and similar action, start at 1/500 or 1/1000. For very fast action, such as motorsports, tennis serves, baseball swings, or track events, go to 1/2000 or faster if the light allows.
Indoor sports often create a problem: you need a fast shutter speed, but the lighting is not generous. In that case, raise ISO and use the widest practical aperture. A noisy sharp photo is usually more useful than a clean blurry one. Viewers forgive grain faster than they forgive a basketball player who looks like a watercolor accident.
Wildlife Photography: 1/500 to 1/4000
Wildlife requires speed because animals rarely follow your creative brief. For walking animals, 1/500 may work. For birds in flight, start around 1/1000 or 1/2000. For small birds, wingbeats, splashes, or sudden takeoff moments, 1/3200 or faster may be needed.
Long lenses magnify camera shake, so even a still animal may require a faster shutter speed than expected. If you are using a 500mm lens, 1/500 is a bare-minimum handheld starting point, and faster is often safer.
Landscape Photography: 1/60 to Several Seconds
Landscape shutter speed depends on whether anything is moving. For a still mountain scene, you can use almost any shutter speed if your camera is on a tripod. For handheld landscapes, 1/60 or faster is a practical baseline with wide-angle lenses.
For moving clouds, water, waves, or grass, shutter speed becomes creative. A waterfall at 1/250 shows texture and force. At 1 second, it becomes smooth and silky. At 10 seconds, it can look misty and surreal. None of these is wrong; they simply tell different stories.
Night Photography: 1 Second to 30 Seconds
Night scenes often require long exposures. City skylines, light trails, stars, and illuminated buildings may need shutter speeds from 1 second to 30 seconds. Use a tripod, a remote shutter release or self-timer, and low ISO when possible for cleaner files.
For stars, shutter speed becomes more delicate. Too long, and stars stretch into trails because Earth is rotating. Many photographers use wide lenses and exposures around 10 to 20 seconds, depending on focal length and camera resolution.
Waterfalls and Rivers: 1/250, 1/15, or 1 Second
Water is the perfect shutter-speed teacher because each setting changes the mood dramatically. At 1/250, droplets and texture remain visible. At 1/30, movement begins to soften. At 1 second or slower, water turns creamy and smooth.
Use a tripod for slow water shots. If the scene is too bright, use a neutral-density filter to reduce light. Otherwise, your camera may overexpose the image before the water gets that elegant, silky look.
Kids and Pets: 1/500 or Faster
Children and pets are basically sports photography with snacks. Start at 1/500 for active play. Use 1/1000 if they are running, jumping, spinning, chasing bubbles, or doing whatever mystery activity caused everyone to suddenly yell, “Careful!”
If they are sitting quietly, 1/125 may be fine. But quiet moments can explode into action quickly, so keep your camera ready. Shutter Priority mode with Auto ISO can be very helpful here.
The Handheld Shutter Speed Rule
A classic rule says your shutter speed should be at least the reciprocal of your focal length when shooting handheld. In simple terms, if you use a 50mm lens, try 1/50 or faster. If you use a 200mm lens, try 1/200 or faster.
This rule is not perfect, but it is useful. High-resolution cameras can reveal tiny camera shake, so faster is often better. Crop-sensor cameras may also require extra caution because the field of view is tighter. Image stabilization can help you shoot slower, but stabilization does not freeze a moving subject. It helps with your hands, not with a toddler sprinting through the frame like a caffeinated squirrel.
When to Use Shutter Priority Mode
Shutter Priority mode is labeled S or Tv, depending on your camera brand. In this mode, you choose the shutter speed, and the camera chooses the aperture needed for exposure. It is one of the best modes for learning because it lets you focus on motion without juggling every exposure setting manually.
Use Shutter Priority when photographing sports, wildlife, kids, pets, panning, or any scene where motion control matters more than depth of field. Combine it with Auto ISO if the light is changing quickly. This setup is especially useful outdoors when clouds keep changing the brightness every five minutes, because apparently weather enjoys participating in your camera settings.
When to Use Manual Mode
Manual mode is ideal when the light is consistent or when you want total control. Studio portraits, flash photography, night scenes, landscapes on a tripod, and controlled product shots are excellent manual-mode situations.
Manual mode is also helpful when the camera meter gets confused. Snow, dark clothing, stage lights, backlit subjects, and high-contrast scenes can trick automatic exposure. By setting shutter speed, aperture, and ISO yourself, you make the creative decision instead of letting the camera panic politely.
Shutter Speed and Flash: The Sync Speed Trap
When using standard flash, most cameras have a maximum flash sync speed, often around 1/200 or 1/250. If you go faster without high-speed sync, part of the frame may become dark because the shutter curtains are not fully open at the same time.
High-speed sync allows faster shutter speeds with compatible flashes, but it reduces flash power. For portraits outdoors, high-speed sync is useful when you want a wide aperture in bright light. For studio work, staying at or below sync speed is usually simpler and more efficient.
Shutter Speed for Video
For video, shutter speed affects motion differently than it does in still photography. A common rule is to use a shutter speed roughly double your frame rate. If filming at 24 frames per second, use about 1/50. If filming at 30 frames per second, use about 1/60. If filming at 60 frames per second, use about 1/125.
This creates natural-looking motion blur. A shutter speed that is too fast can make video look choppy or harsh. A shutter speed that is too slow can make movement look smeary. For bright outdoor video, use an ND filter so you can keep the shutter speed where you want it without overexposing the footage.
Creative Shutter Speed Tricks
Try Panning for Motion With a Sharp Subject
Panning means moving your camera along with a moving subject during the exposure. Try 1/30, 1/60, or 1/125 depending on how fast the subject is moving. Follow through smoothly, like a golf swing, not like you just spotted a spider.
The goal is to keep the subject relatively sharp while the background blurs into streaks. This works beautifully for cyclists, runners, cars, motorcycles, and animals moving across your frame.
Use Long Exposure for Light Trails
For traffic light trails, use a tripod and try shutter speeds between 5 and 30 seconds. Choose a low ISO and a medium aperture such as f/8 or f/11. Cars become glowing lines, intersections become graphic patterns, and ordinary roads suddenly look like the city is signing its name in neon.
Freeze Tiny Moments With Very Fast Shutter Speeds
Fast shutter speeds like 1/2000, 1/4000, or even faster can capture moments the eye barely notices: water splashes, flying sand, popping balloons, hair movement, bird wings, or athletes at peak action. These images often feel dramatic because they reveal a slice of time we normally miss.
Common Shutter Speed Mistakes
Using a Shutter Speed That Is Too Slow for the Lens
If your photos look soft, check the shutter speed before blaming the lens. A 200mm lens at 1/30 handheld is asking for trouble unless you have excellent stabilization and a very steady hand. Use the reciprocal rule as your safety net.
Confusing Motion Blur With Missed Focus
Blur is not always caused by shutter speed. If the entire image has directional streaks, shutter speed or camera shake may be the issue. If the wrong part of the image is sharp, you probably missed focus. Learning the difference saves time, frustration, and unnecessary online arguments about whether your lens is “soft.”
Forgetting That Fast Shutter Speeds Reduce Light
When you jump from 1/250 to 1/2000, the camera receives much less light. If the image becomes dark, raise ISO, open the aperture, add light, or choose a slower shutter speed if the subject allows it.
A Practical Shutter Speed Cheat Sheet
- 1/4000 to 1/8000: Extremely fast action, bright light, wide apertures outdoors.
- 1/2000: Birds in flight, fast sports, splashing water, peak action.
- 1/1000: Wildlife, running, active children, outdoor sports.
- 1/500: General action, pets, casual sports, moving people.
- 1/250: Street photography, events, handheld portraits with mild movement.
- 1/125: Still portraits, everyday handheld shots with short lenses.
- 1/60: Handheld wide-angle scenes, slow movement, stabilized lenses.
- 1/30 to 1/15: Panning, creative motion blur, low light with care.
- 1 second or slower: Waterfalls, night scenes, light trails, tripod work.
How to Choose the Right Shutter Speed in the Field
Start by asking one question: do I want motion frozen or blurred? If you want it frozen, choose a faster shutter speed. If you want it blurred, choose a slower one. Then consider the subject speed, focal length, available light, and whether you are using a tripod.
For a safe workflow, take a test shot and zoom in on the image. Check the eyes in portraits, the face in sports, or the key detail in wildlife. If the important area is blurry from motion, increase shutter speed. If everything is too dark, adjust aperture or ISO. If the background is too frozen and boring, slow the shutter and experiment with panning.
Real-World Experience: What Shutter Speed Teaches You After Many Missed Shots
The first big lesson from practicing shutter speed is that numbers are helpful, but attention is better. You can memorize every cheat sheet on the internet and still miss the photo if you do not watch how the subject moves. A person walking slowly across a quiet street is not the same as a child sprinting toward a birthday cake. A calm lake is not the same as waves hitting rocks. A bird perched on a branch is not the same bird half a second later when it launches into the air like it remembered an urgent appointment.
One of the most useful habits is to set your shutter speed before the action happens. At family events, for example, do not wait until someone blows out candles to realize you are at 1/30. Start at 1/250 or 1/500 if people are moving around. At a park, if kids are running, begin at 1/1000 when light allows. This gives you a safety margin. You can always slow down for creative blur later, but you cannot rescue a once-in-a-lifetime expression that turned into a beige streak.
Another experience-based trick is to review images differently. Do not only look at the full photo on the back of the camera. Zoom in. Check the subject’s eyes, hands, feet, or the most important moving detail. A photo can look sharp on a small screen and still be soft when opened on a computer. This is especially true for wildlife and sports, where the difference between 1/500 and 1/2000 can decide whether feathers, fur, or facial expressions stay crisp.
For travel and street photography, I like to think in “readiness zones.” In bright daylight, 1/500 is a comfortable default because it handles walking people, quick gestures, and handheld shooting. In lower light, 1/250 is often a good compromise. At night, I decide whether I am documenting or creating. If I want sharp people, I raise ISO and protect shutter speed. If I want mood, trails, and blur, I slow down and embrace the atmosphere.
For landscapes, patience matters more than speed. Water teaches this beautifully. At first, many photographers push shutter speed as slow as possible because silky waterfalls look impressive. But after a while, you notice that too much blur can remove character. A mountain stream at 1/4 second may show flow while keeping texture. At 10 seconds, it may become a white fog. The expert trick is not always “go slower.” It is “choose the amount of motion that supports the scene.”
Panning is another area where experience beats theory. The first attempts may look terrible, and that is normal. Start with subjects moving parallel to you, such as cyclists or cars. Use burst mode, keep your elbows close, twist from your waist, and continue moving after pressing the shutter. Try 1/60 for bicycles and 1/125 for faster vehicles. You may throw away many frames, but the successful shots can look energetic and professional.
Finally, shutter speed teaches you to make creative decisions instead of chasing technical perfection. A perfectly sharp image is not always the strongest image. Sometimes a little blur tells the truth of the moment better than frozen detail. A sharp runner shows athletic form; a blurred runner can show speed, effort, and atmosphere. Once you understand that shutter speed is not just a setting but a language, your camera becomes far more expressive.
Conclusion
Learning how to choose a camera shutter speed is one of the fastest ways to improve your photography. Shutter speed decides whether motion is frozen, softened, stretched, or transformed into art. Start with practical baselines: 1/125 for still portraits, 1/250 for street scenes, 1/500 for casual action, 1/1000 or faster for sports and wildlife, and slower speeds for water, night scenes, panning, and creative blur.
The real secret is intention. Decide what you want motion to do, then choose the shutter speed that supports that idea. With practice, those intimidating fractions become second nature. Eventually, you will stop asking, “What shutter speed should I use?” and start asking the much better question: “What story do I want this motion to tell?”