Table of Contents >> Show >> Hide
- Why Windows Get Stuck in the First Place
- Safety First: Tools and Precautions
- How to Free Up a Painted-Shut Wooden Window
- How to Free Up Stuck Vinyl or Sliding Windows
- Stopping Drafts While You’re Freeing Up Windows
- When to Call a Proor Replace the Window
- Real-World Experiences: What DIYers Learn from Freeing Up Old Windows (500+ Words)
If your windows open only after a full-body workout, squeal like a haunted house, or refuse to budge at all, you’re not alone. Stuck, painted-shut, and drafty windows are one of the most common annoyances in older homesand even newer ones if they don’t get much love. A “How To Free Up Windows” tutorial (like something you’d see in a classic Family Handyman video) walks you through simple fixes that most homeowners can tackle with basic tools, a little patience, and a sense of humor.
In this guide, we’ll walk step-by-step through how to free up stuck windows, clean and lubricate window tracks, and seal up sneaky drafts while you’re at it. Call it the extended director’s cut of that quick videomore detail, more context, and plenty of real-world tips pulled from pros and energy-efficiency experts.
Why Windows Get Stuck in the First Place
Before you pry, scrape, or spray anything, it helps to understand why your windows are stuck. Most stubborn windows have one (or more) of these issues:
1. Layers of Paint Gluing the Sash Shut
Older wood windows, especially double-hung sash windows, often get painted over and over. Eventually, paint bridges the tiny gaps between the sash and the frame, effectively gluing everything together. Window pros note that paint buildup is one of the most common reasons older wooden sashes get stuck.
2. Dirt, Debris, and Old Gunk in the Tracks
Over time, window tracks become the graveyard for dust, dead insects, pet hair, and cobwebs. On sliding and vinyl windows, this junk acts like a brake pad. Cleaning and lubricating the tracks is often enough to fix “hard to open” windows in under half an hour.
3. Swollen or Warped Wood
Wood swells when humidity rises and shrinks when things dry out. If the frame or sash swells just a bit, it can rub against the stops or parting beads and jam the window. Light sanding of tight spots is sometimes all it takes, followed by sealing the bare wood to prevent future moisture problems.
4. Worn Hardware or Sash Cords
On older double-hung windows, frayed sash cords, worn pulleys, or broken balances can make windows feel heavy, out of alignment, or unwilling to move. Replacing cords or balances can dramatically improve how smoothly a sash travels.
5. Drafts and Leaks Making Things Worse
Sometimes the window itself moves fine, but gaps around it let in cold air. Deteriorated caulk and weatherstripping can create both drafty rooms and slightly misaligned sashes. Sealing those leaks not only improves comfort and energy efficiencyit often helps windows operate better too.
Safety First: Tools and Precautions
Family Handyman–style projects always start with a quick safety and tools rundown. For freeing up stuck windows, gather:
- Utility knife or razor blade for scoring paint
- Flexible putty knife or “window zipper” tool
- Flat pry bar and scrap wood block
- Shop vacuum and small brush
- Mild cleaner and rags
- Silicone spray or dry lubricant (or paste wax for wood)
- Fine sandpaper (120–180 grit) for tight wooden spots
- Eye protection and work gloves
If your home was built before 1978, assume old paint may contain lead. Avoid sanding or heating old paint aggressively; use gentle scoring and prying methods and follow lead-safe practices.
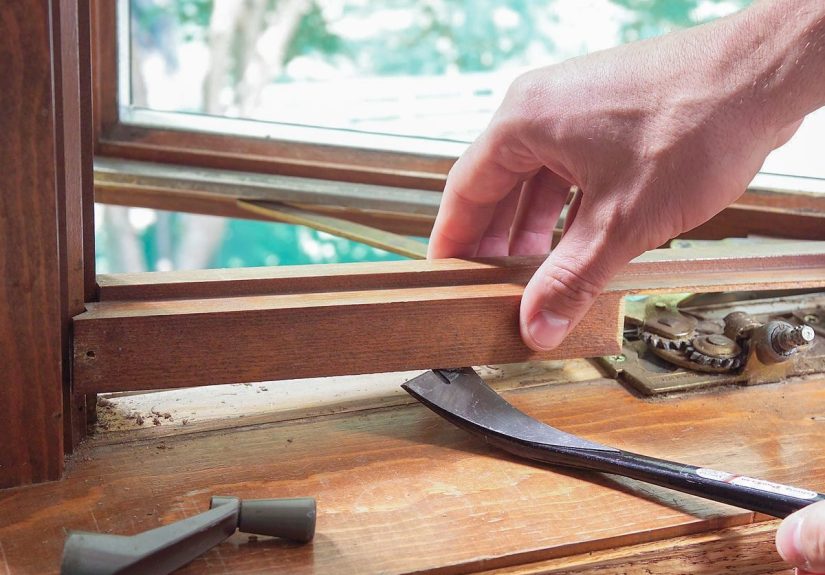
How to Free Up a Painted-Shut Wooden Window
This is the classic “stuck sash” situationa window that’s literally painted into place. Here’s how to free it up without destroying your trim.
Step 1: Score the Paint Lines
Start inside. Run a sharp utility knife slowly along the seam where the sash meets the frame and stops. Don’t just do the top and sides; continue along the bottom rail and any visible joints. In many cases, carefully scoring the paint is enough to break the seal so the window can move again.
If the window is accessible from outside, repeat the scoring on the exterior. It’s common for the outside seam to be painted shut as well, especially after exterior repainting.
Step 2: Work a Putty Knife Around the Sash
Next, slide a flexible putty knife into the gap you just scored. Wiggle it gently and tap the handle with a light hammer to cut through deeper paint that the knife alone can’t slice. Work your way around the entire sash. This is slow, careful workthink “patient surgeon,” not “angry lumberjack.”
Step 3: Pry the Sash Free (Gently)
If the sash still won’t budge, it’s time for controlled persuasion. Place a thin block of wood on the sill to protect it, then slide a flat pry bar on top of the block and under the sash rail. Gently pry upward at one corner, then the other, working gradually until the sash breaks free. Pros recommend prying near the corners first, then the center, to distribute pressure and avoid cracking glass.
Step 4: Test the Movement and Locate Tight Spots
Once the paint seal is broken, try sliding the sash up and down. If it moves but feels tight in one area, mark the problem spot with a pencil. That’s where lightly sanding the wood or cleaning the edge can make a huge difference.
Slide a strip of paper between the sash and the stopif it snags in one area, that’s your binding point. Carefully sand just that spot, then test again. You’re aiming for “slides nicely,” not “loose and rattly.”
Step 5: Lubricate Without Making a Dust Magnet
For wood windows, a thin rub of paste wax or candle wax along the meeting surfaces helps the sash slide smoothly without attracting grime the way greasy products do. Many window specialists prefer wax or dry lubricants on wood, and a silicone-based product on vinyl or aluminum.
How to Free Up Stuck Vinyl or Sliding Windows
Vinyl and aluminum windows don’t usually have paint issues, but their tracks are dirt magnets. The fix usually follows a simple “clean → dry → lubricate” sequence.
Step 1: Clean the Tracks Thoroughly
Open the window as far as you can. Use a vacuum with a crevice tool to suck up loose debris from the tracks. Follow with a small brush (an old toothbrush works) to loosen caked-on grime, then vacuum again. Some pros recommend popping out the track pieces when possible so you can clean them more thoroughly.
Step 2: Wash, Rinse, and Dry
Wipe the tracks with a cloth dampened with warm, soapy water. Avoid flooding the areatoo much water can leak into wall cavities. Rinse with a clean damp cloth and let everything dry completely. Water plus lubricant equals sticky sludge, so patience pays off.
Step 3: Apply the Right Lubricant
For vinyl window tracks, cleaning pros and window manufacturers commonly recommend a silicone-based spray lubricant. Instead of spraying directly into the tracks (which can overshoot everywhere), spray a small amount on a rag and wipe the tracks and contact points. Then open and close the window several times to distribute the lubricant.
Step 4: Check for Warping or Alignment Problems
If the window is still hard to open after cleaning and lubricating, look for bent frame parts, broken rollers, or misaligned sashes. In those cases, you may need to adjust or replace hardware or, with very old units, start thinking about replacement rather than endless tinkering.
Stopping Drafts While You’re Freeing Up Windows
Once your windows open and close smoothly, it’s smart to tackle drafts at the same time. Energy-efficiency experts consistently point out that sealing air leaks around windows and doors is one of the quickest and most cost-effective ways to improve comfort and cut utility bills.
1. Install or Replace Weatherstripping
Weatherstripping seals the moving parts of windowswhere the sash meets the frame. It comes in foam, rubber, vinyl, brush-style “pile,” and more. Inspect the existing weatherstripping for gaps, tears, or flattened sections and replace it if needed.
General guidelines from energy agencies and manufacturers: apply weatherstripping to clean, dry surfaces; measure twice before cutting; and choose a profile that compresses snugly when the window is closed, but doesn’t make operation difficult.
2. Refresh Caulk Around the Frame
Caulk handles the stationary jointswhere the window frame meets the wall. On the exterior, use an exterior-grade, paintable caulk; inside, a quality acrylic-latex or silicone caulk works well. Look for cracks, gaps, or missing caulk and reseal those areas.
3. Use Window Film Kits in Cold Weather
Clear plastic window film kits are a popular seasonal upgrade for drafty single-pane or very old windows. The film is taped to the interior trim and shrunk tight with a hair dryer, creating a nearly invisible extra barrier that reduces convective drafts and heat loss. They’re inexpensive, widely available at hardware stores, and can significantly improve comfort in winter.
4. Add Thermal Curtains or Insulated Blinds
For a low-effort enhancement, thermal curtains and insulated blinds help keep your freshly freed windows from losing heat at night or during extreme weather. Combined with good weatherstripping and caulk, they can make a drafty room feel noticeably more comfortable.
When to Call a Proor Replace the Window
DIY fixes shine when the problem is moderate: a bit of paint, dirt, dry weatherstripping, or minor swelling. But there are times when it’s smartest to bring in reinforcements:
- Cracked or fogged double-pane glass indicating seal failure
- Severely rotted or crumbling wood in the frame or sash
- Broken balances, pulleys, or sash cords you’re not comfortable replacing
- Persistent water leaks around the frame after caulking and flashing checks
- Very old, inefficient windows that remain drafty despite your best efforts
Window specialists or carpenters can rebuild sash windows, replace balances, and advise whether repair or full replacement is more cost-effective for your specific situation.
Real-World Experiences: What DIYers Learn from Freeing Up Old Windows (500+ Words)
Watching a short “How To Free Up Windows” video is reassuringyou see the pro score the paint, give the sash a confident pry, and the window pops open like it has been waiting politely. In real homes, things are a little messier (and usually dustier), but the core techniques still work. Here’s what many homeowners learn after going hands-on with their own stubborn windows.
1. The First Window Is the Scary One. The biggest hurdle is almost always psychological. You’re standing there with a utility knife in one hand and a pry bar in the other, thinking, “Please don’t let me crack this 100-year-old glass.” The trick is to go slowly and use more patience than muscle. Many people report that once they get that first sash moving, the fear disappearsand the next few windows feel like a routine maintenance task rather than a dare.
2. Paint Tells a Story. When you start scoring those paint lines, you can literally see the history of the house in layers: the avocado green from the ‘70s, the crisp white from a recent flip, the faded beige someone thought was a good idea. Those layers also reveal how often windows have been painted shut. You’ll often find brush marks across the sash joint or caulk where paint should have stoppedclues that a past painter valued speed over function.
3. The “Quick Fix” Becomes a Mini Deep-Clean. Many DIYers discover that once the sash finally moves, they can’t un-see the grime in the tracks and sills. What began as “just get this thing unstuck” often turns into vacuuming, scrubbing, wiping down screens, and even touching up chipped trim. The upside: a once-ignored window suddenly looks and feels cared for, which is surprisingly satisfying.
4. The Right Lube Makes All the Difference. A common rookie mistake is reaching for whatever lubricant is in the garageoften something greasy that attracts dust. After reading product labels and advice from window manufacturers, homeowners quickly switch to silicone spray for vinyl tracks or paste wax for wood. Once they feel a sash glide smoothly instead of grinding, they become instant evangelists for “clean then lube” as a yearly ritual.
5. Freeing Windows Changes How You Use Your Home. Stuck windows subtly shape behavior. If two bedroom windows refuse to open, you’re less likely to enjoy cool evening breezes or clear out cooking odors naturally. After freeing them, people often report using natural ventilation more: opening upper sashes to let hot air escape, cracking lower sashes for gentle airflow, and turning the AC down a notch on mild days. That’s not just comfortit can translate into lower energy bills over time.
6. You Start Spotting Drafts Everywhere. Once you’ve learned to feel for drafts and spot gaps around a newly freed window, it’s hard to walk past any window or door without doing a mental inspection. Homeowners often end up installing fresh weatherstripping on patio doors, sealing gaps at the bottom of exterior doors, or adding foam gaskets behind outlet covers on exterior walls. What began as one stubborn sash can snowball into a whole-house comfort upgrade.
7. Old Windows Earn a Little More Respect. After wrestling with heavy wood sashes, cleaning out pulley pockets, or replacing a sash cord, many people develop a new appreciation for old windows. They see the craftsmanship in mortise-and-tenon joints, the charm of wavy glass, and the clever simplicity of counterweights. Instead of ripping them out immediately, they choose to repair and improve themoften combining traditional windows with modern weatherstripping and storm inserts.
8. Small Maintenance Now Avoids Big Headaches Later. One of the biggest lessons from both pros and DIYers is that freeing a stuck window is a great reminder to create a maintenance routine. Once a year, check windows for easy operation, clean tracks, inspect caulk, and replace worn weatherstripping. It’s a few hours of work that can prevent windows from ever getting back to that “I need a crowbar and a prayer” stage.
9. It’s a Confidence Booster. Successfully freeing a window that hasn’t opened in years feels oddly heroic. It’s a tangible improvement you can see, feel, and hear (or rather, not hear, once drafts and rattles are gone). For many homeowners, this small project is a gateway to bigger DIY taskspatching drywall, upgrading insulation, or taking on more advanced trim work. That’s very much in the spirit of a Family Handyman tutorial: give you the skills, then let your confidence do the rest.
In short, learning how to free up windows isn’t just about avoiding a stuck sash. It’s about making your home more comfortable, more efficient, and more enjoyable to live inone smooth-sliding window at a time.