Table of Contents >> Show >> Hide
- What Are Edible Teacups (And What Should You Fill Them With?)
- Quick Pick: Which Edible Teacup Method Should You Use?
- Tools and Ingredients You’ll Actually Use
- Method 1: Cookie Teacups (Best for Warm Tea)
- Method 2: Chocolate Teacups (Most Elegant, Best for Desserts)
- Method 3: Waffle Cone or Wafer Teacups (Fast and Party-Friendly)
- Best Fillings for Edible Teacups
- Decorating Ideas That Look Fancy (But Aren’t Hard)
- Troubleshooting: Common Problems (And How to Fix Them)
- Make-Ahead, Storage, and Transport
- Frequently Asked Questions
- Conclusion: Your Tea Party Just Got a Plot Twist
- Real-World Experiences and Lessons (The Stuff You Only Learn After Making Them)
Imagine serving tea in a teacup… and then calmly eating the teacup like it’s the most normal thing in the world.
That’s the vibe. Edible teacups are equal parts party trick, dessert upgrade, and “I can’t believe this worked” kitchen win.
They’re perfect for tea parties, bridal showers, birthdays, book clubs, and any moment where a regular mug feels emotionally unavailable.
In this guide, you’ll learn three reliable ways to make edible teacups at homecookie teacups, chocolate teacups, and waffle-cone-style teacupsplus
how to seal them so they don’t leak, how to add handles without drama, and what to fill them with (besides “regret,” which is also edible but not recommended).
What Are Edible Teacups (And What Should You Fill Them With?)
An edible teacup is a cup-shaped treat designed to hold a drink or dessertat least long enough for you to serve it, admire it,
photograph it, and then devour it. Some versions work best for cold fillings (like mousse or ice cream), while sturdier versions
can handle warm drinks (like tea, coffee, or cocoa) for a short windowespecially if you seal the inside.
Edible teacups are usually one of these:
- Cookie teacups: sturdy, cozy, and the best option for warm drinks (when sealed).
- Chocolate teacups: elegant and glossy, ideal for desserts and cooler sips.
- Waffle cone/wafer teacups: fast, crunchy, and basically begging for ice cream.
Quick Pick: Which Edible Teacup Method Should You Use?
- Want to serve warm tea? Choose cookie teacups and seal well.
- Want the prettiest, most “wow” look? Choose chocolate teacups (molds make it easiest).
- Need something fast for a party? Choose waffle cone teacups (minimal baking, maximum applause).
Tools and Ingredients You’ll Actually Use
You can make edible teacups with basic kitchen gear. The “fancy” items are optionalbut helpful if you want that smooth,
symmetrical teacup look.
Essential tools
- Muffin tin (standard or mini) and/or oven-safe ramekins
- Parchment paper or baking spray
- Mixing bowl, spatula, and measuring tools
- Cooling rack
- Small spoon or pastry brush (for sealing interiors)
Nice-to-have (but not required)
- Silicone teacup molds (for chocolate teacups)
- Food-safe gloves (for handling warm chocolate cleanly)
- Piping bag (for neat chocolate lining and decorating)
- Small offset spatula (for smoothing chocolate and frosting)
Core ingredients (choose based on method)
- Cookie teacups: sugar cookie dough, shortbread dough, gingerbread dough, or sturdy chocolate cookie dough
- Chocolate teacups: chocolate bars/chips (dark, milk, or white) or candy melts
- Waffle/wafer teacups: waffle bowls, waffle cones, stroopwafels, or thin waffles/wafers (store-bought works)
- Sealer: melted chocolate (best all-around), plus optional cocoa butter or a thin icing glaze
- Handles: pretzels, cookie sticks, thick sprinkles, candy canes, or piped chocolate
Method 1: Cookie Teacups (Best for Warm Tea)
Cookie teacups are the most practical edible “drinkware.” They’re thick, sturdy, and easy to customize.
The key is shaping them well and sealing the inside so your tea doesn’t immediately escape like it just remembered it left the stove on.
Best cookie dough for teacups
- Shortbread: buttery and strong; holds shape beautifully.
- Sugar cookie dough: classic and easy; chill it well for clean shaping.
- Gingerbread: slightly firmer; great for “tea party” flavor.
- Chocolate cookie dough: rich and sturdyespecially if it’s not super soft.
Step-by-step: Bake cookie teacups in a muffin tin
-
Chill your dough. Cold dough prevents slumping and gives sharper edges.
If you’re using store-bought dough, still chill it for 20–30 minutes. -
Prep your pan. Grease a muffin tin well or use parchment circles.
For deeper cups, a “muffin top” pan can work too, but standard muffin tins are easiest. -
Form the cup walls.
Roll dough into balls (about 2 tablespoons each for standard cups), place in the tin, then press dough up the sides
using your fingers or the bottom of a small glass. Aim for an even thicknessthin spots become crack spots. -
Create the hollow.
Press a smaller rounded object (like a shot glass, spice jar, or tart tamper) into the center to create a cavity.
If the dough puffs while baking, you’ll press it down again right after baking. -
Bake until set and golden.
Exact time depends on your dough and pan size. You want edges browned and the center set (not gooey). -
Re-press while warm.
As soon as they come out, gently press the center again with your tool to deepen the cup. Cool in the pan for a few minutes,
then transfer to a rack to cool completely. -
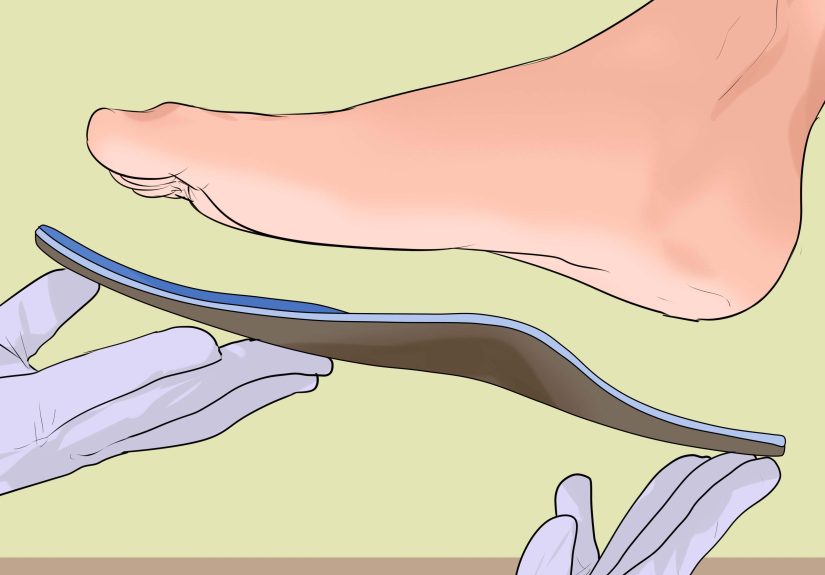
Seal the inside.
Brush or spoon melted chocolate inside the cookie cup and up the sides. Let it harden fully.
This step is what makes a cookie cup act like a cup, not a tragic crumb bowl.
How to add a handle (without a cookie catastrophe)
- Pretzel handle: Dip the ends in melted chocolate and attach. Let set before moving.
- Piped chocolate handle: Pipe a handle shape on parchment, chill until firm, then “glue” to the cup with more chocolate.
- Cookie-stick handle: Break a sturdy cookie stick in half, attach with chocolate, and pretend you planned the geometry.
Optional: Make a “saucer” too
Roll cookie dough and cut circles slightly larger than your cup base. Bake until golden.
When serving, place teacup on the cookie saucer for extra charm (and extra snack insurance).
Method 2: Chocolate Teacups (Most Elegant, Best for Desserts)
Chocolate teacups look fancy with minimal effortespecially if you use silicone molds.
The biggest decision: tempered chocolate or candy melts.
Tempered chocolate sets shiny and crisp, while candy melts are easier and more forgiving.
Option A: Chocolate teacups with silicone molds (the easiest way)
- Melt your chocolate. Use a microwave in short bursts or a double boiler. Stir often.
- Coat the mold. Spoon chocolate into each cavity, then use a small spoon or brush to spread it up the sides.
Aim for a medium-thick shell; too thin = cracking, too thick = “this is now a chocolate bunker.” - Chill and repeat. Chill briefly, then add a second coat for strength. Chill until fully set.
- Unmold gently. Flex silicone to release. If it’s sticking, chill a bit longer.
- Attach a handle. Use a pretzel or piped chocolate handle. “Glue” it on with melted chocolate and chill to set.
Option B: Chocolate teacups with the balloon trick (fun, a little chaotic)
This method is popular because it’s simple and gives round “cup” shapes, though they’re more bowl-like unless you choose smaller balloons.
If you try it, use clean balloons, keep your chocolate thick enough to hold, and work on parchment for easy cleanup.
- Inflate small balloons to teacup size (think: espresso cup, not beach ball).
- Dip balloon base into melted chocolate, swirl, and lift out.
- Set on parchment and chill. Repeat dipping if you want thicker walls.
- Pop and peel carefully once fully set. (The balloon’s job is over. It served. It retired.)
Important note about hot liquids
Chocolate teacups can soften with very hot drinks. If you want to serve tea or coffee in chocolate cups,
keep it warm rather than piping hot, and serve immediately. For stress-free results, use chocolate cups for dessert fillings.
Method 3: Waffle Cone or Wafer Teacups (Fast and Party-Friendly)
If you want edible teacups without mixing dough, this is your speed-run method.
The goal is to shape a waffle/wafer into a cup and then seal it so it stays crisp.
Option A: Waffle cone “teacups”
- Choose your base. Flat-bottom cones are easiest. Regular cones work too with a muffin tin for support.
- Stabilize in a muffin pan. Place cones upright in muffin cups so they don’t tip.
- Seal the inside. Coat with melted chocolate and let set. This prevents sogginess and leaks.
- Add a handle. Pretzel handle + chocolate “glue” = instant teacup energy.
Option B: Press waffles/wafers into a muffin tin
- Preheat your oven to a moderate temperature.
- Soften your waffle/wafer briefly (some people microwave for a few seconds) so it’s pliable.
- Press into a muffin tin to form cup shapes.
- Bake briefly until crisp, then cool before removing.
- Seal with chocolate for maximum crunch longevity.
Best Fillings for Edible Teacups
The filling you choose depends on your cup type. Cookie teacups can handle warm liquids (especially sealed),
while chocolate and waffle cups shine with cool or creamy fillings.
Warm drink ideas (best for cookie teacups)
- Black tea with milk and honey
- Chai latte (warm, not boiling)
- Hot cocoa with mini marshmallows
- Warm apple cider (served immediately)
Dessert fillings (great for all types)
- Chocolate mousse or pudding
- Cheesecake filling with berries
- Whipped cream + jam + crushed cookies
- Ice cream or gelato (waffle/chocolate cups are especially happy here)
- Fruit and yogurt parfait layers
Decorating Ideas That Look Fancy (But Aren’t Hard)
- Rim dip: Dip the rim in chocolate, then in sprinkles, crushed nuts, or cookie crumbs.
- Tea stains (the cute kind): Dust cocoa or cinnamon lightly around the rim.
- Gold moment: Use edible gold dust or shimmer powder for a “royal tea party” effect.
- Flower power: Add a tiny icing flower, or top fillings with edible petals (check they’re food-safe).
- Holiday handles: Candy cane handles in winter, pastel pretzels in spring, chocolate curls year-round because… chocolate.
Troubleshooting: Common Problems (And How to Fix Them)
My cookie teacups puffed up and lost the cup shape
Press the center down again immediately after baking while they’re still warm and soft.
Next time, chill the formed cups before baking to reduce puffing.
My cups cracked
Cracks usually mean thin spots. Make walls even and slightly thicker around the base.
For chocolate cups, add a second coat before unmolding.
My cups stuck to the pan/mold
Grease pans well (or use parchment). Let cookie cups cool slightly before removing.
For chocolate molds, chill until fully set; silicone releases better when the chocolate is firm.
My teacups got soggy
Seal the inside with melted chocolate and let it harden fully. Also, fill right before serving.
Cookie cups are brave, but even they have limits.
My handles fell off
Use melted chocolate as edible glue and let it set completely before lifting.
For heavier handles, use two attachment points and chill longer.
Make-Ahead, Storage, and Transport
- Cookie teacups: Bake 1–2 days ahead. Store airtight at room temperature. Seal with chocolate the day you plan to serve for best crunch.
- Chocolate teacups: Make 2–3 days ahead. Store cool and dry, away from heat and sunlight.
- Waffle/wafer teacups: Best the day of serving. If making ahead, seal with chocolate and store airtight with a dry paper towel inside the container.
- Transport tip: Carry cups empty, fillings separate, and assemble on-site if possible. Your future self will feel extremely wise.
Frequently Asked Questions
Can edible teacups really hold tea?
Cookie teacups can hold warm tea briefly if sealed with chocolate and served right away.
Chocolate cups are better for cooler drinks or desserts because very hot liquid can soften them.
Do I need special molds?
Nope. Muffin tins and ramekins can shape cookie cups, and silicone molds make chocolate cups easierbut they’re optional.
If you can shape a snack into a “cup-ish” object, you’re halfway there.
What’s the best sealer?
Melted chocolate is the most reliable. It creates a moisture barrier and adds flavor.
Two thin coats usually work better than one thick coat.
Conclusion: Your Tea Party Just Got a Plot Twist
Edible teacups turn an ordinary dessert into an event. Whether you bake cookie teacups for warm chai,
mold chocolate teacups for mousse, or whip up waffle teacups for ice cream, the secret sauce is the same:
sturdy shape, a good seal, and fillings added at the last minute.
Start with the method that matches your time and your mood, then experiment with handles, decorations, and flavors.
And when someone asks, “Wait… is the cup edible?” you get to smile and say, “Yes. And it’s been waiting for you.”
Real-World Experiences and Lessons (The Stuff You Only Learn After Making Them)
Edible teacups are one of those projects that look effortless on the internet and then immediately test your patience in real life
but in a fun way, like a puzzle you can eat. Here’s what people typically notice when they make edible teacups at home,
plus the small adjustments that tend to make the biggest difference.
First: the dough has opinions. Cookie teacups are easiest when the dough is cold and slightly firm.
If you shape cups with warm dough, the walls often slump as soon as they hit the ovenlike a tiny cookie puddle trying to become soup.
A simple routine helps: chill dough, shape cups, then chill the shaped cups again for a short rest before baking.
That second chill feels like an extra step, but it’s the step that makes the cups look like cups instead of “cookie-ish concepts.”
Second: you’ll probably re-press the centers. Even well-behaved dough can puff.
Most bakers end up pressing the cup cavity again the moment the pan comes out of the oven.
The trick is to press gently and evenlyenough to deepen the cavity, not enough to crack the base.
If you do get a tiny crack, don’t panic: a brush of melted chocolate inside often seals it completely.
Think of it as edible caulk. Very on-brand for a DIY dessert.
Third: the seal is everything. When someone says, “My cups got soggy,” it’s almost always one of two things:
(1) the cup wasn’t sealed, or (2) the filling sat too long. Sealing with melted chocolate turns the inside into a moisture barrier,
and it also buys you time. Still, edible teacups are happiest when filled close to serving.
If you’re hosting, an easy party strategy is to line up cups on a tray and let guests fill their own.
It becomes an activity, and you get fewer “why is my cup leaking?” moments.
Fourth: handles are a “set it and forget it” situation. The most common handle failure is moving the cup too soon.
Melted chocolate is strong once set, but it needs time to firm upespecially if your kitchen is warm.
If you attach handles and then immediately pick up the cups like you’re running a teacup relay race, handles may surrender.
The fix is simple: attach handles, chill briefly, and don’t lift by the handle. (Yes, even though it’s adorable. It’s a trap.)
Fifth: the “right” teacup depends on your serving plan. Cookie teacups are best when you want a warm drink moment,
but they’re also more time-intensive. Chocolate teacups look the most polished and feel special for dessert serviceespecially with mousse,
whipped cream, or berries. Waffle/wafer teacups are the quickest crowd-pleaser, particularly for ice cream bars or kid parties,
where “crunchy edible cup” is basically a universal language.
Finally: your second batch will be suspiciously perfect. The first batch teaches you your dough thickness,
your bake time, and how aggressive you can be with the pressing tool. The second batch is when you start making “extras”
for “testing,” which is a noble tradition and should be respected.
If you’re making edible teacups for an event, build in a few practice cups (and a few “chef’s snacks”) so you can serve the best-looking ones
without stress. The guests will be amazed. You’ll be relaxed. The cups will be edible. Everyone wins.