
Table of Contents >> Show >> Hide
- Quick Safety Notes (Read Before You Start)
- Tools and Supplies You Might Need
- Step 1: Identify Your Rear View Mirror Mount Type
- How to Remove the Mirror (Leaving the Windshield Button in Place)
- How to Remove the Windshield Mount/Button (The Part Glued to Glass)
- Prepping the Glass for Reinstallation (If You’re Reattaching a Button)
- Using a Rearview Mirror Adhesive Kit (General Best Practices)
- Step-by-Step: Reattaching the Button (A Safe, Clean Workflow)
- Troubleshooting: When the Mirror Won’t Come Off (or Won’t Stay On)
- Conclusion
- Bonus: Real-World Experiences (500+ Words of “Learn From My Mistakes” Energy)
Rear view mirrors are the unsung heroes of driving. They help you merge, back up, and confirm that the mysterious
vehicle tailgating you really is a delivery van and not your long-lost rival from high school. But when a
mirror needs to come offbecause you’re replacing it, fixing a loose mount, swapping to an auto-dimming unit, or
dealing with a button that popped off the windshieldyou want to do it without cracking glass or turning your dash
into a confetti cannon of trim clips.
This guide covers two jobs:
(1) removing the mirror from its mount (usually a metal “button” glued to the windshield), and
(2) removing the mount/button from the windshield (the part bonded with adhesive).
Since designs vary by vehicle, we’ll walk through the common mount types, how to identify yours, and the safest
DIY methods used by mechanics and auto glass pros.
Quick Safety Notes (Read Before You Start)
-
Modern mirrors may have electronics (auto-dimming, HomeLink, cameras, rain/light sensors).
Unplug wiring carefully before you pull hard on anything. Some systems may require calibration after replacement. -
Be gentle with the windshield. Sudden heat on cold glass can crack itwarm gradually if you must
soften adhesive. - Ventilation matters. Many mirror adhesive kits use strong chemicals; work with windows open.
- Protect your interior. Put a towel over the dash and center console before you start scraping.
Tools and Supplies You Might Need
You won’t necessarily need all of thesejust what matches your mirror style and your mission (remove mirror only vs.
remove the button too).
- Small Allen key or Torx bit (common for set-screw mirror mounts)
- Small flathead screwdriver (for trim covers or clips)
- Plastic trim tool (optional, for covers without marring)
- Razor scraper / single-edge razor blades (for old adhesive cleanup)
- Isopropyl alcohol and lint-free cloth (final cleaning step)
- Fishing line / dental floss / thin wire (for “sawing” off a glued button)
- Hair dryer (safer than a heat gun for gradual warming)
- Gloves and eye protection (because gravity loves dropping mirrors on toes)
Step 1: Identify Your Rear View Mirror Mount Type
The best way to remove a rear view mirror is to not guess. Most windshield-mounted mirrors fall into one of
these categories:
1) Windshield “Button” Mount (Most Common)
This is the classic setup: a small metal button is glued to the inside of the windshield, and the mirror slides onto
that button and locks with a set screw or clip. Many DIY guides note the mirror typically slides up and off the
button once the set screw is loosened.
2) Wedge / Cam Lock Mount
Some mirrors use a wedge-shaped shoe or cam lock. There may still be a set screw, but the sliding direction can vary.
If you see a tiny screw at the base where the mirror meets the windshield mount, you’re likely dealing with a
set-screw style.
3) Roof/Headliner or Bracket Mount (Less Common)
Some trucks, buses, older vehicles, or specialty mirrors mount to a bracket rather than directly to the windshield.
In that case you’ll be removing screws from a bracket, not sliding off a windshield button.
Fast check: Look at the mirror “neck” where it meets the glass. If there’s a small screw hole
underneath (often an Allen or Torx), you’re in set-screw territory. If there’s a plastic shroud, pop it off gently
(it usually snaps) to reveal the hardware.
How to Remove the Mirror (Leaving the Windshield Button in Place)
If your goal is to remove the mirror assembly but keep the metal button glued to the windshield, this is usually a
quick win.
A) For a Set-Screw Button Mount (Most Common DIY Scenario)
-
Position the mirror for access. Tilt it so you can see the underside of the base.
(Yes, you may need to do a little driver-seat yoga.) -
Remove any trim cover. If there’s a plastic shroud, pry gently with a plastic trim tool or your
fingers. Don’t use brute forcethese covers are more “snap” than “strength.” -
Disconnect wiring (if present). If the mirror has a connector, unplug it before removal so you
don’t stress the wires. -
Loosen the set screw. Use the correct Allen key or Torx bit. You typically don’t need to remove it
completelyjust loosen enough to unlock the mirror from the button. -
Slide the mirror off the button. Many mirrors slide up to release.
If it won’t budge, re-check that the set screw is truly loose and you’re sliding in the correct direction.
Tip: If it’s stuck, avoid twisting hard against the windshield. Re-loosen the screw, then apply
steady pressure in the sliding direction instead of torquing the glass.
B) For Mirrors with Hidden Screws Under a Cover
- Pop off the cover gently (it often snaps into place).
- Locate the screws holding the mirror to its mount/bracket.
- Support the mirror with one hand while removing the last screw.
- Lift or slide the mirror off the mount, depending on the design.
Some how-to resources also point out that tech-heavy mirrors (auto-dimming, cameras) can be expensive and may need
extra care during removal and reinstallation.
How to Remove the Windshield Mount/Button (The Part Glued to Glass)
This is the “proceed with respect” portion of the program. The metal button is bonded to the windshield with a
strong adhesive designed to survive heat, vibration, and the occasional pothole that feels personal.
In many cases, you only remove the button if:
- The button is damaged or the wrong style for the new mirror.
- The button is in the wrong location.
- You’re re-bonding it because it popped off.
Method 1: “Saw” It Off (Lowest Drama for Glass)
One common glass-friendly technique is to use fishing line or similar to “saw” through the adhesive while keeping
force parallel to the windshield (instead of pulling outward).
-
Warm the area gently (optional). If it’s cold, use a hair dryer on low to warm the glass gradually.
Avoid blasting one spot with intense heat. - Thread fishing line behind the button. Work it between the button and glass.
- Saw back and forth. Use a steady motion to cut through adhesive. Keep tension controlled.
- Remove remaining adhesive. Use a razor scraper carefully to clean the glass smooth.
Method 2: Controlled Heat + Gentle “Work It Loose”
Some step-by-step guides recommend warming the mounting plate and moving it back and forth until it releases. The key
is gradual warming and patiencewindshields don’t enjoy being surprised.
- Warm the mount area with a hair dryer until it’s warm to the touchnot scorching.
- Gently rock the button/mount side-to-side (small movements, no yanking).
- Once it releases, scrape off old adhesive and clean the glass.
Important: If your car has an ADAS camera module near the mirror, consider professional helpsome
auto glass providers warn that the mirror/camera area can be tied to driver assistance systems and may require special
handling.
Prepping the Glass for Reinstallation (If You’re Reattaching a Button)
Whether you’re reinstalling the original button or installing a new one, the prep steps are what separate
“rock-solid” from “falls off during your first speed bump.”
1) Mark the Original Location (Before You Clean Everything)
Multiple adhesive-kit instructions recommend marking the button location on the outside of the
windshield before scraping and cleaning. That way you don’t wipe away your reference point while removing old glue.
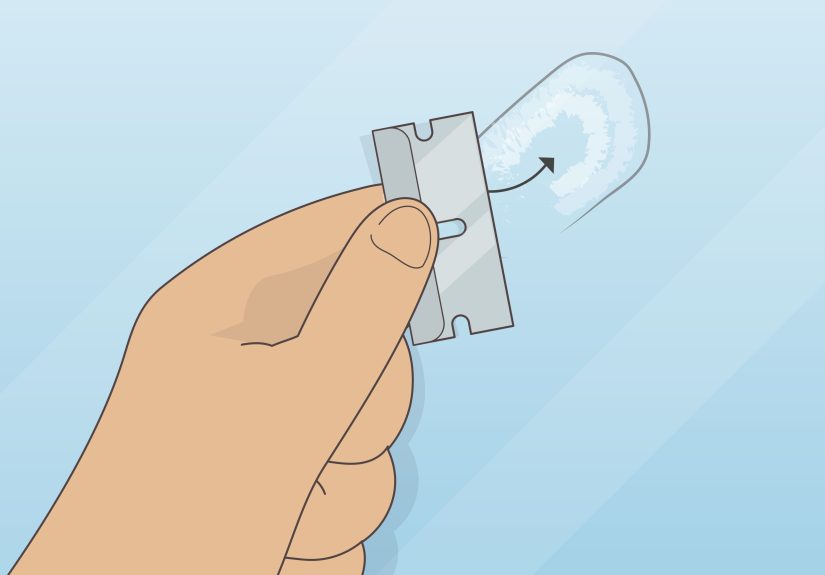
2) Remove Old Adhesive Completely
Scrape the glass until it’s smooth. Old adhesive residue can prevent a clean bond. Use a razor scraper carefully to
avoid gouging the glass.
3) Clean Like a Bond Depends on It (Because It Does)
Wipe the glass with isopropyl alcohol and let it evaporate fully. Several instructions also warn not to touch the
cleaned area with your fingers afterwardskin oils can contaminate the bond.
Using a Rearview Mirror Adhesive Kit (General Best Practices)
There are different brands, but reputable adhesive kits tend to follow a similar two-part system:
a primer/activator plus a strong adhesive.
Temperature and Timing Matter
-
Many kits recommend moderate temperatures for best results (for example, instructions commonly suggest working in a
comfortable “not freezing, not blazing” range). -
Cure times vary. Some directions allow reinstallation after about an hour, while other guidance suggests waiting
longerup to overnight for maximum strength.
Less Glue Is Often More
Some kit instructions specifically caution that using too much adhesive can backfire. A small drop in the center,
then pressing and holding firmly, is a common method.
Plastic Buttons vs. Metal Buttons
Not all adhesives are designed for every button type. Some products explicitly note they are intended for
metal mounting buttons and not plastic onesso verify what you have before you commit.
Step-by-Step: Reattaching the Button (A Safe, Clean Workflow)
If you’re installing a new button or reattaching one, here’s a broadly reliable workflow that aligns with how most
two-part kits instruct you to proceed (always read your kit label too).
-
Remove the mirror from the button first. It’s easier to bond just the button/baseplate than to
wrestle the full mirror while glue is setting. - Mark placement on the outside of the windshield. Use tape, crayon, or a marker.
-
Scrape and clean. Remove old adhesive from glass and button. Clean with isopropyl alcohol and let
dry. -
Apply primer/activator. Many kits have you treat both the glass location and the button surface,
then let it dry for a set time. - Apply a small amount of adhesive. Often a single drop in the center is enough.
-
Press and hold firmly. Hold steadyno sliding, no “just a little reposition.” If it’s off, remove
and redo per kit directions rather than smearing. -
Wait the recommended cure time. Some instructions allow mirror reinstall after about an hour; many
DIY mechanics prefer longer when possible. - Reinstall the mirror onto the button. Slide it on and tighten the set screw.
Troubleshooting: When the Mirror Won’t Come Off (or Won’t Stay On)
If the mirror won’t slide off the button
- Double-check the set screwsome are tiny and easy to under-loosen.
- Confirm the sliding direction. Many go upward, but not all designs are identical.
- Avoid twisting hard against the glass. Use steady sliding force instead.
If the button keeps falling off
- Old adhesive wasn’t fully removed (residue blocks a strong bond).
- Glass wasn’t cleaned thoroughly, or the cleaned area was touched afterward.
- Temperature was too cold/hot for ideal curing.
- Too much adhesive/primer was applied, delaying cure or weakening the bond.
- The button is plastic but the adhesive is meant for metal (or vice versa).
If your mirror has cameras or ADAS features
Treat that area like a “do not poke casually” zone. Some sources advise professional assistance when driver-assist
sensors/cameras are involved, and certain vehicles may require calibration after mirror or windshield-area work.
Conclusion
Removing a rear view mirror is usually a quick DIY jobif you respect the mount type and don’t turn the
windshield into an arm-wrestling opponent. In most cases, you’ll loosen a set screw, slide the mirror off the
windshield button, and call it a day. If you’re removing the button itself, the safest approach is controlled,
glass-friendly force: saw through adhesive with fishing line, warm gradually if needed, scrape carefully, and clean
thoroughly before re-bonding.
Take your time, keep the work area clean, and remember: the mirror doesn’t have feelings, but the windshield
definitely does.
Bonus: Real-World Experiences (500+ Words of “Learn From My Mistakes” Energy)
People rarely remove a rear view mirror on a calm Saturday morning with birds singing and a perfectly organized
toolbox. More often, the mirror is dangling by a wire, the button is still stuck to it like a stubborn barnacle, and
you’re trying to fix it before your next drivebecause driving without a proper mirror is a safety issue and can even
be illegal depending on where you live. In other words: the vibes are usually “urgent,” which is exactly how
windshields get cracked.
One of the most common experiences is the “I loosened the screw, so why won’t it slide?” moment. In real life, set
screws can be tiny, partially stripped, or packed with dust. The trick is to use the correct bit (don’t round it
out), loosen it more than you think you need, and then stop trying to twist the mirror off like you’re opening a
jar. Twisting loads the windshield in a way it doesn’t appreciate. Slidingsteady, controlled slidingis usually the
winning move. If you feel yourself getting frustrated, pause and re-check the direction. Many mirrors slide up; some
slide sideways. “More force” is rarely the correct answer.
Another real-world classic: someone tries to reattach the button without marking the spot first. It sounds minor
until the button ends up slightly off-center, and now the mirror blocks your view in a weird way or sits too low.
Marking the outside of the windshield takes 10 seconds and saves you from the “why does this feel wrong forever?”
experience. The outside mark is also genius because you won’t accidentally scrape it off while cleaning the inside.
Cleaning is where DIY jobs either become satisfying or become a recurring monthly tradition. In practice, people tend
to do a quick wipe and call it goodthen the button pops off again the first time the cabin heats up in the sun. The
best outcomes come from being a little obsessive: scrape all the old adhesive until the glass is smooth, wipe with
isopropyl alcohol, let it fully evaporate, and then don’t touch the clean area. It’s shocking how often a perfectly
prepped surface gets sabotaged by one casual thumbprint right before bonding.
Temperature stories are also very real. Folks in cold climates often attempt this repair in a chilly driveway, then
wonder why curing takes forever or fails. Folks in hot climates sometimes try it in direct sunlight, which can make
adhesives behave differently than expected. The most reliable experiences come from doing the job in mild
temperatures, in the shade, with time to wait. If you’re forced to work in the cold, warming the glass gradually
with a hair dryer feels slow, but it’s a lot cheaper than buying a windshield because you got impatient with a heat
gun.
Finally, modern cars add a twist: camera housings and driver-assistance systems near the mirror can turn a simple job
into a “maybe don’t DIY this part” situation. Plenty of people remove the mirror just fine, but then discover the
surrounding plastic shrouds are tied into sensor covers, wiring harnesses, or camera modules. The best real-world
approach is to treat any camera-equipped mirror like a laptop, not a hammer: disconnect gently, don’t yank on
harnesses, and if you’re unsure, stop before you create a bigger problem. The goal isn’t just removing the mirrorit
is finishing the job with a windshield that’s still one piece and a car that doesn’t light up the dashboard like a
Christmas tree.


