Table of Contents >> Show >> Hide
- What Is a Low Voltage Solder Gun?
- Why Build One Instead of Buying One?
- How the Tool Works
- Main Parts of a DIY Low Voltage Solder Gun
- Safety Comes Before Solder
- What Makes a Good Solder Joint?
- Best Uses for a Low Voltage Solder Gun
- Common Problems and How to Think About Them
- Design Improvements Worth Adding
- Step-by-Step Project Mindset Without the Dangerous Shortcut
- Is It Worth Building?
- Conclusion
- Experience Notes: What Building One Teaches You in the Real World
- SEO Tags
Building a low voltage solder gun from scratch sounds like something cooked up in a garage after midnight, somewhere between “I can fix that” and “Where did I put the fire extinguisher?” But when approached carefully, it is also a fascinating electronics project. It combines power conversion, heat transfer, recycled parts, hand fabrication, and the tiny thrill of making a tool that can make other tools. That is the kind of project that makes a workbench feel less like furniture and more like a laboratory with coffee stains.
A low voltage solder gun is not the same thing as a delicate temperature-controlled soldering station. It is usually built for short bursts of high heat, quick wire joints, lugs, terminals, and heavier soldering jobs where a pencil iron may feel like it showed up wearing slippers. Instead of relying on a small heating element, a solder gun uses a low-voltage, high-current path to heat a copper tip very quickly. The magic is not mystical; it is resistance heating. The trick is making that magic useful without making it unsafe.
This guide explains the idea behind a DIY low voltage solder gun, the parts that matter, the safety decisions that should come first, and the practical lessons learned from building or evaluating one. It is written for curious makers, electronics hobbyists, repair fans, and anyone who has ever looked at a box of scrap parts and thought, “There is definitely a tool hiding in there.”
What Is a Low Voltage Solder Gun?
A solder gun is a handheld tool that heats a metal tip so solder can melt and flow into a joint. Traditional soldering guns often use a transformer inside the handle. When the trigger is pressed, the transformer converts wall power into very low voltage and very high current. That current passes through a copper tip, and the tip heats almost instantly.
A low voltage solder gun from scratch follows the same general concept, but the safer DIY version starts with an external low-voltage power source, such as a certified DC laptop-style power supply. Instead of connecting a homemade transformer directly to wall voltage, the project keeps dangerous mains voltage outside the handmade tool body. That one design choice can turn a scary experiment into a more reasonable bench project.
The essential idea is simple: use low voltage, move a lot of current, and concentrate heat where it is useful. The tip must get hot, while the handle, wiring, switch, and power supply must remain controlled and protected. In other words, the tip should do the drama. Everything else should stay boring.
Why Build One Instead of Buying One?
Let’s be honest: buying a soldering gun is easier. It comes in a box, has a warranty, and usually does not require you to explain to your family why a copper loop is clamped to a homemade handle. But building one has real value for the right person.
It Teaches Power Electronics in a Memorable Way
A low voltage solder gun demonstrates the relationship between voltage, current, resistance, and heat in a very physical way. You are not just reading equations; you are watching copper heat up because electrical energy is being converted into thermal energy. That makes the lesson stick.
It Reuses Scrap Parts
Many DIY examples use salvaged ferrite cores, copper busbars, old laptop power supplies, heavy wire, switches, and pieces of plastic or acrylic for a handmade enclosure. The result can be surprisingly elegant. There is something deeply satisfying about turning retired electronics into a functioning tool instead of letting them become drawer fossils.
It Can Be Customized
A homemade solder gun can be shaped for a specific grip, tip size, power source, or repair task. You can build it for short, intense heat bursts or for heavier wire work. You can also add small comforts, such as a trigger switch, LED work light, removable tip, heat-resistant standoffs, or a safer stand.
How the Tool Works
The core of a low voltage solder gun is a high-current heating loop. In many handmade designs, a DC supply feeds an oscillator or switching circuit, which drives a ferrite transformer. The transformer steps the power down into a very low voltage but allows heavy current to flow through a thick copper secondary. The soldering tip becomes the final resistive part of that circuit.
Think of it like a tiny electrical traffic jam. Most of the conductive path is thick copper, so current moves through it easily. The tip is thinner or shaped in a way that has slightly more resistance. Because resistance creates heat when current flows, the tip gets hot first. That heat is then transferred to the solder joint.
The best DIY builds keep the power path short, solid, and mechanically tight. Loose connections waste energy, create unwanted heat, and make the tool unreliable. A high-current connection that looks “mostly fine” may still behave like a grumpy toaster if it is oxidized, under-tightened, or made with undersized wire.
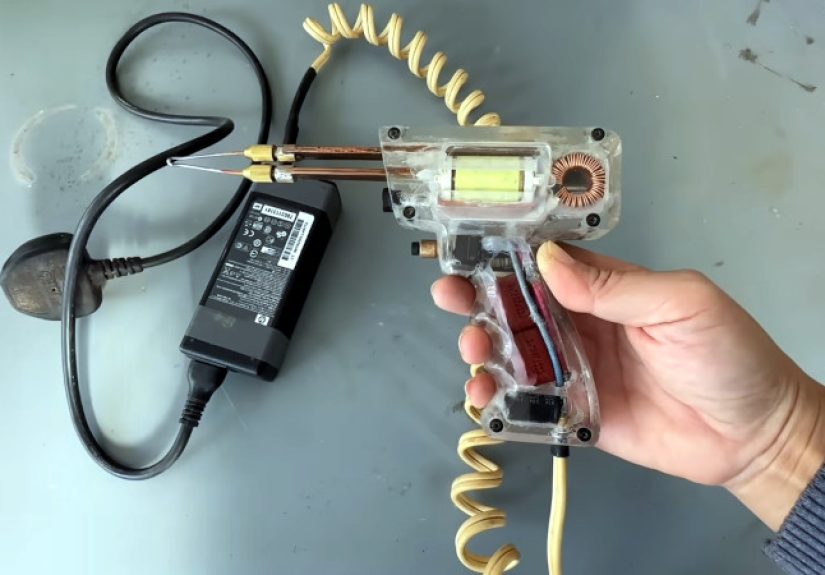
Main Parts of a DIY Low Voltage Solder Gun
1. Low Voltage Power Supply
The power supply is the foundation of the project. A certified external DC power adapter is strongly preferred for hobby builds because it keeps mains voltage outside the handmade enclosure. A 12-volt supply is common in many low-voltage electronics experiments, but the exact rating depends on the design. The important point is not just voltage; it is current capacity, protection, and quality.
A good supply should have overcurrent protection, short-circuit protection, and a rating that matches the load. Do not use mystery chargers with cracked cases, frayed cords, or labels that appear to have been printed during a thunderstorm.
2. Switching Circuit or Oscillator
If the design uses a ferrite transformer, the DC input must be switched rapidly so the transformer can operate. That job belongs to an oscillator or switching circuit. In a practical DIY article, this is where caution matters. Poorly designed switching circuits can overheat components, produce electrical noise, or fail dramatically.
For a safe project mindset, the circuit should include proper insulation, rated components, heat sinking where needed, and a fuse or current-limiting protection. A homemade tool should never rely on optimism as a safety feature. Optimism is nice for gardening. It is not a circuit breaker.
3. Ferrite Transformer
Ferrite cores are often used in compact switching power designs. In a homemade low voltage solder gun, salvaged ferrite cores may be stacked or combined to create a transformer suitable for high-current output. The secondary winding may be made from a thick copper bar or heavy conductor because the current can be substantial.
The transformer should be mechanically secure and electrically insulated. Sharp metal edges, loose windings, and heat-softened plastic are all enemies of reliability. The cleaner the layout, the better the odds that the tool will behave like a tool rather than an educational smoke machine.
4. Copper Tip
The copper tip is where the heat appears. It may be a loop, a shaped piece of copper wire, or a small replaceable element clamped into the high-current path. Copper works well because it conducts heat efficiently, but it also oxidizes and wears over time. Replaceable tips are a smart design choice.
The tip should be easy to remove, easy to tighten, and shaped for the job. A chunky tip works better for heavier wires. A smaller tip offers more precision but may not store enough heat for large joints. This is one reason soldering stations use different tip shapes. One tip cannot be king of every kingdom.
5. Handle and Enclosure
A solder gun needs a comfortable grip, but comfort is not enough. The handle must resist heat, protect the user from exposed conductors, and provide strain relief for wires. Acrylic, polycarbonate, phenolic material, 3D-printed high-temperature plastics, or layered insulating boards may be used depending on skill and availability.
The enclosure should prevent fingers from reaching live conductors, even if those conductors are low voltage. Low voltage can still create burns, sparks, and high-current faults. Add ventilation for warm electronics, but avoid openings that expose metal terminals.
6. Trigger Switch
A trigger switch makes the tool feel like a classic soldering gun. More importantly, it encourages short heat bursts. The switch must be rated for the electrical load it controls. If it only controls a low-current signal that enables the power circuit, it has an easier life. If it directly carries high current, it must be chosen very carefully.
A good design turns on quickly, heats the tip, completes the solder joint, and turns off. Continuous operation should be avoided unless the design is built and tested for it.
Safety Comes Before Solder
A homemade soldering tool can burn skin, melt insulation, start fires, or damage electronics if it is poorly designed. Low voltage reduces shock risk, but it does not eliminate danger. A car battery is low voltage too, and it can still turn a wrench into a branding iron if shorted. Respect current.
Use a Protected Power Source
Choose a power supply with built-in protections and add a fuse appropriate to the project. Do not connect a handmade solder gun directly to wall power. If a design requires mains wiring inside the handle, that is no longer a casual hobby project; it is a certified-product engineering problem.
Control Fumes
Soldering smoke usually comes from flux, not from tiny clouds of metal magically floating around like villain fog. Still, flux fumes can irritate the eyes and respiratory system, and repeated exposure is not something to shrug off. Work in a well-ventilated area, use a fume extractor when possible, and keep your face out of the smoke path.
Plan for Heat
The tip, screws, nearby copper, and freshly soldered joints can remain hot after the trigger is released. Use a stand, keep the bench clear of paper and solvents, and never leave the tool powered where it can roll, sag, or touch something flammable.
Protect the Electronics You Are Repairing
A solder gun can deliver heat quickly, which is useful for large wires but risky for delicate printed circuit boards. Too much heat can lift pads, damage components, or cook insulation. For fine electronics, a temperature-controlled soldering iron is usually the better tool. The solder gun is the hammer in the drawer: useful, but not for adjusting eyeglasses.
What Makes a Good Solder Joint?
No matter how the tool is made, the goal is the same: heat the work, not just the solder. A proper solder joint forms when the pad, wire, terminal, or metal surface becomes hot enough for solder to flow and wet the surface. The solder should not simply blob on top like a nervous silver meatball.
A good joint is usually smooth, shiny or evenly finished depending on solder type, and shaped with a gentle concave fillet. It should not be grainy, cracked, dull from poor heating, or piled so high that it bridges nearby connections. Flux helps remove surface oxidation so solder can wet the metal properly, but leftover flux may need cleaning depending on the type used.
Best Uses for a Low Voltage Solder Gun
A DIY low voltage solder gun is best suited for heavier tasks that benefit from quick heat:
- Soldering medium-gauge wires
- Tinning copper lugs or bus wires
- Repairing battery leads in low-voltage projects
- Joining terminals, tabs, or larger connectors
- Working on non-delicate metal joints where fast heat is useful
It is less suitable for tiny surface-mount parts, fragile circuit boards, ribbon cables, or heat-sensitive components. For those jobs, use a temperature-controlled soldering station with the right tip. There is no shame in using the correct tool. In fact, that is how benches remain peaceful.
Common Problems and How to Think About Them
The Tip Heats Slowly
Slow heating often points to poor current delivery. The power supply may be under-rated, the transformer may be inefficient, the tip may be too thick, or a connection may be loose. High-current devices are brutally honest: every weak connection becomes a tiny heater in the wrong place.
The Handle Gets Warm
If the handle warms noticeably, stop and inspect the layout. Heat may be traveling through copper conductors, or electronics inside may be overloaded. Add thermal spacing, improve ventilation, and check whether the tool is being used longer than intended.
The Solder Balls Up
Solder that balls up instead of flowing usually means the work surface is dirty, oxidized, or not hot enough. Clean the metal, apply appropriate flux, and heat the joint evenly before feeding solder into the connection.
The Tip Oxidizes Quickly
Copper oxidizes when heated. Keep the tip clean, tin it lightly when appropriate, and replace it when it becomes pitted, misshapen, or unreliable. A replaceable tip design saves future frustration.
Design Improvements Worth Adding
A scratch-built tool should evolve after testing. The first version proves the idea; the second version proves that you learned something. Consider adding a power indicator LED, a thermal cutoff, a fuse holder, a removable tip clamp, better strain relief, and an insulated guard around the hottest metal parts.
A current meter or inline power monitor can also be useful during testing. It helps reveal whether the tool is drawing more power than expected. For a more polished build, a small work light near the tip is surprisingly helpful, especially when soldering inside enclosures or under a desk where lost screws apparently go to start new lives.
Step-by-Step Project Mindset Without the Dangerous Shortcut
The safest way to approach this project is not to copy random wiring from the internet and hope for the best. Instead, think in stages. First, define the job: heavy wire soldering, portable field repair, or learning experiment. Second, choose a certified low-voltage supply with enough capacity and protection. Third, design the heating path so high current flows only through conductors meant to carry it. Fourth, build the handle so no exposed metal can be touched during use. Fifth, test briefly, measure temperatures, and inspect after every short run.
Never test a new build on an important circuit. Practice on scrap wire and spare terminals. Keep sessions short. Watch for smell, discoloration, softening plastic, buzzing, arcing, or any sign that the tool is unhappy. Electronics are polite until they are not.
Is It Worth Building?
For everyday electronics repair, a commercial temperature-controlled soldering station is usually the better first purchase. It is precise, predictable, and kinder to circuit boards. But as a learning project, a low voltage solder gun from scratch is excellent. It teaches current handling, heat management, mechanical design, and safety discipline in one compact package.
The finished tool may not replace a professional soldering station, but it can become a useful specialty device. More importantly, the process of building it teaches lessons that transfer to other projects: power supplies, transformers, enclosures, switches, thermal design, and troubleshooting.
Conclusion
A low voltage solder gun from scratch is part tool, part lesson, and part personality test for your workbench. It asks whether you can respect current, manage heat, and build something that is not only clever but also safe. The best version uses a protected low-voltage supply, solid high-current connections, a replaceable copper tip, a heat-resistant handle, and a healthy suspicion of anything that smells hot.
If your goal is precision circuit-board work, buy or use a quality temperature-controlled iron. If your goal is to understand how a fast-heating solder gun works and to build a practical tool from salvaged parts, this project is a satisfying challenge. Just remember: the most impressive DIY tool is not the one that gets hottest. It is the one that works reliably, safely, and does not require an apology to the smoke detector.
Experience Notes: What Building One Teaches You in the Real World
The first experience most people have with a homemade low voltage solder gun is surprise. The tip can heat faster than expected, especially when the current path is short and the copper tip is sized correctly. That quick heat is exciting, but it also forces you to develop better habits. You learn to press the trigger only when the tip is near the joint, feed solder deliberately, and release power as soon as the joint flows. It is less like using a slow pencil iron and more like using a tool with a little engine under the hood.
The second lesson is that mechanical connections matter as much as electrical theory. On paper, a thick copper conductor looks perfect. On the bench, a slightly loose screw or oxidized clamp can steal performance. The tool may act weak, then suddenly improve after tightening the tip or cleaning a contact surface. That experience teaches a valuable repair principle: high-current devices depend on low-resistance joints. The smallest bad connection can become the biggest problem.
The third lesson is about ergonomics. A tool can work electrically and still feel awkward. If the handle angle is wrong, the trigger is too stiff, or the tip blocks your view, soldering becomes clumsy. A handmade enclosure gives you the chance to shape the grip around your own hand. After a few test joints, you may discover that a slightly longer nose, a wider trigger, or a better strain relief makes the tool far more pleasant to use. Comfort is not decoration; it affects control.
The fourth lesson is humility. A homemade solder gun is not automatically better than a store-bought tool. Commercial soldering equipment benefits from testing, materials engineering, certifications, and decades of product refinement. Your DIY version may be brilliant for learning and occasional heavy joints, but it may not be the tool you trust for tiny pads on an expensive motherboard. That is not failure. That is wisdom wearing safety glasses.
The fifth lesson is that soldering is a complete process, not just a hot tip. Clean metal, proper flux, the right solder, stable work holding, and ventilation all matter. Many beginners blame the tool when the real problem is dirty copper, movement during cooling, or trying to heat a large connector with a tiny contact area. Building your own solder gun makes these variables obvious because you can feel how the joint responds.
Finally, the project makes you appreciate controlled power. Low voltage sounds gentle, but high current deserves respect. Once you see how quickly a copper tip can heat, you stop treating wires, switches, and clamps as afterthoughts. You start designing with fuses, insulation, strain relief, and thermal spacing from the beginning. That mindset is the real prize. The homemade solder gun is useful, but the builder who finishes the project with better safety instincts has gained something even more valuable.