
Table of Contents >> Show >> Hide
- Why a Mousetrap Car Is Such a Great Project
- Materials for a Simple Mousetrap Car
- The Four Things Every Good Mousetrap Car Must Do
- How to Build a Mousetrap Car: Step-by-Step
- How the Physics Works Without Making Your Brain File a Complaint
- Simple Tuning Tips That Actually Matter
- Common Mousetrap Car Problems and Fixes
- Best Beginner Design for Distance
- What Builders Usually Experience When They Make Their First Mousetrap Car
- Final Thoughts
If you have ever looked at an ordinary mousetrap and thought, “You know what this needs? Wheels,” congratulations. You are exactly the kind of curious builder this project was made for. A mousetrap car is one of the most satisfying little engineering builds around because it turns a small spring into a rolling lesson in physics, design, patience, and the fine art of fixing things that absolutely worked better in your imagination.
This simple design tutorial walks you through how to build a mousetrap car with beginner-friendly materials, clear steps, and enough tuning advice to keep your vehicle from becoming an elegant but stationary sculpture. Along the way, you will learn why alignment matters, why friction is both friend and enemy, and why a longer lever arm can make your car act less like a drag racer and more like a marathon runner. Whether you are building for a class project, a STEM challenge, or just for the joy of making a tiny machine scoot across the floor, this guide will help you build smarter from the start.
Why a Mousetrap Car Is Such a Great Project
A mousetrap car works by storing potential energy in the spring of the trap and converting that energy into motion. In plain English, the spring wants to snap back, the string pulls the axle, the axle turns the wheels, and the wheels roll the car forward. Tiny machine. Big drama.
The beauty of this project is that it teaches real engineering ideas without needing a garage full of fancy tools. You can test wheel size, traction, chassis weight, axle friction, and lever-arm length with everyday materials. Even better, the results are easy to see. When a car rolls straight and far, you know your design choices are working. When it veers into a chair leg like it has a personal grudge, you also get useful feedback.
Materials for a Simple Mousetrap Car
For a beginner-friendly build, gather these supplies:
- 1 standard wooden mousetrap
- 1 lightweight chassis, such as balsa wood, foam board, corrugated cardboard, or thin plywood
- 2 wooden dowels, skewers, or straight metal rods for axles
- 2 drinking straws or similar tubing for simple axle bushings
- 4 wheels, such as CDs, foam-board circles, bottle caps, or lightweight plastic lids
- Rubber bands or balloon strips for wheel traction
- Strong string, braided line, or dental floss
- Tape or hot glue
- Ruler and pencil
- Scissors or a craft knife
- Pliers
- Optional: a wooden dowel, bamboo skewer, or lightweight rod to extend the mousetrap arm
Safety first: mousetraps are small, but they are not polite. Use eye protection, keep fingers clear of the snap arm, and get adult help if you are cutting thick materials or working with hot glue.
The Four Things Every Good Mousetrap Car Must Do
1. Roll straight
If the axles are crooked or the wheels wobble, your car will waste energy wandering left and right instead of moving forward. A straight car is usually a better car.
2. Reduce friction where you do not want it
The axle should spin freely inside the straw or bushing. If the axle rubs badly against the frame, your car will lose precious energy before it even gets a chance to look impressive.
3. Add traction where you do want it
The drive wheels need enough grip on the floor so they push the car forward instead of spinning in place like an overconfident athlete on a freshly polished gym floor.
4. Match the design to your goal
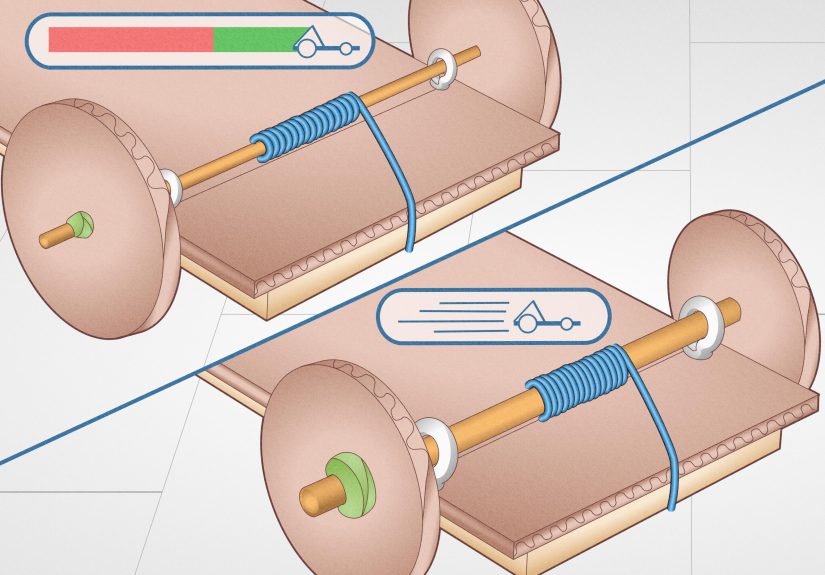
If you want distance, a longer lever arm and larger drive wheels usually help. If you want quick acceleration, a shorter lever arm and more torque-focused setup often works better. Same mousetrap. Different attitude.
How to Build a Mousetrap Car: Step-by-Step
Step 1: Build a light, stiff chassis
Cut your chassis to a rectangle about 10 to 14 inches long and 3 to 5 inches wide. It should be stiff enough to support the mousetrap without bending, but not so heavy that the spring has to drag it like a reluctant suitcase through an airport.
Foam board, balsa wood, and sturdy cardboard are all common choices. For a first build, do not worry about making it beautiful. Worry about making it straight.
Step 2: Add the axle guides
Tape or glue two short pieces of straw across the underside of the chassis, one near the front and one near the rear. These act as bushings that let the axles spin. Make sure the straws are parallel to each other and square to the chassis. If they are not aligned, your car will crab-walk instead of roll.
Leave enough space between each straw and the edge of the chassis so the wheels will not rub against the frame.
Step 3: Prepare the axles and wheels
Slide one axle through each straw. Then attach a wheel to each end. If you are using homemade wheels, mark the center carefully before punching the axle hole. Off-center wheels wobble, and wobble is just friction wearing a silly hat.
For a simple distance design, many builders use larger rear wheels and smaller front wheels. That setup can help the car travel farther per axle rotation while keeping the front lighter and easier to steer. If making two wheel sizes feels like too much work for version one, use four matching wheels and focus on keeping them centered and round.
Step 4: Add traction to the drive wheels
Wrap rubber bands around the rear wheels, or stretch thin balloon strips over the rims. This gives the wheels more grip on smooth floors. Without traction, the rear wheels may spin uselessly, and your mousetrap car will perform a very convincing impression of trying hard without accomplishing much.
Step 5: Mount the mousetrap
Attach the mousetrap firmly on top of the chassis with tape, glue, or zip ties. Place it near the rear axle if you are building a basic distance car, and line the snap arm up with the center of the chassis so the pull stays straight.
Do not block the spring or the moving arm. The trap needs room to do its dramatic little spring-powered speech.
Step 6: Extend the lever arm
For a simple long-distance design, tape or attach a lightweight dowel or skewer to the trap’s snap arm. This creates a longer lever arm. A longer arm pulls the string over a greater distance, which spreads out the release of energy and usually produces a smoother, longer run.
A good starting length is 10 to 15 inches from the trap. That is long enough to help distance without becoming so awkward that it catches on everything in the room, including your patience.
Step 7: Tie the drive string
Tie one end of the string to the end of the lever arm. Tie the other end to the rear axle, or loop it onto a small hook attached to the axle. Wind the string neatly around the rear axle in the direction that will pull the car forward when the arm returns.
The string should be long enough to unwind smoothly but not so sloppy that it snarls. If the string gets tangled, the car will stop instantly and teach you several valuable engineering words that should not be repeated in class.
Step 8: Test the rolling alignment
Before winding the trap, gently push the car by hand on a smooth floor. It should roll straight and easily. If it drifts hard to one side, check whether:
- One wheel is rubbing the chassis
- An axle is bent
- A straw bushing is crooked
- A wheel is off-center
- The chassis is twisted
Fix these issues now. A badly aligned car will only become more dramatic once the trap is loaded.
Step 9: Wind and launch
Carefully pull back the lever arm while winding the string around the rear axle. Set the car on a smooth surface, release gently, and watch what happens.
If all goes well, the arm will swing back, the string will unwind, the axle will rotate, and the car will move forward. If all does not go well, welcome to engineering. That is what the next section is for.
How the Physics Works Without Making Your Brain File a Complaint
The spring inside the mousetrap stores energy. When the trap arm is released, that energy turns into pulling force on the string. The string applies torque to the rear axle, and the axle rotates the wheels. Each full turn of a wheel moves the car forward by roughly one wheel circumference. That means larger drive wheels can move the car farther per rotation.
Here is the tradeoff: larger wheels can increase distance, but they also need enough torque to get moving. That is why wheel size, axle diameter, traction, and lever-arm length all affect performance together. A longer lever arm usually lowers the pulling force at any given moment but increases the pulling distance, which tends to help long-distance builds. A shorter arm releases energy faster, which can help speed builds.
In other words, there is no magic setup. There is only the setup that best matches your goal.
Simple Tuning Tips That Actually Matter
Use the lightest chassis that still stays rigid
A heavy car can waste energy fast. Keep decorations modest. Your mousetrap car does not need a spoiler unless you are trying to impress a pigeon.
Keep the axles spinning freely
If the axle drags inside the straw, trim, realign, or replace the bushing. Even small friction losses add up quickly.
Make sure the rear wheels grip the floor
Balloon rubber or rubber bands can dramatically improve traction on slick surfaces.
Test wheel sizes
Larger rear wheels often help distance, but only if your car still has enough torque and low enough friction to use them well.
Try lever-arm lengths
Start with a moderate extension, then test a longer one. If the car travels farther but launches more gently, that is normal. You are not losing your mind. You are discovering a design tradeoff.
Watch the string path
The string should pull in a straight line from the lever arm to the rear axle. A crooked pull can twist the car or waste energy.
Common Mousetrap Car Problems and Fixes
The car does not move
Check that the string is wrapped the correct direction, the rear axle can spin, and the lever arm is actually pulling the axle instead of catching on the chassis.
The wheels spin, but the car barely goes forward
You probably need better traction. Add rubber to the drive wheels or test on a different surface.
The car jerks and stops early
The string may be tangling, the lever arm may be too short for a distance run, or friction at the axle may be too high.
The car turns left or right
Alignment is off. Straighten the axle guides, re-center the wheels, and make sure the chassis is not warped.
The car goes fast but not far
That usually means the energy is being released too quickly. A longer lever arm, larger drive wheels, or a lighter chassis may help.
Best Beginner Design for Distance
If your goal is to build a simple mousetrap car that travels far, this is a strong starting setup:
- Light but stiff chassis
- Very straight straw bushings
- Low-friction axles
- Larger rear wheels with rubber traction
- Smaller front wheels
- Lever arm extended to about 12 inches
- String wrapped neatly on the rear axle
- Lots of testing on a smooth floor
This design will not break any secret engineering records, but it gives beginners an excellent balance of simplicity, distance, and sanity.
What Builders Usually Experience When They Make Their First Mousetrap Car
One of the most common experiences in a mousetrap car project is the surprise of how small details decide everything. Most people start by thinking the spring is the whole story. It feels like the trap is the engine, so the logic seems simple: attach wheels, release trap, enjoy victory. Then the first launch happens, and the car either crawls, spins its wheels, turns into a wall, or does a dramatic half-roll before lying still like a tiny machine that has seen too much. That first failure is not a problem. It is the moment the project becomes interesting.
Builders also tend to discover that “straight enough” is not actually straight enough. A straw glued just slightly crooked, a wheel hole punched a little off-center, or an axle with a subtle bend can ruin the whole run. This teaches a great lesson that applies far beyond mousetrap cars: precision matters most in places that do not look exciting. Nobody stands around admiring an axle guide. Yet that humble piece can decide whether a car glides beautifully or travels like a shopping cart with personal issues.
Another common experience is learning that friction has two personalities. At the axles, friction is the villain stealing energy. At the drive wheels, friction is the hero giving the car grip. Beginners often reduce friction everywhere, then wonder why the rear wheels spin uselessly. Others add too much weight to improve traction and accidentally create a tiny brick with ambition problems. After a few tests, most builders begin to understand the balancing act. They stop thinking in simple good-versus-bad terms and start asking better questions: where do I want force, where do I want efficiency, and what tradeoff am I willing to accept?
The lever arm is another classic aha moment. When builders extend it, the car often launches more gently but travels farther. That can feel backward at first. People expect harder snap, bigger result. Instead, the project teaches that spreading energy out over a longer pull can be more useful for distance than dumping it all at once. That is a sneaky little engineering lesson hiding inside a craft project. It is also why so many students and hobbyists become oddly obsessed with testing “just one more version,” which is usually followed by six more versions and a floor covered in string scraps.
Perhaps the best experience of all is the moment a revised design finally works. After small fixes to the alignment, a little extra traction on the wheels, and a cleaner string path, the car suddenly rolls straight and far. It looks effortless, which is funny because it absolutely was not. That moment feels earned. It shows how engineering often works in real life: not with one magical breakthrough, but with observation, adjustment, patience, and the willingness to admit that your first idea was charming but flawed. A mousetrap car may be a tiny project, yet it gives builders a very real taste of design thinking, experimentation, and problem-solving. Plus, when it finally takes off, it is hard not to grin like you have just invented the world’s least practical but most lovable race car.
Final Thoughts
If you want to know how to build a mousetrap car successfully, start simple and test often. Build a straight chassis, keep the axles smooth, give the rear wheels traction, and match the lever arm to your goal. Do not chase perfection on the first try. Chase improvement. The best mousetrap car builders are not the ones who guess correctly on day one. They are the ones who notice what went wrong, tweak the design, and try again.
That is the real magic of this project. Sure, it is fun to build a little spring-powered car. But the bigger win is learning how small design changes create big results. And that, unlike a loose wheel, tends to stick with you.


