Table of Contents >> Show >> Hide
- Quick Table of Contents
- Before you start
- Step 1: Prep the room and subfloor
- Step 2: Layout math (avoid the dreaded skinny row)
- Step 3: Install the planks (row-by-row, click-by-click)
- Step 4: Cuts, door jambs, and obstacles
- Step 5: Finish work (trim, transitions, and protection)
- Troubleshooting: common problems and fast fixes
- Real-world experience: what DIYers wish they knew sooner (extra section)
- SEO Tags
Vinyl plank flooring (often called LVP, for “luxury vinyl plank”) is basically the “I got this” option of DIY floors: tough, good-looking, and forgiving enough that a motivated weekend warrior can install it without learning ancient woodworking spells. Most modern LVP uses a click-lock system that “floats” over the subfloormeaning no nails, no glue, and no tears… ideally.
This guide follows a Family Handyman-style approach: practical, job-site-smart, and focused on the details that make the difference between “Wow!” and “Why does it crunch when I walk there?”
Quick Table of Contents
- Before you start (materials, tools, and planning)
- Step 1: Prep the room and subfloor
- Step 2: Layout math (avoid the dreaded skinny row)
- Step 3: Install the planks (row-by-row, click-by-click)
- Step 4: Cuts, door jambs, and obstacles
- Step 5: Finish work (trim, transitions, and protection)
- Troubleshooting: common problems and fast fixes
- Real-world experience: what DIYers wish they knew sooner (extra section)
Before you start
Pick the right type of vinyl plank (and read the box like it’s the instructions to your spaceship)
Most DIY installs are floating click-lock planks. Some vinyl is glue-down or loose-lay. Your installation steps change a lot depending on the type, so confirm you’re installing the correct system for your product.
Pro tip: Look for notes on the carton about underlayment requirements, expansion gaps, temperature limits, and whether you can install under cabinets or heavy fixed items.
Tools and materials checklist
- Measuring tape, pencil, framing square
- Chalk line (helpful for keeping the first rows straight)
- Utility knife + straightedge (many planks can be score-and-snap)
- Miter saw or jigsaw (for tricky cuts), plus a fine-tooth blade
- Tapping block and pull bar (for tightening joints without damaging edges)
- Spacers (for expansion gap)
- Rubber mallet (not a “take out your frustration” hammer)
- Vacuum/shop vac, broom, and a long straightedge or level
- Underlayment and/or vapor barrier if required by your product
- Transition strips (T-molding, reducer, end cap as needed)
- Baseboards and/or quarter round (or reinstall existing)
How much flooring to buy
Plan on buying extra for cuts and waste. A common rule is around 10% overage for a basic rectangular room, and more for lots of angles, closets, or patterns. (Your future self will thank you when you don’t have to hunt for “one last box” that’s suddenly discontinued.)
Step 1: Prep the room and subfloor
Remove trim and clear the room
Take off baseboards (or at least quarter round), and remove doors if they swing into the room. Label trim pieces if you plan to reuse thembecause “mystery baseboard jigsaw” is not a fun game.
Don’t sand or grind old resilient flooring unless you know what it is
If you’re installing over older vinyl/linoleum or adhesive, be cautious. Some older materials may contain asbestos or silica, and many manufacturers warn against mechanically disturbing them. If you’re unsure, follow local rules and consider professional testing/removal.
Make the subfloor flat, clean, and boring
Vinyl plank wants a subfloor that’s clean, dry, and flat. “Level” is nice, but flat is the big one. High spots can keep joints from locking; low spots can make the floor flex and click (and not in the satisfying “click-lock” way).
Target: Many installation instructions call for a tolerance around 1/8 inch over 6 feet and 1/16 inch over 1 foot. Use a long straightedge to find dips and crowns. Fill low areas with an appropriate patch/leveling compound, and address high spots per subfloor type.
Concrete and moisture: the invisible troublemaker
On concrete, moisture matters. Even “dry-looking” slabs can push vapor upward. Your product may require a vapor barrier (often a poly film) or specific moisture testing before installation. Follow your flooring’s instructionsthis is where warranties go to either live happily or vanish dramatically.
Step 2: Layout math (avoid the dreaded skinny row)
Layout is where pros quietly win. The goal: a balanced look, strong joints, and no last row that’s thinner than a celery stick.
Choose direction
A common approach is to run planks parallel to the longest wall for a visually larger feel. If you have strong natural light in one direction, many installers also like to run planks with the light to make seams less noticeable. But the best direction is also the one that avoids weird slivers at walls and helps flow through doorways.
Do a quick “last row” check
Measure the room width (perpendicular to plank direction). Subtract your two expansion gaps. Divide by plank width to see what your last row would be.
Example: Room width is 121 inches. You need 1/4 inch expansion gap on both sides (1/2 inch total), so usable width is 120.5 inches. If your plank is 7 inches wide: 120.5 ÷ 7 = 17 full rows (119 inches) plus 1.5 inches leftover. That last row would be ~1.5 inchestoo skinny. Fix it by ripping the first row narrower so the last row ends up wider (aim for at least ~2.5–3 inches if you can).
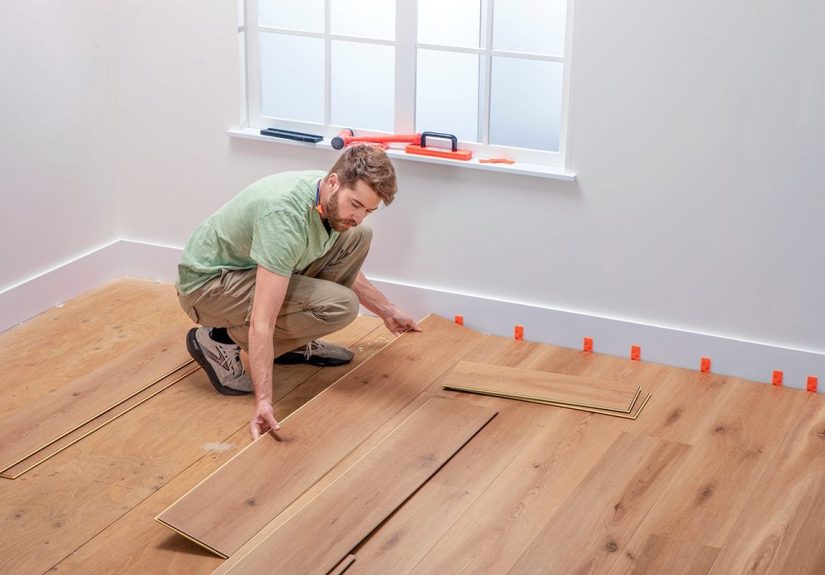
Step 3: Install the planks (row-by-row, click-by-click)
1) Establish your starting wall and expansion gap
Most installs begin along the straightest wall. Place spacers so you maintain a 1/4-inch expansion gap at walls and vertical obstructions (pipes, posts, etc.). Floating floors need room to expand and contract with temperature changes.
2) Start the first row
Many click-lock systems install easiest with the groove side facing out, and the tongue/cut side toward the starting wall. Some guides recommend trimming the short tongue edge on the first plank so it sits cleanly against spacers. Follow your plank’s locking profile instructions.
- Set the first plank with spacers in place.
- Add the next plank end-to-end, locking the short joint as directed (often angle-in and drop).
- Continue to the end of the row, then cut the last plank to length (remember the expansion gap at the end wall too).
3) Stagger end joints (for strength and style)
Don’t stack end joints like bricks in a cartoon wall. Many instructions call for a minimum 6-inch stagger between end joints from row to row. This improves stability and looks more natural.
Easy method: Use the leftover cutoff from the end of Row 1 to start Row 2if it’s long enough to meet the minimum stagger. If it’s too short, cut a starter piece that works.
4) Lock long seams and keep joints tight
Most systems use an angle-and-click action on the long side. Work steadily and keep the seam cleantiny debris can keep the lock from fully seating.
- Angle the plank into the groove of the previous row.
- Lower it to engage the long joint.
- Lock the short end joint to the previous plank in the row.
- Use a tapping block only if your system allows it, and tap gently to avoid damaging edges.
Quality check every few rows: Step back and sight down the seams. If the floor starts “walking” off-square, it’s easier to correct early than after you’ve installed half the room and emotionally bonded with it.
Step 4: Cuts, door jambs, and obstacles
Undercut door jambs (so the floor slides under, not into a fight)
Undercutting door casing lets the plank slide underneath for a clean look while still allowing the floating floor to move. A common trick is to place a scrap piece of flooring (plus underlayment if used) against the jamb as a height guide, then cut carefully.
Cutting planks: score-and-snap vs. saw
Many vinyl planks cut well by scoring the face with a utility knife and snapping. For notches, vents, and curved cuts, a jigsaw is your friend. Use a fine-tooth blade and support the plank to reduce chipping.
Pipes and floor registers
For a pipe, measure carefully, drill a hole slightly larger than the pipe (so you can maintain expansion space), and cut a slit to the hole if needed to fit the plank around it. Cover the gap with a trim ring/escutcheon if desired.
Step 5: Finish work (trim, transitions, and protection)
Install transitions the right way
At doorways and where LVP meets other flooring, use the appropriate transition (often a T-molding). The key rule: don’t pin the floating floor. Fasten transitions to the subfloor (or use an approved track), and leave the required small movement gap so the LVP can expand.
Reinstall baseboards (and don’t nail into the floor)
Baseboards and quarter round should be attached to the wallnot through the planks. Leave a tiny clearance so the floor can move underneath without squeaking.
Protect the floor immediately
Use felt pads under furniture, avoid dragging appliances across the surface, and cover the floor with protective sheets if other work is still happening. Vinyl is tough, but it’s not invincibleespecially at the edges during the first few days when you’re still moving everything back in place.
Troubleshooting: common problems and fast fixes
Problem: Joints won’t lock or keep popping open
- Likely causes: subfloor isn’t flat, debris in the groove, plank edge damage, or forcing the wrong locking angle.
- Fix: vacuum seams, re-seat the plank, and re-check flatness. If the subfloor flexes, patch/level the area.
Problem: Crunchy sounds when walking
- Likely causes: grit under the planks, loose debris in the click system, or movement over a low spot.
- Fix: clean thoroughly and correct low spots; ensure underlayment/vapor barrier isn’t wrinkled.
Problem: Buckling or “tenting”
- Likely causes: no expansion gap, trim/transition pinching the floor, or temperature/sunlight extremes.
- Fix: confirm 1/4-inch gap at walls and vertical surfaces, relieve pinch points, and follow the product’s guidance for sun-heavy areas.
Problem: The floor looks “random” in the wrong way
Mix planks from multiple boxes as you install. This helps distribute color variation and prevents “one box is darker” stripes. Your floor should look intentionalnot like it’s trying to camouflage itself.
Real-world experience: what DIYers wish they knew sooner (extra section)
Let’s talk about the part no one brags about on social media: the moments where you realize vinyl plank flooring is “easy” the same way tacos are “easy”right up until you’re making them for twelve people and someone says, “Can you do gluten-free, too?”
1) Prep is the actual project. Many DIYers go in thinking installation is the big challenge, then discover the truth: subfloor prep is where time goes. The first few rows can feel smooth and confidence-boosting, but if you didn’t flatten the floor, the planks start telling on you later. Joints won’t sit tight. You’ll get tiny vertical “lips.” You’ll hear a click underfoot that sounds like a polite complaint. The fix is rarely “tap harder.” It’s usually “I should’ve filled that dip.” A good rule is: if you can rock a straightedge, your floor will rock your patience.
2) The first row is your steering wheel. If your first row drifts off-square by even a little, the entire floor gradually skews until your last row looks like it’s trying to escape through the wall. People often learn this after installing five rows, stepping back, and feeling that sinking sensationlike when you realize you’ve been sending emails with a typo in your signature for months. Snap a chalk line, check alignment every couple of rows, and don’t be afraid to reset early. It feels like “losing progress,” but it’s actually buying a straight floor.
3) Door jambs are the boss level. Cutting around door trim without undercutting can turn into a jigsaw puzzle where the prize is… still an ugly gap. DIYers who undercut jambs (carefully) almost always end up happier with the final look. It also prevents the floating floor from getting trappedbecause a trapped floor tends to announce itself with buckling in the most visible spot possible (usually the doorway you use every day).
4) Stagger planning saves you from “pattern panic.” A lot of people start with good intentionsrandom staggering!and then accidentally repeat the same offset every row, creating a very obvious “stair-step” pattern. The trick is simple: keep an eye on the last few rows and vary your starters. If you’re using the cutoff to start the next row, occasionally force a different length so the pattern stays natural. Your future guests won’t consciously notice good staggering, but they’ll absolutely notice bad staggering (and then they’ll pretend they didn’t notice, which is worse).
5) Your knees and your blade choices matter. Vinyl plank installs involve a lot of kneeling, bending, and getting up like a creaky folding chair. Knee pads are not a luxury; they’re a friendship offering to your joints. Also, cutting is smoother with the right blade. A dull knife makes score-and-snap messy. A rough saw blade chips edges. Many “my planks don’t fit” stories are really “my cuts aren’t square” stories.
6) The finish work is where it looks professional. Reinstalling baseboards cleanly, choosing the right transitions, and keeping the floor free to move (not pinned by trim) is what turns a DIY floor into a “wait, you did this yourself?” floor. Take your time here. You already did the hard partdon’t fumble at the one-yard line with a rushed quarter-round install.
Bottom line: Installing vinyl plank flooring is very doablebut the “secret sauce” is patience, subfloor flatness, and treating the first rows like they’re the foundation of a skyscraper (a very stylish, walkable skyscraper).