Table of Contents >> Show >> Hide
- Before You Start: Identify What You’re Fixing
- Tools & Supplies Checklist
- The 14-Step Repair Method
- Step 1: Remove laces and stabilize the shoe
- Step 2: Dry brush to remove grit
- Step 3: Wipe down with a barely damp cloth
- Step 4: Try the easiest fix first (buff the scuff)
- Step 5: Lift transfer marks (eraser method)
- Step 6: Clean the area properly
- Step 7: Let the leather dryfully
- Step 8: For faint scuffs, warm-and-massage (optional)
- Step 9: Condition to restore flexibility
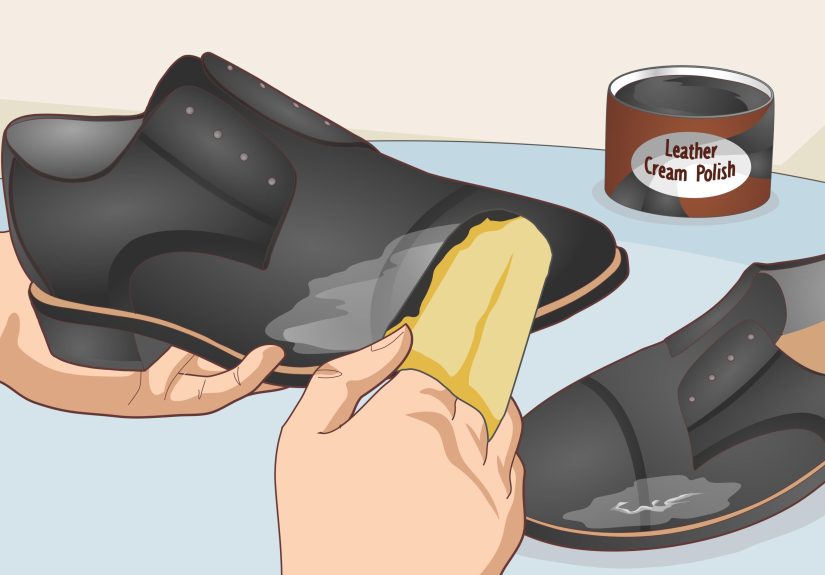
- Step 10: Rebuild color with cream polish (the real scuff-coverer)
- Step 11: Layer for blending (thin coats win)
- Step 12: Handle deeper scratches (smoothing + filler if needed)
- Step 13: Seal and shine with wax polish (optional, but satisfying)
- Step 14: Finish the edges and protect against future scuffs
- Common Mistakes That Make Scuffs Worse
- When You Should Call a Cobbler
- Field Notes: 5 Real-World “Scuff Situations” (and What Actually Works)
- Conclusion
Scuffed leather shoes are like a tiny loudspeaker announcing, “I walked outside today.” The good news: most scuffs are
superficial, and even the uglier ones can usually be tamed with the right combo of cleaning, conditioning, and color.
This guide walks you through a practical, at-home method to repair scuffed leather shoes without turning your
living room into a chemistry lab (or your shoes into modern art).
Before You Start: Identify What You’re Fixing
Not all scuffs are created equal. Treat the wrong problem with the wrong product and you’ll get a new problem: a weirdly
shiny toe that looks like it’s auditioning for a disco revival.
Quick scuff “diagnosis”
- Surface transfer: A mark from rubber, paint, or whatever that curb was made of. Usually wipes off.
- Color loss: The leather looks lighter where it scuffed. Needs pigment (cream polish) to blend.
- Scratch/gouge: You can feel an edge or roughness with your fingernail. Might need filler + smoothing.
- Finish damage: The coating looks cloudy or cracked. You can improve it at home, but perfection may require a cobbler.
Tools & Supplies Checklist
You don’t need a museum-grade kit. You need the basicsand a little patience.
- Shoe trees (or clean socks/newspaper for stuffing)
- Horsehair brush (or a soft shoe brush)
- 2–3 clean microfiber or cotton cloths
- Leather cleaner (or saddle soap if you already use it)
- Leather conditioner
- Cream polish close to your shoe color (key for covering scuffs)
- Wax polish (optional, for extra shine and protection)
- Cotton swabs (precision work on small scuffs)
- White pencil eraser or melamine “magic” eraser (use gently, test first)
- Very fine sandpaper/emery board (optional, for raised scratch edges)
- Leather repair cream/filler (optional, for deeper gouges)
- Edge dressing/sole edge product (optional, for the “finished” look)
The 14-Step Repair Method
These steps are written for smooth leather dress shoes and most smooth-finish boots. If your leather is suede or nubuck,
stop here and use suede-specific toolsotherwise you’ll turn soft texture into sad texture.
Step 1: Remove laces and stabilize the shoe
Take off the laces so you can clean the tongue and eyelet area properly. Insert shoe trees (best) or stuff the toe and vamp
firmly. A stable surface keeps you from “polishing” new wrinkles into the leather.
Step 2: Dry brush to remove grit
Brush the entire shoe with a horsehair brush. This is not busywork: grit acts like sandpaper when you rub, and that’s the
opposite of “repair.”
Step 3: Wipe down with a barely damp cloth
Lightly wipe the shoe to remove remaining dust. Don’t soak leatherthink “morning dew,” not “tropical storm.”
Step 4: Try the easiest fix first (buff the scuff)
For many surface scuffs, brisk buffing with a soft cloth or brush is enough. Use short, firm strokes and check the mark
from different angles under light.
Step 5: Lift transfer marks (eraser method)
If the scuff looks like material on top of the leather, gently rub it with a white pencil eraser.
Work slowly. If you use a melamine “magic” eraser, use feather-light pressure and test in an inconspicuous area first
it can be mildly abrasive and may dull delicate finishes.
Step 6: Clean the area properly
Apply a small amount of leather cleaner (or saddle soap if that’s your normal routine) to a cloth and clean the scuffed zone,
then blend outward. The goal is to remove grime and old wax so your color and conditioner can absorb evenly.
Step 7: Let the leather dryfully
Give it at least 20–30 minutes (longer if you used more cleaner). Leather that’s still damp can darken unevenly when you
add product, which is how “repair” becomes “why is my toe two different colors?”
Step 8: For faint scuffs, warm-and-massage (optional)
Some light scuffs are just displaced oils. You can try warming the area gently (your hand warmth is safest), then massaging
in small circles with a cloth. If you use a hair dryer, keep it on low, keep distance, and keep movingno heat blasting.
Overheating can dry out leather or warp finishes.
Step 9: Condition to restore flexibility
Apply a thin coat of leather conditioner to the shoe (or at least the repaired area plus surrounding panels). Conditioning
helps prevent the scuffed spot from looking dry and “chalky” after you recolor.
Step 10: Rebuild color with cream polish (the real scuff-coverer)
Use a cream shoe polish that closely matches your leather color. Apply a tiny amount firstespecially on the scuffed spot.
Use cotton swabs for precision on small marks (like toe scuffs). Let it dry, then buff lightly.
Step 11: Layer for blending (thin coats win)
If the scuff still shows, repeat with another thin layer rather than one thick one. Thick polish tends to cake, crack, or look
like makeup in the wrong shade. Build coverage until the repaired area blends with the rest of the shoe.
Step 12: Handle deeper scratches (smoothing + filler if needed)
If a scratch has a raised edge, you can very gently smooth it with ultra-fine sandpaper or an emery boardcarefully, and only
on the raised ridge. If there’s a small gouge, apply a leather repair cream/filler according to its instructions, let it cure,
then smooth lightly. After that, return to cream polish to restore color.
Step 13: Seal and shine with wax polish (optional, but satisfying)
Wax polish adds extra protection and a higher shine, especially on toe caps. Apply a small amount in light circular motions,
let it haze, then brush and buff. If you like a high gloss, you can use a tiny bit of water on your cloth while buffingjust
don’t overdo it.
Step 14: Finish the edges and protect against future scuffs
If the shoe edge or sole edge looks scuffed, touch it up with edge dressing or a dedicated edge product. Then consider a
protective step: rotate shoes, store with shoe trees, and use a weather-appropriate protector. For work boots that get
hammered at the toe, toe protection products exist for a reason.
Common Mistakes That Make Scuffs Worse
- Skipping cleaning: Polish over dirt = gritty rubbing + uneven color.
- Over-wetting: Water can stain, swell leather fibers, and cause blotchy darkening.
- Too much product: Thick layers crack and look unnatural. Thin coats blend better.
- Wrong color match: “Close enough” is fine, but wildly off is… noticeable.
- Heat aggression: Leather is tough, but not “hold my beer” tough.
When You Should Call a Cobbler
Home repair is great for scuffs and many scratches. But a cobbler is your best bet if:
- The leather is torn or deeply gouged across a large area
- The finish is cracking or peeling extensively
- Stitching is damaged near the scuff
- You need an exact color match on high-end shoes (especially lighter tones)
Field Notes: 5 Real-World “Scuff Situations” (and What Actually Works)
To make this guide feel less like a lab manual and more like real life, here are common scenarios that mirror what most
people mean when they say, “I scuffed my leather shoes… help.”
1) The Sidewalk Ambush (aka “I swear the curb moved”)
This is the classic toe scuff: you clip a curb, a stair edge, or that one concrete corner that has beef with everyone.
Most of the time, the damage is color loss on the very top grain. The win here is cream polish in thin layers.
Clean first (don’t grind grit in), condition lightly, then dab cream polish with a cotton swab. If you rush and smear a thick coat,
you’ll get a darker, patchy toe that looks like it lost a fight with a chocolate bar.
2) The Airport Roller-Bag Drive-By
A suitcase wheel scuffs the side of your shoe in a line. These often look like surface transferrubber or grime sitting on top.
Before you reach for polish, try buffing with a dry cloth and then the white eraser trick. If the mark lifts, you just saved yourself
20 minutes and prevented unnecessary product buildup. If it doesn’t lift and the leather looks lighter, then switch to cream polish.
3) The “Office Chair Swipe” (mysterious black streaks)
Desk chairs, chair legs, and random plastic edges love leaving dark streaks. Again: think transfer mark first.
Gentle eraser, then mild leather cleaner. If you’re dealing with glossy finished leather, go slow and test firstover-scrubbing can
dull shine. Once the streak is gone, a light conditioner and a quick buff usually restores a natural look.
4) The Winter Salt Ring (the scuff’s annoying cousin)
Salt stains can appear near toe scuffs and make everything look worse. If you see a white ring or haze after a wet day,
clean first and consider a diluted vinegar-and-water wipe (lightly, and test first), then let the shoe dry completely.
Condition afterward. Salt dries leather out, and dry leather highlights scuffs like a spotlight.
5) The Work-Boot Toe Grind (kneeling, scraping, repeat)
If your toe scuffs come from kneeling or dragging your toes at work, you’re fighting physics. You can keep covering scuffs with
colored boot cream and wax, but for chronic toe damage, prevention matters. Consider a toe protection product designed for work boots.
It’s not “overkill”it’s basically a helmet for the part of your boot that takes the hits.
The big lesson across all these situations: start gentle, then escalate only as needed. Cleaning + thin color layers beats
aggressive scrubbing + thick polish nine times out of ten. The tenth time? That’s when you make friends with a cobbler.
Conclusion
Repairing scuffed leather shoes isn’t magicit’s method. Brush off grit, clean the surface, condition for flexibility,
rebuild color with cream polish, and (optionally) seal with wax for shine and protection. Do it calmly, in thin layers,
and your shoes will look less “battle-worn” and more “tastefully lived-in.”