
Table of Contents >> Show >> Hide
- What Bleed Means in Illustrator
- Why Bleed Matters Before You Hit Print
- How to Add Bleed in Illustrator: 15 Simple Steps
- Step 1: Check Your Printer’s Required Bleed Size
- Step 2: Open Your Illustrator File or Create a New One
- Step 3: Set the Correct Final Trim Size First
- Step 4: Go to File and Open Document Setup
- Step 5: Enter the Bleed Amount
- Step 6: Look for the Red Bleed Boundary
- Step 7: Extend Background Colors to the Bleed Line
- Step 8: Stretch Photos Carefully, Not Recklessly
- Step 9: Keep Text and Logos Inside the Safe Zone
- Step 10: Turn on Rulers and Guides for Better Control
- Step 11: Check Color Mode for Print
- Step 12: Review Edge Objects One More Time
- Step 13: Save the File as a PDF
- Step 14: Open Marks and Bleeds in the PDF Settings
- Step 15: Check Use Document Bleed Settings and Export
- Common Mistakes to Avoid
- Bonus Tip: Use Newer Illustrator Tools When Available
- Final Thoughts
- Experience Notes: What Designers Usually Learn the Hard Way
- SEO Tags
Let’s be honest: bleed is not the glamorous part of design. Nobody wakes up, stretches dramatically, and says, “Ah yes, today I shall conquer print production.” But if you are sending artwork to a printer, bleed is the tiny hero that keeps your beautiful design from coming back with awkward white edges that look like your file got stage fright.
If you have ever wondered how to add bleed in Illustrator without turning the whole document into a chaotic guessing game, this guide walks you through it step by step. You will learn what bleed actually is, why printers care so much about it, how to set it up in Adobe Illustrator, and how to export a print-ready PDF without unpleasant surprises. We will also cover the classic mistakes people make, because learning from other people’s headaches is one of life’s great bargains.
What Bleed Means in Illustrator
In plain English, bleed is the extra artwork that extends past the final trim size of your printed piece. If your business card, flyer, poster, or postcard is supposed to print all the way to the edge, your background colors, photos, or shapes need to continue beyond the trim line. That extra area gives the printer a little breathing room when the paper is cut.
Without bleed, even a tiny shift during trimming can leave a hairline of white on the edge. And those tiny white slivers? They have a magical ability to make a perfectly good design look unfinished. Illustrator makes bleed fairly easy to manage, but only if you set it up correctly and remember to include it when exporting.
Why Bleed Matters Before You Hit Print
Bleed matters because print is a physical process, not a digital fairy tale where every cut lands with laser-perfect drama. Commercial printers trim stacks of paper, and tiny movement happens. That is normal. Bleed protects edge-to-edge artwork from those small shifts.
For many standard print jobs in the United States, a bleed of 0.125 inch on all sides is common. Some larger pieces or specialty products may need more, so it is always smart to check the print specs first. Think of bleed as insurance for your layout. It does not cost much effort, but it saves a lot of regret.
How to Add Bleed in Illustrator: 15 Simple Steps
Step 1: Check Your Printer’s Required Bleed Size
Before touching your file, check the printer’s instructions. Many standard jobs use 0.125 inch bleed on all sides, but not every print shop uses the exact same setup. Posters, packaging, and large-format pieces may ask for a larger bleed. Starting with the printer’s specs saves you from rebuilding the file later, which is the design equivalent of assembling furniture and then discovering you did it upside down.
Step 2: Open Your Illustrator File or Create a New One
You can add bleed to a brand-new document or to an existing file. If you are just starting, this is the perfect moment to set bleed correctly from the beginning. If the design already exists, do not panic. Illustrator still lets you add bleed later through the document settings.
Step 3: Set the Correct Final Trim Size First
Your artboard should represent the final trimmed size of the printed piece, not the trim size plus bleed. For example, if the finished flyer will be 8.5 by 11 inches, set the artboard to 8.5 by 11. The bleed lives outside that artboard. This part matters because making the artboard larger to “fake” bleed can create confusion when you export crop marks or hand files off to a printer.
Step 4: Go to File and Open Document Setup
In Illustrator, the easiest route is File > Document Setup. This is where you add or edit bleed values for the document. If you are working on an existing design, this is the moment where Illustrator politely says, “Sure, I can fix this, but now you have to extend your artwork too.”
Step 5: Enter the Bleed Amount
In the Bleed section, enter the amount your printer requires. For many jobs, type 0.125 in for top, bottom, left, and right. If the little link icon is active, changing one value updates all four sides at once. That is convenient unless you are intentionally using different bleed values for a special project, which most people are not doing on a random Tuesday.
Step 6: Look for the Red Bleed Boundary
Once bleed is added, Illustrator shows a red boundary outside the artboard. That line is your visual reminder that the design does not stop at the trim edge. If you do not see artwork reaching that red line, you are not actually using the bleed yet. You just invited it over and forgot to make room on the couch.
Step 7: Extend Background Colors to the Bleed Line
Any background that touches the edge of the final printed piece should extend all the way to the red bleed guide. Solid color fills, full-page photos, textures, gradients, and edge-to-edge shapes should all continue into that outer area. If the design stops at the artboard edge, the printer can still cut perfectly and you can still end up with white borders. Print is rude like that.
Step 8: Stretch Photos Carefully, Not Recklessly
If you are using photos, extend them into the bleed without distorting the image. Scale proportionally and make sure the composition still looks right. A full-bleed image that suddenly turns people into funhouse mirrors is technically printed to the edge, but emotionally it is still a failure. Use linked high-resolution images when possible so the print holds up well.
Step 9: Keep Text and Logos Inside the Safe Zone
Bleed is for backgrounds and edge-touching artwork, not for important text. Keep headlines, logos, contact details, and anything critical safely inside the trim line. A practical safety margin is at least 0.125 inch inside the trim, and many designers prefer 0.25 inch for a more comfortable buffer. That way, if the cut shifts slightly, the text does not end up looking like it is trying to escape the page.
Step 10: Turn on Rulers and Guides for Better Control
Illustrator does not automatically give you rich margin tools the way some page-layout software does, so guides are your friend. Turn on rulers and drag guides where you want your trim-safe area to sit. This makes it much easier to align text, logos, and key design elements consistently. Guides are boring in the same way seat belts are boring: not exciting, extremely useful.
Step 11: Check Color Mode for Print
If the file is meant for professional printing, make sure you are designing with print in mind. Many print workflows prefer CMYK rather than RGB because on-screen color and printed color are not identical twins. They are more like cousins who look similar in photos but behave differently at family events. If your printer has specific color requirements, follow those exactly.
Step 12: Review Edge Objects One More Time
Zoom in and inspect every edge of the artboard. Does every photo, block of color, and decorative shape that should print to the edge extend to the bleed? This review is important because files often look correct at normal zoom even when they stop a hair short. One tiny gap is all it takes to invite a white line into your life.
Step 13: Save the File as a PDF
When the design is ready, save or export it as an Adobe PDF. Illustrator supports both a Save As and Export workflow for PDF creation. For print jobs, you generally want a high-quality PDF, not a tiny web-optimized file that treats resolution like an optional personality trait.
Step 14: Open Marks and Bleeds in the PDF Settings
In the PDF dialog box, go to the Marks and Bleeds section. This is where many designers accidentally ruin an otherwise perfect setup by forgetting to include the bleed in export. You can build the bleed beautifully inside the document and still chop it off at the last second if you skip this panel. Tragic, but common.
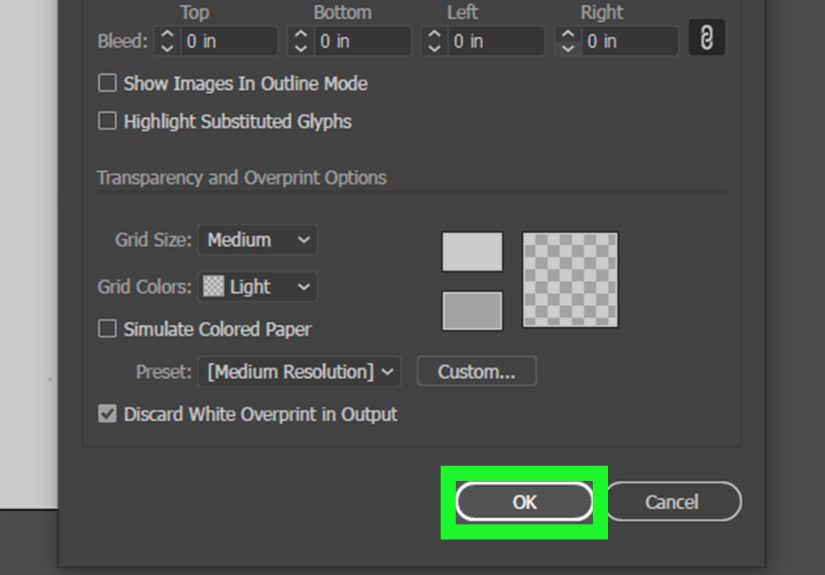
Step 15: Check Use Document Bleed Settings and Export
Select Use Document Bleed Settings so the PDF includes the bleed values you already defined in Illustrator. If your printer requests trim marks, add them here too. Just remember that the offset for printer’s marks should be greater than the bleed amount, so the marks do not land awkwardly on top of the bleed area. Then export the PDF and do one final review before sending it out.
Common Mistakes to Avoid
Forgetting to Extend the Artwork
Adding a bleed value in Document Setup does not magically stretch your artwork. Illustrator creates the bleed area, but you still need to extend the edge elements into it. The red line is not decorative. It is a job description.
Making the Artboard Bigger Instead of Adding Bleed
Your artboard should stay at the final trim size. If you enlarge the artboard to include bleed, you blur the difference between trim and extra print area. That can create incorrect crop marks and a confused printer, which is not the energy you want in production.
Placing Text Too Close to the Edge
Even if nothing gets cut off, text too close to the trim line can look cramped and accidental. Use a comfortable safe zone so the layout feels intentional. Good print design should look confident, not like it is nervously leaning over a cliff.
Exporting Without Bleed
This is the classic blunder. The file is set up correctly, but the PDF is exported without the bleed included. Always double-check the Marks and Bleeds panel before saving the final PDF.
Ignoring the Printer’s Specs
Some printers want PDF/X presets, specific color profiles, outlines, embedded fonts, or larger bleed for special products. Your local settings are helpful, but the printer’s instructions win every time. In print, the final boss is always the production spec sheet.
Bonus Tip: Use Newer Illustrator Tools When Available
Some recent Illustrator workflows include newer print-bleed assistance features that can help extend artwork more quickly, especially when you need to continue a background or image naturally into the bleed area. That can be a nice shortcut, but it does not replace checking the result manually. The software may be smart, but your eyeballs are still in charge.
Final Thoughts
Learning how to add bleed in Illustrator is one of those small design skills that makes a big difference in real-world results. It is not flashy, but it is one of the clearest signs that a file was prepared by someone who understands print. Once you get used to setting bleed, extending edge artwork, protecting the safe zone, and exporting with the correct PDF settings, the process becomes second nature.
And that is the real goal: fewer reprints, fewer white edges, fewer printer emails that begin with “Hi, quick question about your file…” Set the bleed, respect the trim, and let your design go to press looking polished and professional.
Experience Notes: What Designers Usually Learn the Hard Way
The funny thing about bleed is that most people do not truly respect it until it betrays them once. The first time I saw a printed flyer come back with a whisper-thin white edge, I stared at it like it had personally insulted my family. On screen, the file looked perfect. In print, it looked like the design had flinched. That is usually the moment bleed stops being “some printer thing” and becomes “oh, this is absolutely my problem now.”
Another common experience happens when someone adds bleed late in the process. Technically, Illustrator lets you do that, which is helpful. Emotionally, however, it can feel like renovating a kitchen after the cabinets are already installed. Suddenly the background photo is too tight, the colored bar does not reach far enough, and the decorative border that looked elegant at trim size now has to be rethought. It is fixable, but it is rarely graceful.
Designers also learn that full-bleed layouts require more discipline than bordered layouts. A design with a white margin can hide small positioning issues. A full-bleed design does not hide anything. If a photo is slightly off, if text is too close to the edge, or if one shape ends a fraction too early, print will expose it with the ruthless honesty of a high-definition mirror.
There is also the PDF moment. You export the file feeling accomplished, maybe even a little smug, then open the PDF and realize the bleed is missing because you forgot to check one tiny box. That box, of course, is Use Document Bleed Settings, and forgetting it is almost a rite of passage. Once it happens to you, it tends to happen exactly one fewer times.
Over time, the experience becomes less dramatic and more methodical. You build a rhythm. Check the final size. Add the bleed. Extend the backgrounds. Protect the safe zone. Export carefully. Review the PDF. That routine is boring in the best possible way because boring workflows usually produce dependable print files.
Perhaps the biggest lesson is that bleed is not there to make design harder. It is there to make real-world printing more forgiving. Paper shifts. Blades trim. Machines behave like machines. Bleed is simply how smart designers leave room for reality. Once you accept that, the whole process feels much less annoying and much more professional.
SEO Tags
Note: This HTML body is ready for web publishing and has been cleaned of unnecessary source artifacts such as contentReference tags.


