
Table of Contents >> Show >> Hide
- What an Excel footer is (and why it “disappears”)
- Before you start
- How to Add a Footer in Excel: 11 Steps
- Step 1: Open the worksheet you plan to print (and save it)
- Step 2: Go to the Insert tab and choose Header & Footer
- Step 3: Confirm you’re in Page Layout view
- Step 4: Scroll to the bottom of the page and click “Click to add footer”
- Step 5: Choose your footer section: Left, Center, or Right
- Step 6: Type your custom footer text (keep it short and useful)
- Step 7: Insert built-in footer elements (page numbers, date, file name)
- Step 8: Add a logo or image (optional, and best used sparingly)
- Step 9: Adjust footer behavior (Different First Page, Odd/Even pages, scaling)
- Step 10: Apply the same footer to multiple worksheets (the smart time-saver)
- Step 11: Preview your footer and fine-tune margins
- Footer templates that look professional
- Troubleshooting: when your footer won’t behave
- Extra tips that make you look like the Excel person in the room
- Experiences: of Real-World Footer Lessons
- Conclusion
- SEO Tags
Adding a footer in Excel is one of those “adulting” moves that instantly makes a spreadsheet look like it owns a briefcase. Whether you’re printing invoices, school projects, timesheets, or a report that needs to scream “yes, this is the final version”, a good footer helps every page stay identifiableespecially when the pages inevitably get separated (because printers love chaos).
In this guide, you’ll learn exactly how to add a footer in Excel in 11 clear steps, plus how to insert page numbers, dates, file names, sheet names, and even a logowithout turning your spreadsheet into a banner ad.
What an Excel footer is (and why it “disappears”)
An Excel footer is text or elements that show up at the bottom of each printed page (or in Page Layout view). It usually includes helpful details like page numbers, dates, workbook names, confidentiality notes, or department names.
Here’s the part that trips people up: footers don’t show in Normal view. If you’re in the usual grid view and thinking, “I added a footer… where did it go?”it’s not gone. It’s just living its best life in Page Layout view and in printouts.
Before you start
- Decide what the footer should do: Identify pages (page numbers), label documents (file/sheet name), or brand reports (company name/logo).
- Keep it readable: Footers are small by naturedon’t cram a novel into the bottom margin.
- Know your goal: If you’re printing, always verify in Print Preview. If you’re exporting to PDF, preview there too.
How to Add a Footer in Excel: 11 Steps
-
Step 1: Open the worksheet you plan to print (and save it)
Open your Excel workbook and click into the worksheet where you want the footer. Save firstbecause printing settings have a talent for becoming “mysteriously different” later.
-
Step 2: Go to the Insert tab and choose Header & Footer
On the Ribbon, click Insert, then look for Header & Footer (usually in the Text group). Excel will switch you into Page Layout view automatically.
-
Step 3: Confirm you’re in Page Layout view
You’ll know you’re in the right place when the worksheet looks like printable pages instead of an endless grid. This view is where headers and footers are visible and editable.
-
Step 4: Scroll to the bottom of the page and click “Click to add footer”
At the bottom margin of the page, you’ll see a prompt like Click to add footer. Click itthis activates the header/footer editing area and reveals the Header & Footer tools on the Ribbon.
-
Step 5: Choose your footer section: Left, Center, or Right
Excel footers have three boxes (left, center, right). This is perfect for common layouts like:
- Left: Department or workbook name
- Center: Report title or “Confidential”
- Right: Page numbers and date
Click the section you want to edit, then start typing.
-
Step 6: Type your custom footer text (keep it short and useful)
Add the text you wantlike “Q1 Sales Report” or “Prepared for: Accounting”. If you want a line break in the footer, press Enter.
Real-world tip: If you need to include an ampersand (
&) in plain text (like R&D), you may need to type it as&&so it prints correctly (Excel treats some&patterns as special codes). -
Step 7: Insert built-in footer elements (page numbers, date, file name)
With the footer box selected, use the Header & Footer Elements buttons to insert dynamic infothings Excel updates automatically. Common choices:
- Page Number (great for “Page 1”)
- Number of Pages (for “Page 1 of 6”)
- Current Date / Current Time
- File Name and Sheet Name
- File Path (helpful in corporate shared-drive land)
Example: Click in the right footer box and insert Page Number, type of , then insert Number of Pages. You’ll end up with a classic Page 1 of 6 style footer that stays correct even if pages change.
-
Step 8: Add a logo or image (optional, and best used sparingly)
Want branding? You can insert a picture into a header or footer (often used for logos). After inserting, Excel may display a placeholder like a picture code until you click away.
Keep it subtle. A small logo can look polished; a giant logo can look like your spreadsheet is running for office.
-
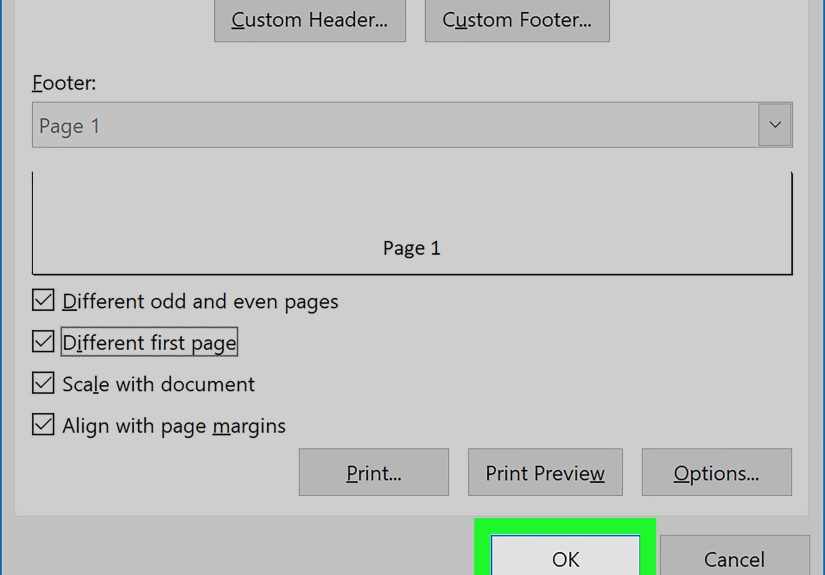
Step 9: Adjust footer behavior (Different First Page, Odd/Even pages, scaling)
On the Header & Footer tools (often a Design tab), look for options like:
- Different First Page: Useful if page 1 is a cover page and shouldn’t have a footer.
- Different Odd & Even Pages: Helpful for booklet-style printing.
- Scale with Document: Keeps footer scaling consistent with your worksheet scalingor lets you decouple it.
- Align with Page Margins: Makes the footer line up nicely with your left/right margins.
These settings are where you go from “I added a footer” to “this looks like a real report.”
-
Step 10: Apply the same footer to multiple worksheets (the smart time-saver)
If you want the same footer across several sheets, you have two practical approaches:
- Group sheets: Select multiple sheet tabs (Shift for a range, Ctrl for non-adjacent), then add the footer once. (Just remember to ungroup afterward so you don’t accidentally edit every sheet later.)
- Use Page Setup: Go to Page Layout > open the Page Setup dialog (small launcher arrow), then use the Header/Footer tab and choose Custom Footer. This is especially handy when you’re managing several sheets at once.
-
Step 11: Preview your footer and fine-tune margins
Go to File > Print to see Print Preview. Confirm the footer appears where you want and isn’t being cut off. If it looks cramped, adjust margins (or header/footer spacing) using Page Setup or margin controls in Print Preview.
If your footer seems “too high” or “too low,” it’s usually a margins issue, a scaling issue, or your printer’s unprintable area. A quick preview can save you from producing 20 pages of disappointment.
Footer templates that look professional
Template A: Classic report footer
- Left: File Name
- Center: Report title (e.g., “Monthly Operations Summary”)
- Right: Page X of Y
Template B: Light compliance vibe (without being dramatic)
- Left: Department
- Center: “Internal Use Only”
- Right: Current Date
Template C: School or training assignment
- Left: Your name
- Center: Class / period
- Right: Page Number
Troubleshooting: when your footer won’t behave
“I added a footer, but I can’t see it.”
Switch to Page Layout view. Footers don’t display in Normal view. Also check Print Previewif it shows up there, you’re good.
“My footer prints, but it’s cut off.”
Increase bottom margin, reduce footer text, or adjust scaling. Some printers can’t print close to the page edge, so a footer that looks fine on-screen can get clipped in real life.
“Page numbers are wrong after I changed the print area.”
Print area and page breaks affect page count. Re-check Print Preview, then confirm your page breaks and scaling settings. If you want a custom starting page number, use Page Setup to change the first page number.
“I’m using Excel in a browser and I don’t see Header & Footer.”
Some web-based Excel experiences have limited print layout features. If you don’t see Header & Footer tools, open the workbook in the desktop app to add or edit footers, then return to the browser version if needed.
Extra tips that make you look like the Excel person in the room
- Don’t over-format: Simple text beats decorative fonts almost every time.
- Use dynamic elements: File name and page numbers prevent “Which version is this?” panic.
- Match margins: Aligning the footer with page margins makes the whole page look intentional.
- Keep it consistent: If you’re printing multiple worksheets, standardize the footer across them.
Experiences: of Real-World Footer Lessons
Footers sound boring until you’ve lived through the “mystery spreadsheet” moment. You know the one: you print a report, walk away for thirty seconds, and come back to a pile of pages that all look suspiciously similarlike clones who refuse to introduce themselves. That’s when you realize a footer isn’t just decoration; it’s a tiny ID badge for each page.
One of the best practical uses is adding Page X of Y. It feels basic, but it prevents the classic “Is page 3 missing?” argument that magically appears during meetings. I’ve seen teams waste time flipping pages like they’re auditioning for a magician role, only to realize the printer shuffled everything. A page-number footer makes the fix instant: sort the pages, spot the missing number, reprint only what you need. It’s like giving your report a map instead of letting everyone wander.
The second big win is inserting the file name or sheet name. This matters more than people expect, especially in shared folders where files get copied, renamed, and “final_final_really_final.xlsx” becomes a lifestyle. When the file name prints in the footer, you can trace a page back to its source without playing detective. Pair it with the date, and suddenly you’re running a professional operation instead of a spreadsheet escape room.
My favorite “learned the hard way” tip: always check Print Preview before sending anything to a printer or PDF. I’ve watched beautifully designed footers get clipped because the bottom margin was too small or the printer couldn’t print near the edge. On-screen everything looked perfect, but the printout cut the last line like it had a personal grudge. A 10-second preview avoids the embarrassment of handing someone a report where the footer reads “Confiden…” and the rest is gone.
Another moment that catches people: grouped sheets. It’s amazing for applying the same footer everywhereuntil you forget the sheets are grouped and you change one thing “real quick” and accidentally edit ten worksheets at once. The fix is simple (ungroup the sheets when you’re done), but the lesson sticks. Grouping is power. Treat it like you’re holding a laser pointer: useful, but don’t aim it at your own eyes.
Finally, keep footers practical. A footer isn’t the place for long slogans, inspirational quotes, or your company’s entire mission statement. If you want your printout to feel polished, think like a reader: page numbers, date, file/sheet name, and maybe a short label. Done right, your footer becomes the quiet helper that makes your spreadsheets easier to share, easier to print, and harder to mess upbasically the friend who shows up early and brings snacks.
Conclusion
Adding a footer in Excel is a small change that makes a big differenceespecially when printing or exporting to PDF. Use Page Layout view to insert a footer, place content in left/center/right sections, add dynamic elements like page numbers and file names, and always verify in Print Preview. Keep it simple, consistent, and readable, and your spreadsheets will look less like “draft energy” and more like “this person absolutely knows what they’re doing.”


