Table of Contents >> Show >> Hide
- What Does “Julienne” Mean?
- Why This Basic Knife Skill Matters
- Best Foods to Julienne
- What You Need Before You Start
- Version 1: How to Julienne with a Knife
- Version 2: The Shortcut Julienne Method
- Knife Method vs. Shortcut Method
- Common Julienne Mistakes to Avoid
- How to Use Julienned Vegetables
- How to Practice This Basic Knife Skill
- Final Thoughts on How to Julienne
- Kitchen Experience: What Learning to Julienne Actually Feels Like
If you have ever watched a cooking show and thought, “Wow, those carrot sticks look suspiciously perfect,” welcome to the world of julienne. This basic knife skill sounds fancy because it is French, and French cooking terms have a long history of making ordinary kitchen tasks sound like they require a beret and a culinary degree. But here is the good news: julienning is not kitchen wizardry. It is simply cutting food into thin, even matchsticks.
Once you learn how to julienne, a whole bunch of recipes suddenly look more doable. Stir-fries cook evenly. Salads look sharper. Slaws get a better crunch. Garnishes stop looking like random vegetable confetti. And perhaps most importantly, you get to feel like a very organized person, even if your spice drawer says otherwise.
In this guide, you will learn two versions of the julienne technique: the classic knife method and the shortcut method. Both work. One makes you feel like a pro. The other makes you feel efficient. Honestly, both are excellent personality traits.
What Does “Julienne” Mean?
A julienne cut is a basic culinary knife cut that turns vegetables or fruits into thin, uniform strips that resemble matchsticks. In professional kitchens, a traditional julienne is usually about 1/8 inch thick and 2 to 3 inches long. At home, you do not need to measure every stick like you are building a tiny vegetable fence. The goal is consistency, not ruler-based emotional damage.
Uniform size matters because evenly cut food cooks at the same rate and looks better on the plate. That means your bell peppers do not go limp while your carrots stay oddly crunchy, and your garnish does not look like it was cut during a power outage.
Why This Basic Knife Skill Matters
Learning how to julienne is one of those small kitchen upgrades that pays off forever. It helps with:
- Even cooking: Similar-sized pieces soften and brown more consistently.
- Better texture: Julienned vegetables stay crisp and elegant in salads, slaws, and spring rolls.
- Presentation: A simple dish instantly looks more polished with neat strips of carrot, cucumber, or pepper.
- Speed: Once you get the motion down, prepping vegetables becomes much faster.
- Versatility: Julienne cuts can become stir-fry ingredients, toppings, garnishes, fries, or the starting point for a fine dice.
Best Foods to Julienne
You can julienne a surprising number of ingredients, but some are easier than others. Great choices for practice include:
- Carrots
- Bell peppers
- Cucumbers
- Zucchini
- Potatoes
- Leeks
- Green onions
- Broccoli stems
- Apple or pear for salads
- Onions, once you understand their layers and attitude
If you are brand new, start with carrots or bell peppers. They are firm, predictable, and less likely to collapse into a weird vegetable puzzle.
What You Need Before You Start
1. A Sharp Knife
This is not the time for a dull blade that smashes tomatoes and bruises your confidence. A sharp chef’s knife gives you cleaner cuts and better control. Ironically, sharp knives are safer than dull ones because they require less force and are less likely to slip.
2. A Stable Cutting Board
If your cutting board slides around like it is late for a meeting, put a damp paper towel or kitchen towel underneath it. A steady board makes all knife work safer and calmer.
3. Proper Hand Position
Use the classic claw grip with your non-dominant hand. Curl your fingertips inward and guide the knife with your knuckles. This protects your fingers and helps keep the cuts even. It may feel awkward at first, but it quickly becomes second nature.
Version 1: How to Julienne with a Knife
This is the traditional method and the best one to learn if you want real knife confidence. The basic principle is simple: square off the ingredient, cut it into planks, stack the planks, then slice them into thin strips.
Step 1: Trim and Create a Flat Side
Round vegetables roll, and rolling vegetables are little chaos gremlins. Trim the ends and cut the vegetable so it has a flat side to rest on. Stability comes first.
Step 2: Cut into Manageable Sections
For longer vegetables like carrots or zucchini, cut them into sections about 2 to 3 inches long. That gives you a practical length for classic julienne and makes the next steps easier to control.
Step 3: Square Off the Sides
If you want clean, uniform sticks, trim the rounded sides to create a rectangular block. Yes, this feels slightly ruthless. Yes, it works beautifully. Save the scraps for stock, soup, stir-fry, or omelets so nothing goes to waste.
Step 4: Slice into Thin Planks
Lay the block flat and slice it lengthwise into planks about 1/8 inch thick. Take your time. This is where the final shape begins.
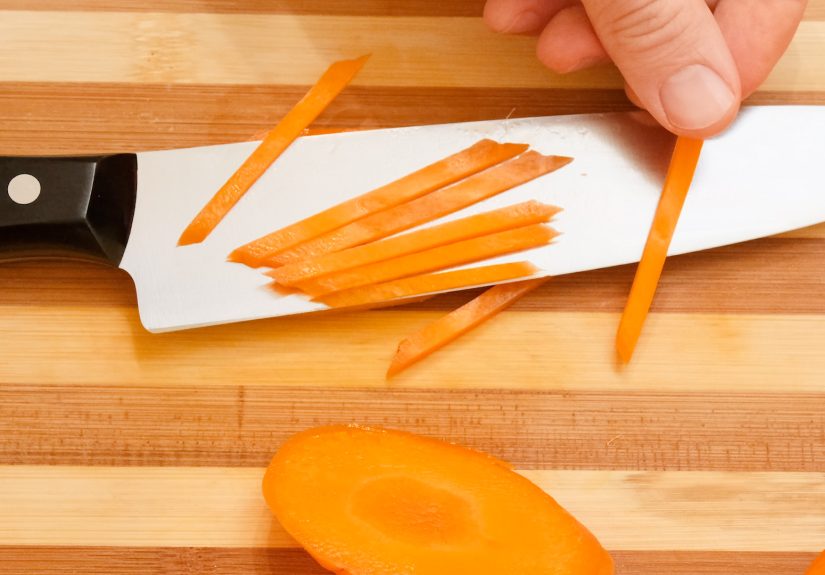
Step 5: Stack and Slice into Matchsticks
Stack a few planks neatly, then slice lengthwise again into 1/8-inch strips. Congratulations, you have julienned vegetables. Try not to look too smug about it, though frankly you have earned the right.
Example: How to Julienne a Carrot
- Peel the carrot and trim both ends.
- Cut it into 2- to 3-inch sections.
- Trim one side flat, then square off the remaining rounded sides.
- Slice the carrot block into thin planks.
- Stack the planks and cut them into matchsticks.
This is the classic practice vegetable because it teaches precision, control, and patience. Also, carrots do not complain.
Example: How to Julienne a Bell Pepper
- Cut off the top and bottom, then remove the core and seeds.
- Open the pepper into flat panels by cutting down one side.
- Lay each panel skin-side down.
- Slice into thin strips.
Bell peppers are easier than they look because once flattened, they behave nicely on the board. That is more than can be said for certain onions.
Example: How to Julienne an Onion
Onions are a little different because they have natural layers. To julienne an onion:
- Cut off the stem end and leave the root end mostly intact.
- Slice the onion in half from top to root.
- Peel it and place the flat side down.
- Make thin slices from top to root for slender strips.
This produces elegant onion slivers for stir-fries, fajitas, noodle dishes, and caramelized toppings. Keep your slices even, and maybe keep tissues nearby if onions turn you into an emotional documentary.
Version 2: The Shortcut Julienne Method
If you want the look of julienne without practicing your knife skills on a Tuesday night when dinner is already late, this method is for you. The shortcut version uses a mandoline, julienne peeler, or sometimes a food processor attachment.
Option A: Mandoline
A mandoline is one of the fastest ways to create uniform julienne strips. Many models include julienne blades or settings that cut ingredients into neat matchsticks with very little effort.
How to do it:
- Set the mandoline to the julienne blade or attachment.
- Trim the vegetable so it fits securely.
- Use the hand guard every single time.
- Run the vegetable over the blade with steady pressure.
The results are fast, clean, and consistent. The downside? Mandolines are famously unforgiving if you get casual. This is not the kitchen tool for “I’ll just do one quick pass without the guard.” That sentence has a bad ending.
Option B: Julienne Peeler
A julienne peeler is great for carrots, zucchini, cucumbers, and similar produce. It makes thin shredded strips quickly, though the cuts are often less formal than classic knife julienne.
Best for: salads, slaws, quick garnishes, and noodle-style vegetables.
Option C: Food Processor Attachment
If you are cooking for a crowd or prepping a lot of vegetables, a food processor with a julienne disc can save serious time. It is less hands-on and more batch-friendly, though sometimes less precise than a knife or mandoline.
Knife Method vs. Shortcut Method
Use the Knife Method When:
- You want to improve your basic knife skills
- You need more control over size and shape
- You are working with just a few vegetables
- You enjoy precise prep work
Use the Shortcut Method When:
- You need speed
- You are prepping a large volume of produce
- You want consistent results with less effort
- You are making slaw, fries, or meal-prep vegetables in bulk
The truth is, both versions are useful. Learning the knife technique makes you a better cook. Using a mandoline on a busy weeknight makes you a sane cook. There is room in life for both ambition and shortcuts.
Common Julienne Mistakes to Avoid
1. Using a Dull Knife
A dull knife tears instead of slices and makes even cuts much harder. Sharpen your knife or have it professionally sharpened if needed.
2. Skipping the Flat Side
If the ingredient rolls, your cuts will be uneven and your setup less safe. Always start by creating stability.
3. Making the Planks Too Thick
If the initial planks are inconsistent, the final julienne will be inconsistent too. Focus on the plank stage. That is the foundation.
4. Overstacking
Do not stack too many planks at once. A small stack is easier to control and gives you cleaner results.
5. Forgetting Safety with a Mandoline
Use the guard. Then use the guard again. Then resist the strange human urge to think, “I am sure I can finish the last inch safely.” The guard exists because overconfidence is undefeated.
How to Use Julienned Vegetables
Once you know how to julienne, you will find excuses to do it all the time. Try julienned vegetables in:
- Stir-fries
- Spring rolls
- Asian-style noodle bowls
- Coleslaw
- Green salads
- Soup garnishes
- Fajitas
- Shoestring fries
- Pickles
- Raw veggie platters
They are especially useful when you want vegetables to cook fast but still hold their shape and texture.
How to Practice This Basic Knife Skill
The best way to improve is repetition. Not glamorous repetition. Not cinematic repetition. Just regular, practical kitchen repetition. Grab a few carrots, a cucumber, or a bell pepper and practice turning them into neat strips. Your first batch may look rustic. Your second batch may look slightly less rustic. By your fifth batch, you will notice your hands moving more confidently.
A smart practice routine looks like this:
- Work slowly.
- Focus on flat surfaces and even planks.
- Use the claw grip consistently.
- Choose one vegetable and repeat the same cut several times.
- Compare the finished pieces and adjust.
You do not need perfection. You need progress and dinner.
Final Thoughts on How to Julienne
Learning how to julienne is one of the most useful kitchen upgrades for home cooks. It builds confidence, improves presentation, and helps your food cook more evenly. More importantly, it teaches you that “fancy” cooking terms often describe very practical skills.
If you want the full experience, practice the classic knife method. If you want speed and consistency, use a mandoline or julienne tool. Neither approach is cheating. They are just two versions of the same basic knife skill, and both can make your cooking look sharper, cleaner, and more professional.
So the next time a recipe tells you to julienne carrots, peppers, potatoes, or onions, do not panic. You are not being asked to join culinary school. You are just being asked to make elegant little vegetable matchsticks. Which, admittedly, does sound much cooler in French.
Kitchen Experience: What Learning to Julienne Actually Feels Like
The first time I tried to julienne a carrot, I was wildly optimistic. I had watched enough cooking videos to believe I could casually transform a blunt orange root into perfect restaurant-style matchsticks in about thirty seconds. What actually happened was more like a slow negotiation between me, the carrot, and a knife that suddenly seemed much larger than it had five minutes earlier.
At first, the pieces were all over the place. Some were thick enough to qualify as fries. Some were so thin they looked emotionally exhausted. A few were less “julienne” and more “abstract expressionism.” But that is what makes this knife skill so relatable. You do not master it in one magical afternoon. You get better because your hands begin to understand the rhythm.
One of the biggest lessons is that julienning teaches patience more than speed. New cooks often want to move fast because fast looks professional. In reality, professionals move fast because they have already spent a lot of time moving carefully. Once I stopped trying to impress an imaginary audience and focused on making flat sides, even planks, and controlled cuts, the whole process became less stressful and much more satisfying.
I also learned that your setup changes everything. A sharp knife makes a shocking difference. A stable cutting board makes you feel calmer immediately. Good lighting helps. So does not trying to practice a new knife skill while also answering texts, checking the oven, and wondering whether you forgot to buy cilantro. Julienne rewards attention. It is not difficult, but it is honest work.
Then there is the strangely joyful moment when the cut finally clicks. You slice a carrot into planks, stack them neatly, and cut those planks into slim, tidy sticks. Suddenly the pieces are actually uniform. They look good. They cook beautifully. You toss them into a stir-fry or pile them into a salad, and the dish seems more intentional somehow. That little visual difference changes the whole feel of the meal.
Another real-world discovery is that different vegetables have different personalities. Carrots are disciplined. Bell peppers are cooperative once flattened. Potatoes are sturdy and satisfying. Onions, meanwhile, are dramatic. They slip apart, release fumes, and act like they were not informed this was happening today. Learning to julienne is partly about knife control and partly about understanding what each ingredient wants from you.
I have also come to appreciate the shortcut version. Some nights are made for practicing classic knife cuts. Other nights are made for using the mandoline, wearing the hand guard like it is non-negotiable, and getting dinner on the table before your hunger turns you into a less pleasant version of yourself. There is no shame in choosing efficiency. In fact, one sign of a smart home cook is knowing when to pursue artistry and when to pursue noodles in under twenty minutes.
Over time, julienne becomes more than a single technique. It becomes a gateway skill. Once you understand how to create even planks and strips, dicing makes more sense. Garnishes look better. Prep feels less random. You stop seeing vegetables as awkward objects and start seeing shapes, angles, and possibilities.
That is probably my favorite thing about learning how to julienne: it makes the kitchen feel less mysterious. It turns “knife skills” from a vague, intimidating phrase into a series of small, learnable moves. And every time you do it, you build a little more ease, a little more speed, and a little more confidence. Not bad for a pile of carrot sticks.