
Table of Contents >> Show >> Hide
- What You’re Buying: The Quick Profile of Montauk Black 2×12 Natural Cleft
- Natural Cleft, Explained (Without the Geology Lecture You Didn’t Ask For)
- Where Montauk Black 2×12 Looks Amazing (and Where It Gets… Complicated)
- Design Ideas: Making a 2×12 Natural Cleft Tile Look Custom
- Planning Your Purchase: Quantity, Overage, and Stone Reality
- Installation Tips for Montauk Black Natural Cleft (So It Looks Like a Designer Did It)
- Sealing & Color Enhancement: How to Get That Deep, Inky Look
- Cleaning & Maintenance: Keep It Handsome Without Babying It
- Cost & Value: Why 2×12 Can Cost More Than Bigger Slate
- FAQ: Quick Answers Before You Commit
- Real-World Experiences With Montauk Black 2×12 Natural Cleft (The Extra You Asked For)
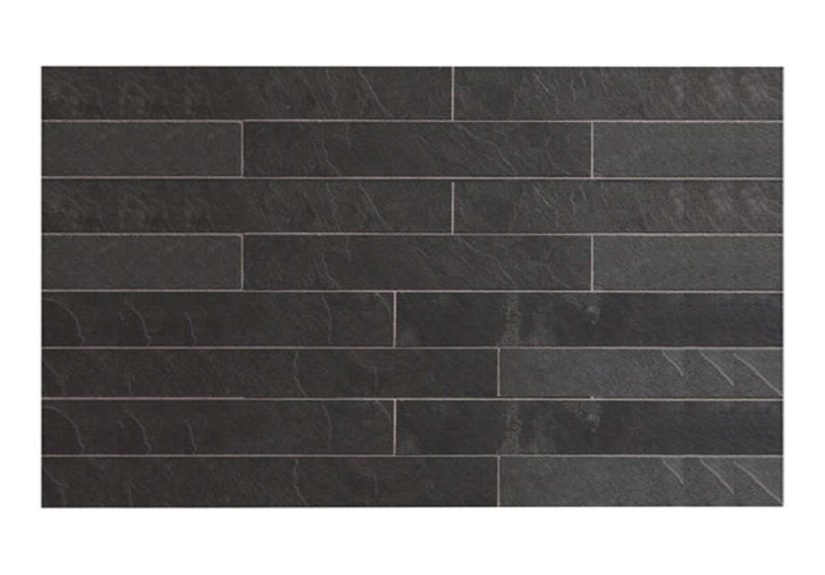
If you’ve ever looked at a perfectly smooth, factory-made tile and thought, “Nice… but where’s the drama?” then Montauk Black 2 in. x 12 in. Natural Cleft slate is here to give your walls (or floors) a little attitude. This is real slatenaturally layered stonesplit along its grain so the face keeps that rugged, slightly uneven “I came from a mountain, not a mold” texture. And the 2×12 shape? It’s the subway-tile format’s moodier cousin: longer, sleeker, and ready to make neutral spaces look instantly intentional.
In this guide, we’ll break down what “natural cleft” actually means, where this tile shines, what it demands from installers and homeowners, and how to keep it looking rich and charcoal-cool instead of dusty and “why is my grout everywhere?” We’ll also end with a longer, real-world experience sectionbecause slate is gorgeous, but it’s also the kind of gorgeous that needs boundaries.
What You’re Buying: The Quick Profile of Montauk Black 2×12 Natural Cleft
Montauk Black is a popular slate line known for its charcoal-to-black tones with subtle gray movement. It’s often described as having relatively low visual variation compared to wilder slates (meaning fewer surprise rust streaks and sudden green patches), but it still has the natural shading you want from stone. The “natural cleft” finish is the key feature: the surface is textured from the splitting process, while many versions are sold with a gauged back (a flatter back for easier setting).
In the 2 in. x 12 in. size, this tile is commonly listed around a 3/8 in. nominal thickness. That thickness is great for durability, but the natural cleft face means the top surface won’t be perfectly flatby design. The format is also frequently sold with coverage math that’s easy to plan around (for example, listings commonly note 6 tiles per square foot for 2×12 pieces).
Why the 2×12 size is such a sweet spot
- It reads modern without feeling trendyclean lines, but with stone texture that keeps it warm.
- It’s flexible for patterns: stacked, running bond, vertical “skinny brick,” and more.
- It’s scale-friendly: big enough to feel architectural, small enough for backsplashes and niches.
Natural Cleft, Explained (Without the Geology Lecture You Didn’t Ask For)
Slate forms in layers, and natural cleft is what happens when the stone is split along those layers. The result is a surface with micro-ridges and tiny valleys that catch light differently throughout the day. In the morning it can look deep charcoal; at night, under warm bulbs, it can shift to a soft black with smoky highlights.
The upsides of natural cleft
- Texture and grip: it’s naturally more slip-resistant than polished stone.
- Visual forgiveness: small scuffs and daily wear blend in better than on shiny surfaces.
- Authenticity: it looks like stone because it is stoneand it’s not trying to pretend otherwise.
The trade-offs (aka “the part you’ll wish someone told you earlier”)
- More nooks to clean: that texture can hold dust, soap film, or kitchen splatter if you ignore it.
- Grout haze is clingy: slate can be porous; careless cleanup can leave a chalky film.
- Lippage is easier to notice: uneven faces + imperfect setting = edges that catch bare feet or the side-eye.
Where Montauk Black 2×12 Looks Amazing (and Where It Gets… Complicated)
Montauk Black slate is commonly positioned as a versatile material for floors, walls, and even exterior use, depending on the specific product and installation method. With the 2×12 natural cleft format, your best results usually come from places where texture is a benefitnot a cleaning punishment.
Best uses
- Backsplashes: especially behind a range, where black slate can anchor light cabinets and hide minor splatter better than glossy white tile.
- Fireplace surrounds: natural cleft texture looks high-end and intentional, even when you keep the rest of the room minimal.
- Accent walls and niches: the long format adds rhythm, and the surface texture gives depth without needing bold color.
- Mudrooms and entry floors: texture helps with traction; dark tones are forgiving with daily traffic.
Use with caution
- Shower walls: yes, it can be done, but natural cleft means more surface area to trap soap residue. If you want slate in a shower, sealing and a consistent cleaning routine are non-negotiable.
- Countertops: slate can be used, but it’s not a “set it and forget it” surface; sealing and spill discipline matter. If you cook like you’re auditioning for a chaotic food show, consider a honed finish instead.
Design Ideas: Making a 2×12 Natural Cleft Tile Look Custom
The 2×12 shape lets you riff on classic subway layouts, but it also gives you more modern optionsespecially when you play with direction and grout color.
1) Clean and modern: stacked horizontal
Lay the tiles directly aligned (no offset) for a crisp, architectural look. Pair with a charcoal grout for a seamless field, or a mid-gray grout to lightly outline the pattern without going full checkerboard.
2) Classic with edge: running bond (brick pattern)
Offset each row by 1/3 or 1/2. The stone texture keeps it from looking “basic,” and the pattern adds movement without competing with the slate’s natural shading.
3) Vertical “skinny brick”
Rotate the tile vertically for a taller, more contemporary vibeespecially great behind a vanity or as a kitchen backsplash up to the hood. It visually lifts the ceiling and makes small spaces feel taller.
4) Framed moments: borders and inlays
Use 2×12 pieces as a border around larger slate tiles, or as a band in a shower niche or backsplash. The mix of scale (large field tile + slimmer accent) reads high-end even in a modest space.
Planning Your Purchase: Quantity, Overage, and Stone Reality
Natural stone is not wallpaper. Every box has variation, and cuts happen. Plan to order extraespecially for a long, skinny format that may need more trimming around outlets, corners, and edges.
- Minimum overage: 10% is a smart baseline for most rooms; bump to 15% for lots of corners, diagonal layouts, or complicated cuts.
- Blend boxes: open multiple boxes and mix tiles as you install so the color variation distributes naturally.
- Save spares: stone lots can shift over time. Extra tile now is cheaper than a repair that never matches later.
Also: don’t panic if the slate looks a little dusty or “flatter” before installation. Many slates deepen dramatically after sealingespecially darker collections.
Installation Tips for Montauk Black Natural Cleft (So It Looks Like a Designer Did It)
Slate installation is half craftsmanship, half patience, and half “why is this three halves?” (Because it’s natural stone and it loves math jokes.) The good news: with the right prep, this tile installs beautifully.
Step 1: Make sure the surface is worthy of stone
Natural stone assemblies generally require a stiffer floor than standard ceramic installations. If you’re installing on a floor, confirm your structure meets natural stone requirements (and if you’re unsure, consult a pro or the relevant installation standard). This matters because stone doesn’t like flexflex leads to cracks, and cracks lead to regret.
Step 2: Consider an uncoupling membrane
Many installers use uncoupling underlayment systems designed for tile and stone to help manage movement between the subfloor and the tile layer. This can be especially helpful over wood subfloors.
Step 3: Dry-lay and choose your “hero” tiles
Because natural cleft slate varies, do a quick dry layout for visible areas. Put the nicest, most consistent pieces at eye level (backsplash focal area, fireplace center), and save slightly rougher pieces for edges or less noticeable zones.
Step 4: Pre-seal as grout insurance
One of the best pro moves with slate is applying a clear sealer or enhancer before grouting as a grout release. This helps prevent grout pigment from staining the stone face and makes cleanup easier.
Step 5: Grout thoughtfully
- Joint size: slightly wider joints often look more natural with cleft stone and can help disguise minor thickness variation.
- Color: charcoal and medium grays tend to look clean and hide everyday mess better than stark white.
- Cleanup: wipe often, use clean water, and don’t let grout haze “set up and settle down.” It will move in permanently if you let it.
Step 6: Final seal (and don’t rush it)
After the grout cures, apply your final sealer (and enhancer if you want a deeper “wet look”). The tile should be dry and clean before sealing so you don’t trap moisture or haze under the finish.
Sealing & Color Enhancement: How to Get That Deep, Inky Look
Here’s the honest truth about black slate: it can look “pretty black” dry, and “wow, that’s expensive” once sealed. A stone protectant/sealer can deepen the color and help resist stainsespecially helpful in kitchens, entries, and bathrooms.
Sealer vs. enhancer: what’s the difference?
- Penetrating sealer: helps repel moisture and stains while keeping a more natural, matte look.
- Enhancing sealer: deepens color and contrast (often the choice if you want the slate to read as a richer black).
Maintenance-wise, slate commonly benefits from periodic resealing. A simple schedule is to check performance yearly and reseal when water no longer beads on the surface.
Cleaning & Maintenance: Keep It Handsome Without Babying It
Slate is durable, but it’s still stone. The goal is to clean it without slowly dissolving it (so: skip harsh acids and abrasive scrubs). A simple routine keeps Montauk Black looking sharp.
Daily / weekly
- Sweep or vacuum using a soft attachment to prevent gritty abrasion.
- Damp mop with a pH-neutral cleaner designed for stone or a gentle soap solution.
Monthly
- Spot-check high-use areas (sink backsplash, behind the stove, entry path).
- Clean buildup earlytexture hides grime until it suddenly doesn’t.
What to avoid
- Vinegar and acidic cleaners for routine maintenance.
- Steel wool and aggressive abrasive pads.
- “Miracle” all-purpose cleaners that don’t specify safe use on natural stone.
Cost & Value: Why 2×12 Can Cost More Than Bigger Slate
Pricing varies by retailer, region, and availability, but one thing surprises a lot of people: smaller or specialty sizes can cost more per square foot than larger tiles. Why? Extra cutting, extra handling, and sometimes different packaging.
You’ll often see larger Montauk Black slate tiles priced competitively in mainstream home improvement channels, while a 2×12 natural cleft format may be positioned more as a design-forward option and priced accordingly. The upside is the look: long-format natural stone tends to read “custom,” which is exactly what many people want.
FAQ: Quick Answers Before You Commit
Is Montauk Black 2×12 natural cleft real slate?
Yesthis is natural stone slate, not a porcelain “slate look” imitation. That means real texture, real variation, and real maintenance expectations.
Do I have to seal it?
You don’t have to, but you’ll probably want to. Sealing helps resist stains and can deepen the black tone. It also makes grout cleanup dramatically easier.
Can I use it outside?
Many slate collections are marketed for exterior use, but exterior performance depends on the specific product ratings, your climate (freeze/thaw cycles), and installation details (slope, drainage, suitable mortar). If you live where winters freeze, verify the tile’s suitability and follow exterior-rated installation practices.
Is it hard to install?
It’s not “hard” like calculus, but it’s not “easy” like peel-and-stick anything. Natural cleft slate demands prep, a flatter substrate, careful layout, and patient cleanup. If you enjoy detail work, it’s a satisfying DIY. If you hate details, hire someone who loves them.
Real-World Experiences With Montauk Black 2×12 Natural Cleft (The Extra You Asked For)
Let’s talk about what it’s actually like living with (and installing) a 2×12 natural cleft slate tilebecause showroom lighting is a liar, and your kitchen backsplash has no interest in your dreams.
Experience #1: The “Why does it look lighter in my house?” moment.
A lot of homeowners unbox Montauk Black and have a brief crisis: “This is charcoal, not black.” Totally normal. Slate often looks drier and dustier straight out of the box. The tone can deepen after sealingsometimes dramaticallyso the smart move is to test sealer or enhancer on a spare tile first. This is also the moment you learn an important life lesson: natural stone has moods, and your job is to pick which mood you want.
Experience #2: The texture is gorgeous… and it collects evidence.
Natural cleft looks amazing because it’s uneven, and it’s uneven because nature didn’t consult your cleaning schedule. On a backsplash, you’ll notice that cooking oils and steam can settle into the micro-texture. It’s not hard to clean, but it rewards quick wipe-downs. If you let splatter bake on for a week, the tile won’t be ruinedit’ll just make you work for your forgiveness. A soft brush and a pH-neutral cleaner usually handle it, especially if you sealed properly.
Experience #3: Layout feels easy… until you hit outlets and corners.
The 2×12 format is long enough to look sleek, but it also means cuts are more noticeableespecially around electrical outlets. The best DIY installs often involve a “dry layout day” where you pre-plan where full tiles land and where cuts go. People who skip this step usually end up with tiny slivers next to the cabinet end paneland those slivers will haunt them every time they make coffee.
Experience #4: Grout haze is the villain with a long-term lease.
Slate can be more porous than you expect, and the cleft texture gives grout haze more places to cling. Installers who pre-seal before grouting (as a grout release) tend to have an easier cleanup and a cleaner finished look. If you don’t pre-seal, you can still get a great result, but you’ll need to be disciplined: frequent sponge rinsing, clean water changes, and no “I’ll clean it tomorrow” optimism. Tomorrow becomes next weekend, and next weekend becomes “why is there a chalk film forever?”
Experience #5: The finished look is worth itbecause it doesn’t look like everyone else’s tile.
Once installed and sealed, Montauk Black 2×12 natural cleft has that rare quality: it looks both modern and grounded. It pairs beautifully with white quartz, warm butcher block, brushed brass, matte black hardware, and even stainless appliances. In a bathroom, it can make a simple vanity wall feel boutique-hotel. In a kitchen, it can turn basic cabinets into something that looks curated. The texture adds depth without adding clutter, and that’s why people keep coming back to slateeven knowing it’s not the lowest-maintenance option.
The biggest takeaway from real-world use is simple: slate rewards preparation. If you want something perfectly uniform and perfectly smooth, this isn’t your tile. But if you want a surface with charactersomething that looks better the longer you live with itMontauk Black natural cleft is the kind of upgrade that feels “designer” without needing designer behavior from you. Just seal it, clean it with kindness, and don’t let grout haze set up a permanent residence.


