Table of Contents >> Show >> Hide
- What “Before” Kitchens Usually Get Wrong
- The “After” Formula: Island Ideas That Actually Improve the Room
- Idea 1: Right-size the island (and give it breathing room)
- Idea 2: Consider an angled or custom-shaped island for tricky layouts
- Idea 3: Assign the island a primary job (then support it)
- Idea 4: Build storage that matches how you cook
- Idea 5: Make seating comfortable (not just “technically possible”)
- Idea 6: Add power the right way (and in the right places)
- Idea 7: Light the island like a workspace, not a stage prop
- Idea 8: Pick a countertop edge and material that fit your lifestyle
- Idea 9: Use the island to fix the room’s relationships
- Idea 10: Consider “two island” zoning (for big kitchens or big cooks)
- Before-and-After Scenarios You Can Borrow
- A Practical Planning Checklist (So Your “After” Stays Awesome)
- Common Mistakes (A.K.A. Things That Look Fine Until You Live There)
- of Real-World “Experience” From Island Makeovers
- Wrap-Up
A kitchen island is basically the kitchen’s Swiss Army knife: it chops, stores, seats, charges your phone, hides your recycling, andif you design it wrongblocks the dishwasher so thoroughly you’ll start eating takeout out of spite.
“Before and after” island makeovers are so satisfying because the island is usually the problem and the solution. Before: awkward traffic, nowhere to prep, nowhere to land groceries, and a cook who keeps getting hip-checked like it’s an NHL game. After: a central hub that makes the room work the way your life actually works.
This Old House has featured transformations where a smartly sized island (including an angled layout) adds seating, improves circulation, and pulls the dining area into the kitchen so nobody feels exiled at the table. It’s the kind of change that looks “simple” in photosuntil you realize it’s backed by real planning: clearances, knee space, outlets, lighting, and what you want the island to do all day long.
What “Before” Kitchens Usually Get Wrong
In many remodels, the original kitchen layout was designed for a different era: fewer appliances, less entertaining, and a lot less “why is the backpack on the counter again?” Real-life kitchens take a beating, and the layout has to cooperate.
1) The kitchen has no “landing zone”
If the only clear counter space is a 6-inch strip next to the toaster, meal prep becomes a game of counter Tetris. A good island creates a dedicated prep surface and a place to drop mail, groceries, and that one mixing bowl you swear you’ll wash “right after this.”
2) Traffic cuts through the work zone
Kitchens often double as hallways. When the path to the backyard, pantry, or powder room slices through where you’re cooking, the result is chaos. A well-placed island can re-route foot traffic so cooking stays safer and calmer.
3) There’s seating… but it’s in the worst possible place
Sometimes a “breakfast bar” is basically a row of stools parked directly in front of the refrigerator or dishwasher. Congratulations, you’ve created a family bonding area that prevents anyone from accessing food or cleaning dishes. We can do better.
4) The island is sized like a dream and spaced like a nightmare
Big islands look amazing online. But if you don’t preserve the work aisles around them, your gorgeous centerpiece becomes a daily obstacle course. The magic is not just the islandit’s the space around it.
The “After” Formula: Island Ideas That Actually Improve the Room
The best island upgrades share the same DNA: right-sized, right-cleared, and purpose-driven. Here are the design moves that show up again and again in successful before-and-after projects.
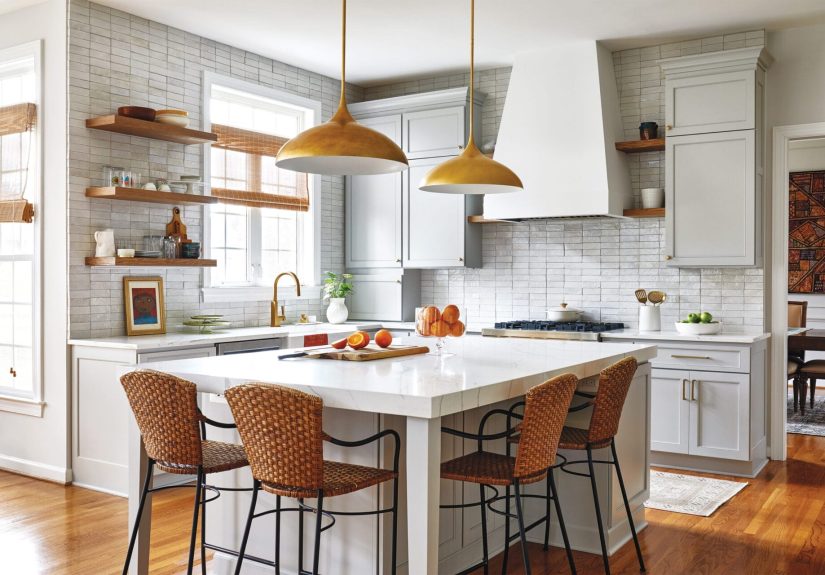
Idea 1: Right-size the island (and give it breathing room)
A common planning baseline for a built-in island is about 4 feet by 2 feet as a minimum workable footprint. But the more important number is the space around it: many designers aim for about 42 inches of clearance for a one-cook kitchen and 48 inches where multiple cooks, appliances, or heavy traffic are involved.
Quick reality check: if you can’t open the dishwasher and still walk past it without turning sideways, the island is too big or too close. Your kitchen should not require interpretive dance.
Idea 2: Consider an angled or custom-shaped island for tricky layouts
Not every kitchen wants a perfect rectangle. In some This Old House-style transformations, an angled island helps relieve pinch points and improves flowespecially in busy family kitchens where several people cook at once. Custom shapes can also “aim” circulation around seating so stools don’t clog the main aisle.
Angled ends, clipped corners, or gently curved edges can make a huge difference in how a kitchen feels when it’s actually in motion (which is most of the time).
Idea 3: Assign the island a primary job (then support it)
Islands fail when they try to do everything without enough surface area. Choose a primary function and design around it:
- Prep-first island: wide uninterrupted counter, deep drawers for knives/boards/bowls, trash pull-out close by.
- Seating-first island: generous overhang, comfortable knee space, outlets placed so cords don’t drape over laps.
- Cleanup-first island: sink with nearby dishwasher and pull-outs for trash/recycling, plus a “dirty-to-clean” workflow.
- Entertaining-first island: beverage fridge, serving zone, and lighting that flatters both food and humans.
You can mix functions, but prioritize one. Otherwise, you’ll end up with a sink in the middle of the seating area and a cooktop directly under the pendant lights that are now wearing a fine mist of olive oil.
Idea 4: Build storage that matches how you cook
The island is prime real estate for storage because it sits where you work. The “after” kitchens that feel effortless usually include:
- Deep drawers for pots, pans, and mixing bowls (easier than spelunking in base cabinets).
- A trash/recycling pull-out near the prep zone (your future self will write you a thank-you note).
- Open shelving on the non-work side for cookbooks or display piecesif you’re okay dusting them.
- Appliance garages or dedicated cubbies so the counter stays calm even when life is not.
Idea 5: Make seating comfortable (not just “technically possible”)
Seating looks cute in photos. Comfort makes it usable in real life. A good rule is to allow about 24 inches of width per seat so people aren’t elbowing each other like competitive ravioli-makers.
Knee space matters too. The required overhang depends on counter height, and the seating should allow legs to tuck in comfortably without forcing everyone to perch like a nervous bird.
- Counter-height seating (about 36 inches high): often benefits from roughly 15 inches of knee space/overhang.
- Bar-height seating (about 42 inches high): can work with a bit less knee depth, but demands the right stools.
Also, plan space behind stools. People need room to slide in and out without scraping the wallor your shinsdaily.
Idea 6: Add power the right way (and in the right places)
“After” islands nearly always include power for small appliances, charging, and entertaining. Electrical requirements change over time and vary by location, but the big takeaway is consistent: islands need a plan for receptacles, and modern codes increasingly emphasize accessible placement and future-proofing.
Design tip: put outlets where they’ll actually be usednear prep zones and seating cornersand avoid placing them where cords trail across the walkway (a.k.a. the “why did I do this to myself” zone).
Idea 7: Light the island like a workspace, not a stage prop
Pendant lights are popular for a reason: they anchor the island visually and deliver task lighting where you chop, mix, and assemble. A common guideline is to hang pendants so the bottom of the fixture sits roughly 30–36 inches above the countertop (adjusting for ceiling height and fixture size).
Bonus points for dimmers. Bright for cooking, softer for dinner, and mercifully low when you’re grabbing water at 2 a.m. like a raccoon in socks.
Idea 8: Pick a countertop edge and material that fit your lifestyle
“After” islands tend to look more intentional because the countertop choice becomes a design statement. Popular directions include:
- Quartz or sealed stone for durability and easy maintenance.
- Butcher block for warmth and a softer, more lived-in feel (with appropriate care).
- Waterfall edges for a modern, sculptural lookdramatic and clean, but often more expensive and can reduce end-use flexibility.
- Mixed materials (like stone for prep + wood for seating) to balance function and style.
Your “best” option is the one that matches your cooking habits, your tolerance for maintenance, and your budget. The goal is a surface that can handle real life, not just a photoshoot.
Idea 9: Use the island to fix the room’s relationships
The most satisfying before-and-after transformations don’t just add an islandthey improve how the kitchen connects to dining, outdoors, and living spaces. That might mean shifting a doorway, relocating a passage, or orienting the island so the cook faces the room instead of a wall.
When the island is positioned thoughtfully, it becomes the social bridge: family can sit, talk, and snack without entering the hot zone where knives and boiling water are doing their thing.
Idea 10: Consider “two island” zoning (for big kitchens or big cooks)
In larger renovations, one growing trend is multiple islandsoften separating a hardworking prep island from a more relaxed serving/seating island. It’s not necessary for most homes, but when you have space (and the right layout), it can keep the kitchen from feeling like a single crowded intersection.
Before-and-After Scenarios You Can Borrow
Scenario A: The crowded U-shape becomes a social kitchen
Before: Counters everywhere, but no clear prep zone and constant bumping at corners.
After: A modest island adds prep space and storage; traffic routes around the perimeter; seating moves to a calmer side.
Scenario B: The peninsula that blocks everything gets replaced
Before: Peninsula creates a choke point, traps people in corners, and turns the kitchen into a one-person-at-a-time experience.
After: A freestanding island opens the room, preserves clearances, and makes the kitchen feel larger without adding square footage.
Scenario C: The small kitchen adds a movable island (without regret)
Before: No landing space, constant counter clutter.
After: A compact rolling island/carts adds storage and a prep surface, and it can move when you need floor space for cooking or company.
A Practical Planning Checklist (So Your “After” Stays Awesome)
- Tape it out on the floor. Mark island size, stool pull-out space, and appliance doors. Walk it like a normal daythen walk it like Thanksgiving.
- Protect your work aisles. Prioritize clearance where people cook, pass, and open appliances.
- Decide the island’s main purpose. Prep, seating, storage, cleanup, or entertainingthen design the features around that goal.
- Plan outlets early. Coordinate with your electrician and local code requirements; don’t treat power like an afterthought.
- Coordinate lighting with function. Use task lighting for prep, ambient lighting for the room, and dimmers for flexibility.
- Be honest about maintenance. Choose materials you’ll actually care for (not just admire).
- Design storage for your real stuff. If you own a stand mixer, don’t pretend you don’t. Give it a home.
Common Mistakes (A.K.A. Things That Look Fine Until You Live There)
- Oversizing the island and undersizing the aisles.
- Putting seating on the traffic side where everyone walks through.
- Adding a cooktop without a ventilation plan (grease has a way of making itself part of the décor).
- Forgetting trash and recycling until the endthen awkwardly parking bins in the corner like unwanted guests.
- Choosing lighting that’s pretty but impractical (hello, glare; goodbye, visibility).
of Real-World “Experience” From Island Makeovers
If you read enough renovation stories (and talk to enough homeowners who have survived one), you start to notice a pattern: the island is rarely the first thing people think about, but it’s the first thing they feel after the remodel. Not in a mystical waymore like, “Wow, I can finally unload groceries without balancing a bag of onions on top of the coffee maker.”
One of the most common “before” complaints is the daily traffic jam. Families describe mornings where someone is making lunches, someone is hunting for a clean water bottle, and someone is trying to get past the dishwasher door without doing a sideways shuffle. After adding (or resizing) an island with proper clearance, the kitchen stops functioning like a narrow airport aisle. People can pass behind the cook. Appliance doors can open without blocking the whole room. The change sounds smallan extra few inches here and therebut homeowners often say it’s the difference between a kitchen that looks nice and a kitchen that feels friendly.
Seating is another big “experience” lesson. In the planning stage, it’s easy to count stools like they’re points in a video game: “If we just squeeze in one more, we’ll have five!” After living with the space, many people realize that four comfortable seats beat five uncomfortable ones every day of the week. The households that love their islands long-term tend to plan generous elbow room and knee space, and they avoid placing seating where it interferes with the fridge, range, or the main walking path. In other words, they design the island for humans, not for bragging rights.
Storage wins are the quiet heroes of the “after” phase. Deep drawers for pots and pans, a pull-out trash near the prep zone, and a dedicated place for small appliances consistently show up in happy post-remodel reviews. People don’t gush about toe-kick details at parties (well, most people), but they absolutely notice when the counter stays clear because the island is doing its job underneath.
Finally, there’s the emotional shift that comes when the cook faces the room. Many homeowners say that turning the island so the prep area looks outward changes how the kitchen feels during gatherings. You’re no longer cooking with your back to everyone like you’re being punished. You’re part of the conversation, keeping an eye on homework, and still getting dinner on the table. That’s the real “before and after” payoff: the island isn’t just a piece of cabinetryit’s a daily-life upgrade that makes the kitchen easier to live in.
Wrap-Up
The best kitchen island “before and after” transformations aren’t about copying a photo. They’re about solving the specific problems your kitchen has been quietly complaining about for years: missing prep space, tangled traffic flow, awkward seating, and storage that doesn’t match your real habits.
Size it with clearance in mind, give it a primary purpose, plan seating like you actually want people to sit there, add power and lighting intentionally, and choose materials that can handle your version of cooking (whether that’s meal prep or microwaving nachos with confidence).