Table of Contents >> Show >> Hide
- When Should You Replace a Guitar Nut?
- Acoustic vs. Electric Guitar Nut Replacement: What Changes?
- Choose the Right Replacement Nut
- Tools You’ll Want Before You Start
- Step 1: Check the Setup Before You Touch the Nut
- Step 2: Remove the Old Nut Safely
- Step 3: Clean the Nut Slot
- Step 4: Fit the New Nut to the Slot
- Step 5: Set the Overall Nut Height
- Step 6: Cut or Refine the String Slots
- Step 7: Glue the Nut in Place
- Step 8: Final Setup After the New Nut Is Installed
- Mistakes to Avoid When Replacing a Guitar Nut
- Acoustic and Electric Examples
- When You Should Hand the Job to a Pro
- Real-World Experiences and Lessons From Replacing Guitar Nuts
- Conclusion
If your guitar has started making that annoying little “ping” while tuning, feels weirdly stiff in first position, or buzzes on open strings like it’s auditioning for a garage band, the nut may be the culprit. The guitar nut is tiny, but it does a very big job: it sets string spacing, helps control action at the first fret, and plays a huge role in tuning stability and feel. In other words, it’s a small part with the confidence of a lead singer.
The good news is that replacing a guitar nut is absolutely possible for careful DIY players. The not-as-fun news is that it also happens to be one of those jobs where “close enough” can turn into “why does my G string hate me?” pretty fast. This guide walks you through how to replace a guitar nut on both acoustic and electric guitars, how to avoid common mistakes, and when to stop being brave and call a luthier.
This article covers standard fixed nuts on steel-string acoustic and electric guitars. If your guitar uses a Floyd Rose locking nut, a zero-fret system, or another specialty design, the process is different and may require model-specific parts and tools.
When Should You Replace a Guitar Nut?
Not every tuning issue means your nut is doomed. Sometimes the slots just need lubrication or a light cleanup. But replacement makes sense when you notice one or more of these problems:
- Open strings buzz, even though fretted notes sound fine.
- The guitar feels hard to fret near the first few frets.
- Strings bind in the slots and jump in pitch while tuning.
- The nut is chipped, cracked, or visibly worn.
- String spacing feels awkward or inconsistent.
- You changed string gauges and the old slots are now too tight or too sloppy.
On many guitars, a bad nut shows up as tuning instability first. If the string does not glide smoothly through the slot, it sticks, releases suddenly, and makes tuning feel like a negotiation instead of a quick adjustment.
Acoustic vs. Electric Guitar Nut Replacement: What Changes?
The basic repair is similar on both acoustic and electric guitars: remove the old nut, clean the slot, fit the new piece, adjust the height, cut or refine the slots, and do a final setup check. The differences show up in the details.
On acoustic guitars
Action changes are often influenced by humidity, top movement, neck relief, and saddle height. So before blaming the nut, make sure the guitar is not simply reacting to weather or string tension. Acoustic guitars are a little more dramatic about climate, and yes, they know it.
On electric guitars
Bridge height is usually easier to adjust after the nut is installed, which makes final setup more forgiving. But electrics with angled 3×3 headstocks, like many Gibson-style guitars, can be picky about slot shape and break angle, especially on the D and G strings.
Choose the Right Replacement Nut
Before you remove anything, choose a replacement that matches your guitar’s width, thickness, radius, and string spacing as closely as possible. Pre-slotted nuts can save time, but they are rarely true drop-in parts. Most still need sanding, shaping, and final slot adjustment.
Common guitar nut materials
- Bone: Traditional, durable, and popular for both acoustic and electric guitars. Great choice, but it usually needs careful shaping.
- TUSQ or other engineered materials: Consistent, predictable, and widely available in pre-slotted options. Some versions are self-lubricating, which can help tuning stability.
- Plastic: Functional and inexpensive, though often less durable and less refined than higher-end options.
- Graphite or lubricated synthetics: Useful if tuning stability is your main goal.
If you want the easiest install, a pre-slotted nut matched to your guitar’s nut width and fretboard radius is usually the best starting point. If you want the most control, a blank lets you customize everything, but it also demands more skill.
Tools You’ll Want Before You Start
- String winder and tuner
- Sharp craft knife or razor blade
- Small wood block or firm non-marring tapping block
- Small hammer
- Feeler gauges
- Sandpaper on a flat block or flat sanding surface
- Nut files sized for your string gauges
- Ruler or calipers
- Pencil for graphite marking and lubrication
- A small amount of white wood glue or Titebond-style glue
Can you replace a guitar nut without proper nut files? Technically, people try. Realistically, that often ends with a slot that is too wide, too rough, or shaped like a tiny canyon. If you are doing this yourself, nut files are one of the few places where the right tool genuinely matters.
Step 1: Check the Setup Before You Touch the Nut
Do this first, because nut work should not happen in a vacuum. Put on the string gauge you actually plan to use and tune the guitar to pitch. Then check:
- Neck relief: A slight forward bow is normal.
- Action at the nut: Is it too high, too low, or uneven?
- Action at the bridge or saddle: This affects how the guitar feels overall.
- Intonation: Final adjustments come later, but you should know where the guitar stands now.
A smart setup order is relief first, then nut height, then saddle or bridge height, and finally intonation. If your neck relief is off, do not finalize the nut slots yet. Otherwise, you may end up chasing measurements that move the moment the neck is corrected.
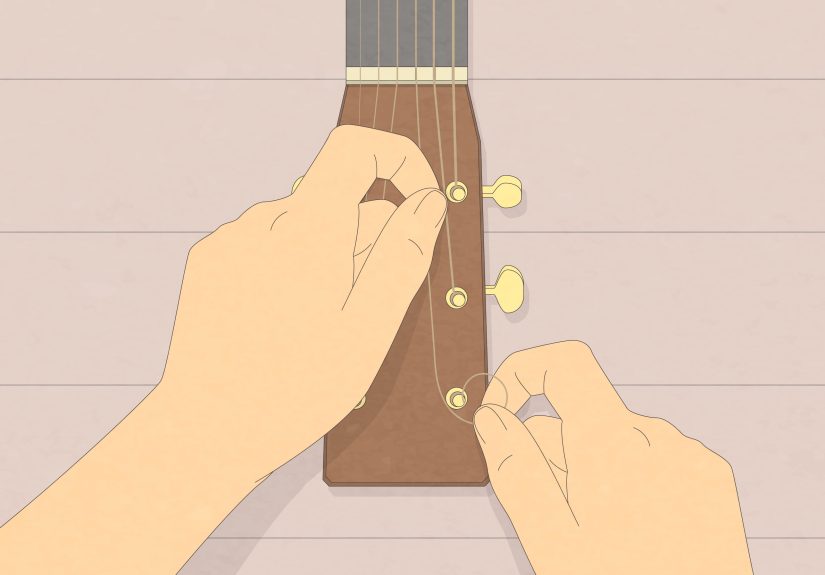
Step 2: Remove the Old Nut Safely
Loosen and remove the strings or pull them aside enough to clear the nut. Then score the finish carefully around the nut with a sharp blade. This helps prevent lacquer or finish from chipping when the nut breaks free.
Once the finish line is scored, tap the nut gently using a hardwood or firm block. For many standard nuts, alternating light taps from the fretboard side and the headstock side will loosen it. If the guitar is heavily finished or the nut is especially stubborn, forcing it can chip finish or damage wood. Some nuts may need to be carefully cut through and collapsed inward instead of simply tapped loose.
If you see heavy finish buildup, suspiciously strong glue, or anything that suggests the nut is essentially welded into place, stop before turning a setup job into a headstock repair story.
Step 3: Clean the Nut Slot
Once the old nut is out, clean the slot thoroughly. Remove old glue residue, finish flakes, and debris from the bottom and sidewalls. The slot should be clean and square, but do not start carving wood out of it like you’re remodeling a kitchen. You want a neat fit, not a bigger problem.
A dirty slot can keep the new nut from seating flat, which throws off height and fit before you even begin slotting. If the bottom is uneven, your measurements will lie to you. And unlike your buddy who swears his guitar “plays amazing” with a mile-high action, measurements do not joke around.
Step 4: Fit the New Nut to the Slot
Test-fit the new nut dry, with no glue. It should sit snugly in the slot without force. Sand the bottom or sides gradually on a flat surface until it fits. Go slow. Very slow. The golden rule is simple: you can always remove more material, but adding it back is much less fun.
What a good fit looks like
- The nut sits flat on the bottom of the slot.
- It does not rock front to back.
- It does not lean to one side.
- It slides in with light pressure, not brute force.
If you are using a pre-slotted nut, do not assume the slot height is already perfect. Pre-slotted usually means “the hard part is less awful,” not “skip all fitting forever.”
Step 5: Set the Overall Nut Height
Before refining individual slots, get the nut’s overall height in the right range. A common approach is to fret each string at the third fret and check for a tiny gap over the first fret. If the string is sitting high above the first fret, the nut or slot is too high. If the string is already touching the first fret, the slot is too low.
Some techs use rough starting targets around .020" on wound strings and .015" on plain strings, but feel, playing style, string gauge, and instrument type all matter. Use those as ballpark references, not divine law written on a stone tablet.
If the entire nut is too tall, sand the bottom of the nut carefully on a flat block, then reinstall and recheck. This is often faster and cleaner than trying to cut all six slots dramatically deeper.
Step 6: Cut or Refine the String Slots
This is the part that separates a decent nut replacement from one that actually improves the guitar. Each slot should match the string gauge closely, hold the string securely, and allow it to move freely during tuning and bending.
Best practices for slot filing
- Use a file that matches the string size or is only slightly larger.
- File with a gentle downward angle toward the tuner post.
- Keep the front edge of the nut as the clean takeoff point for the string.
- File a smooth slope behind that point so the string does not bind.
- Work slowly and tune back to pitch often to recheck height.
Coloring the slot with pencil graphite is a handy trick because it shows where the file is actually cutting. It also adds a little lubrication, which is especially helpful during final testing.
On guitars with 3×3 headstocks, the back half of the D and G slots often needs extra attention so the string has a straighter path to the tuner. If those slots are shaped badly, you can get tuning jumps, friction, or that classic “my G string refuses to act like a grown-up” problem.
Step 7: Glue the Nut in Place
When the fit and height are right, remove the nut one last time and add only a tiny amount of glue. Think two or three small drops, not a glue flood. The goal is to hold the nut in place, not to make future removal a dramatic event with witnesses.
White wood glue or a light Titebond-style application is commonly used because it holds securely but is still serviceable later. Press the nut back into place, string the guitar to pitch, and make sure it stays aligned while the glue sets.
Step 8: Final Setup After the New Nut Is Installed
Once the glue has set, bring the guitar to pitch and do a full setup check:
- Check neck relief again.
- Check action at the first fret and 12th fret.
- Adjust the bridge or saddle as needed.
- Check intonation.
- Lubricate the nut slots lightly if needed.
On acoustics, remember that saddle height and humidity can change how the whole guitar feels. On electrics, fine bridge adjustments usually go faster, but the nut still affects the first-position feel more than many players realize.
Mistakes to Avoid When Replacing a Guitar Nut
- Skipping the setup check first: You may fix the wrong problem.
- Hammering too hard: Finish chips and wood damage happen fast.
- Using too much glue: Future-you will not appreciate it.
- Filing slots too low: Open-string buzz is the usual reward.
- Ignoring string gauge: A slot that is too tight or too wide causes trouble.
- Assuming pre-slotted means perfect: It almost never does.
- Forgetting break angle: Slot shape matters just as much as slot depth.
Acoustic and Electric Examples
Example 1: Acoustic guitar with stiff first-position chords
If your open chords feel harder than they should, but the guitar plays fine up the neck, the nut slots may be too high. A new, properly fitted bone or TUSQ nut can make cowboy chords feel easier and cleaner without forcing you to lower the saddle too much.
Example 2: Electric guitar with tuning jumps on bends
A Strat-style or Tele-style guitar with a poorly cut nut may “catch” during tuning or after bends. A well-fit pre-slotted nut, lightly refined and lubricated, can make tuning stability noticeably better.
Example 3: Gibson-style electric with a rebellious G string
Because of the angled 3×3 headstock path, the G slot often needs careful shaping on the back half. If the slot does not guide the string cleanly toward the tuner, the string can bind and suddenly jump in pitch. That problem often gets blamed on tuners when the nut is the real troublemaker.
When You Should Hand the Job to a Pro
DIY is great until it becomes “why is there finish missing from my headstock?” Consider professional help if:
- The guitar is expensive, vintage, or sentimental.
- The nut appears heavily glued or finished in place.
- You do not own proper nut files.
- You are working with a locking nut or specialty design.
- You already filed one slot too low and your confidence has left the building.
There is no shame in paying a luthier for nut work. In fact, many players happily do that because nut replacement sits in the awkward middle ground between “basic maintenance” and “tiny precision woodworking.” That is not a relaxing place to be with a razor blade in one hand and regret in the other.
Real-World Experiences and Lessons From Replacing Guitar Nuts
One of the most common real-world experiences with guitar nut replacement is discovering that the nut was only part of the problem. A player will often assume the nut is bad because the guitar feels stiff near the headstock, but once the old nut comes off and the new one goes on, they realize the neck relief was also off, the strings were heavier than expected, or the saddle height had been compensating for a setup issue somewhere else. That is why experienced techs almost always look at the whole setup before they commit to slot depth. The nut may be guilty, but it rarely acts alone.
Another common lesson is how much better a guitar can feel from a change that seems tiny on paper. Many players expect a new nut to improve tuning only, but the first thing they notice is usually comfort. Chords near the first fret feel easier. Notes ring more evenly. Bar chords stop feeling like arm day at the gym. This is especially noticeable on acoustic guitars, where a poorly cut nut can make the instrument feel tougher than it really is.
Players replacing a nut for the first time also tend to underestimate how important fit is before any slotting happens. A nut that is slightly too tall, slightly tilted, or not fully seated can send you into a spiral of unnecessary filing. Then you keep chasing the numbers, and suddenly a simple install turns into “how do I fix a slot I cut too low?” The best experiences usually come from slow sanding, repeated dry-fitting, and resisting the urge to rush because everything looks “basically right.” In nut work, basically right is often secretly wrong.
Electric guitar players often report the biggest change in tuning stability after replacing a worn plastic nut with a better-cut bone or self-lubricating synthetic nut. On 3×3 headstock guitars, the D and G strings are frequent troublemakers, and once those slots are shaped properly, tuning can feel dramatically smoother. Acoustic players, meanwhile, often notice improved clarity on open chords and a more balanced response across the strings, especially if the old nut had uneven slot wear.
There is also the universal experience of learning that less glue is more. Many beginners assume the nut needs to be “secure,” so they apply enough adhesive to hold a dining table together. Then the next replacement becomes a small archaeological excavation. A light application is enough. The strings provide downward pressure, and the glue is really there to keep the nut from shifting sideways when the strings are off.
Finally, the biggest long-term lesson is that good nut work teaches patience. It trains your eye, your feel, and your ability to stop before overdoing a cut. Once players understand how much the nut affects comfort, action, and tuning, they usually become more thoughtful about the entire setup. That is the funny thing about this little strip at the end of the fretboard: replacing it can change the way you think about the whole guitar.
Conclusion
Learning how to replace a guitar nut on acoustic and electric guitars is one of the most useful repair skills a player can develop. Done well, it improves tuning stability, comfort, string spacing, and overall playability. Done badly, it becomes an impressive demonstration of how six tiny slots can ruin your afternoon.
The safest path is simple: diagnose first, measure carefully, fit the nut slowly, file with the correct tools, and use only a tiny amount of glue. Whether you choose bone, TUSQ, or another quality material, the real secret is precision. A guitar nut is not glamorous, but when it is cut correctly, the whole instrument feels more relaxed, more responsive, and much more fun to play.


