Table of Contents >> Show >> Hide
- Why Mason Jar Snow Globes Are So Popular
- What You Need to Make Mason Jar Snow Globes
- How to Make Mason Jar Snow Globes Step by Step
- Best Tips for a Mason Jar Snow Globe That Looks Professional
- Creative Mason Jar Snow Globe Ideas
- Common Mistakes to Avoid
- How to Display and Gift Mason Jar Snow Globes
- Are Mason Jar Snow Globes Worth Making?
- Experience and Practical Lessons From Making Mason Jar Snow Globes
- Conclusion
- SEO Metadata
Note: This article is fully rewritten in original, web-ready English and stripped of unnecessary reference artifacts for direct publishing.
There are two kinds of winter people: the ones who dream of a gentle snowfall outside the window, and the ones who like their snow where it belongsinside a jar, on a shelf, and nowhere near their driveway. If you fall into the second camp, learning how to make mason jar snow globes is basically a holiday superpower. It is charming, affordable, beginner-friendly, and just messy enough to feel like a craft without turning your kitchen into a glitter crime scene.
A DIY mason jar snow globe is one of those rare holiday projects that checks every box. It looks custom. It feels nostalgic. It makes a thoughtful handmade gift. And it gives you an excuse to buy tiny bottle brush trees, which is honestly one of life’s quieter joys. Better yet, you can personalize the scene to match your style. Go classic with a miniature deer and evergreen trees, make a family photo version for gifting, or skip the Christmas theme entirely and build a cozy winter village that can stay out long after the last cookie disappears.
Below, you’ll find a practical, polished guide to making mason jar snow globes that actually look good when you flip them over. No sad floating glue blobs. No mystery leaks. No glitter sludge lurking at the bottom like a tiny craft swamp.
Why Mason Jar Snow Globes Are So Popular
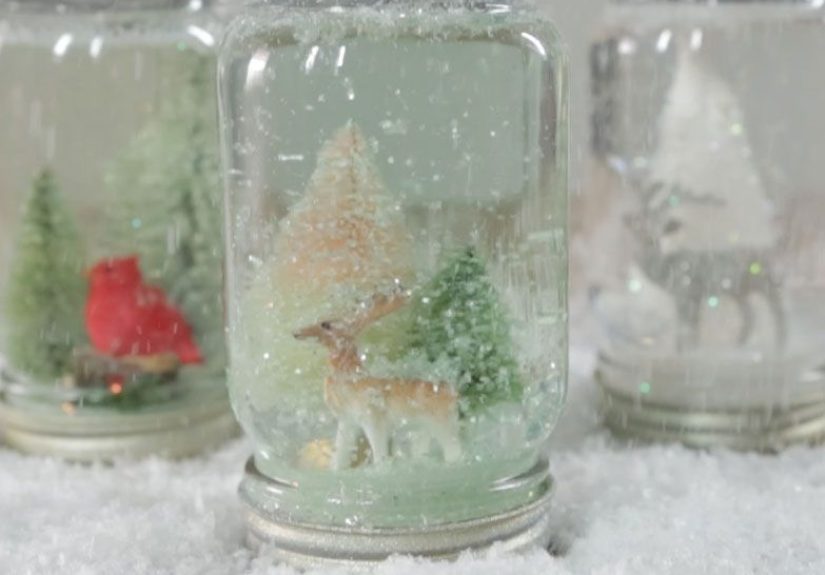
Mason jars make ideal snow globe containers because they are easy to find, sturdy, reusable, and available in multiple sizes. They also give the finished project a slightly rustic, handmade look that works beautifully with holiday decor. A small jar feels sweet and giftable, while a pint-size jar gives you enough room to create a more detailed winter scene.
Another reason this craft has lasting power is flexibility. You can keep it traditional with snowy evergreens and woodland animals, create a personalized photo snow globe for grandparents, or go delightfully off-script with retro cars, pastel trees, tiny houses, or even non-holiday figurines. The basic process stays the same. The personality is all yours.
What You Need to Make Mason Jar Snow Globes
Essential supplies
- Mason jar with lid and band
- Mini figurines, bottle brush trees, or other small waterproof decorations
- Waterproof adhesive such as epoxy, super glue, or another waterproof craft glue
- Distilled water
- Fine glitter, glitter flakes, or faux snow
- Glycerin or clear glue
Optional supplies
- Sandpaper for roughing the inside of the lid
- Laminated photos for a personalized version
- Ribbon, twine, lace, bells, or washi tape for decorating the outside
- Fake moss, tiny pebbles, or white craft filler for extra texture
- Hot glue gun for non-water-exposed decorative details
A quick reality check: not every cute little object belongs inside a water-filled snow globe. Paper decorations will not survive unless they are laminated. Untreated metal may rust. Cardboard will absolutely surrender. If you want your handmade Christmas decor to last beyond one cheerful season, stick with plastic, ceramic, sealed wood, or properly laminated pieces.
How to Make Mason Jar Snow Globes Step by Step
1. Choose your scene before you touch the glue
Set your figurines and trees on the lid first and test the fit by placing the jar over them. This simple step saves you from gluing down the world’s cutest tiny reindeer only to realize it is too tall and now permanently lives in a jarless existence. Keep the design low and centered so it looks balanced from every angle.
2. Prep the lid for better grip
If the inside of the lid is slick, lightly sand it. This gives epoxy or waterproof glue a little more bite, which helps the figurines stay put after repeated shaking. It is a small detail, but it can make a big difference in how durable the final globe feels.
3. Glue the figurines in place
Attach your figurines, trees, or laminated photo to the inside of the lid. Use waterproof adhesive for anything that will sit inside the globe. Let it cure completely according to the product directions. This is the part where patience earns its holiday bonus. If you rush it, your snowman may go from “charming centerpiece” to “dramatic winter shipwreck.”
4. Fill the jar almost to the top
Pour distilled water into the jar, leaving just enough room for the inserted scene. The goal is to minimize large air bubbles while still allowing the lid and attached decorations to slide in without overflowing like a tiny craft geyser. Distilled water is commonly used because it keeps the globe looking clean and clear.
5. Add glitter and your swirl helper
Add a pinch or spoonful of glitter, depending on jar size and your tolerance for sparkle. Then add a few drops of glycerin. This helps the glitter float more slowly, which creates that classic drifting-snow effect. Some crafters use clear glue instead for a similar slow-fall look. The trick is moderation. Too little, and your glitter drops like a rock. Too much, and it clumps like it is staging a protest.
6. Seal the jar
Carefully lower the decorated lid into the jar and screw it on tightly. Some makers like to run a bead of glue around the rim or underside of the lid for extra insurance against leaks. Once sealed, gently invert the jar and check for drips before you start shaking like it owes you money.
7. Style the outside
Dry the jar, then dress it up. Wrap twine around the neck for a rustic look, add ribbon for a gift-ready finish, or paint the lid band to match your holiday palette. This outer layer is where a simple jar turns into a polished decoration.
Best Tips for a Mason Jar Snow Globe That Looks Professional
Use the right glitter
Fine glitter creates a soft snowfall effect. Chunkier glitter flakes add drama and flash. Faux snow can look beautiful, but only if the pieces are light enough to move well in the liquid. Mixing two sizes often creates the most natural motion.
Keep the scene simple
A crowded snow globe rarely looks magical. It looks like rush-hour traffic in December. One focal figurine and one or two supporting elements often create the prettiest result.
Match the base to the story
White glitter and bottle brush trees work for a classic holiday look. A laminated family photo makes a keepsake gift. Tiny houses create a village scene. A retro car with a tree tied to the top gives the globe a nostalgic, vintage feel. The best snow globe ideas always feel like a tiny story trapped in glass.
Let the glue cure fully
This is the tip people ignore right before they regret everything. Give the adhesive enough time to dry before filling the jar. If you do not, decorations may shift, lift, or float loose in the water.
Creative Mason Jar Snow Globe Ideas
Classic woodland winter
Use a deer, a fox, or a tiny cabin with a couple of green trees. Add silver glitter for a frosty look. This version works beautifully on mantels and side tables.
Family photo keepsake
Print a favorite photo, laminate it, trim around the figures, and glue it into the lid scene. This is especially nice for grandparents, teachers, or long-distance relatives who appreciate something personal and handmade.
Minimalist winter decor
Choose a single bottle brush tree, white glitter, and a neutral ribbon. It is simple, elegant, and easy to pair with modern holiday decorating.
Kid-friendly character globe
Let kids choose plastic animals, tiny snowmen, or cheerful figurines. Just make sure an adult handles the stronger glue and final seal. It is a fun winter craft because children get creative input without needing advanced skills.
Waterless version
If you hate the idea of leaks or want a less fussy project, make a waterless mason jar snow globe. Add faux snow, tiny trees, and figurines inside a jar without any liquid. It will not swirl the same way, but it still looks festive and is easier to store.
Common Mistakes to Avoid
- Using non-waterproof glue: Regular craft glue may loosen over time in a liquid-filled globe.
- Adding too much glitter: More is not always merrier. Too much sparkle can make the scene cloudy.
- Overdoing the glycerin or glue: A little slows the snow. A lot creates sluggish, sticky glitter soup.
- Skipping a fit test: Always check the height of your decorations before gluing.
- Using unsealed paper: Unless it is laminated, it will not hold up.
- Ignoring cure time: Wet glue and eager crafting do not mix.
How to Display and Gift Mason Jar Snow Globes
These DIY snow globes look great grouped in odd numbers on a mantel, shelf, or entryway table. Mix heights and themes so the display feels collected instead of copy-and-paste. For gifts, tie a handwritten tag around the lid and pair the globe with hot cocoa mix, a holiday mug, or a cozy tea towel. Suddenly your cute little craft turns into a full gift moment.
If you are making several at once, create a mini assembly line. Prep all the lids, plan all the scenes, glue everything down, then move on to filling and sealing. Batch crafting is faster, cleaner, and much less likely to leave you wandering around the house wondering where you put the tiny bottle brush tree that was just in your hand five seconds ago.
Are Mason Jar Snow Globes Worth Making?
Absolutely. They are one of the best holiday crafts for people who want something festive without needing advanced DIY skills or a giant supply list. The materials are manageable, the process is adaptable, and the results can look surprisingly polished. More importantly, mason jar snow globes have that handmade quality people actually remember. Store-bought decor can be lovely, but a tiny winter scene you built yourself has more personality than another box-store ornament trying very hard to seem whimsical.
If you want a winter project that is easy to personalize, fun to display, and charming enough to give away, this one earns a permanent spot in the holiday craft rotation.
Experience and Practical Lessons From Making Mason Jar Snow Globes
One of the funniest things about making mason jar snow globes is that the first one teaches you more than any supply list ever could. On paper, the project seems almost suspiciously simple: glue, water, glitter, lid, done. In real life, you discover that tiny design choices make a huge difference. A figurine that looked adorable on the table can suddenly seem enormous once it is trapped inside a jar. Glitter that looked “subtle” in the bottle can behave like it just signed a performance contract. And the jar you grabbed because it was convenient can turn out to have exactly the wrong proportions for the scene you imagined. That is not failure. That is the craft doing what good crafts doteaching you while pretending to be cute.
Most people also learn quickly that snow globes reward restraint. The most successful versions are not usually the ones with seven trees, three deer, a sled, a fence, and enough glitter to qualify as a weather event. They are the ones with a clear focal point and a little breathing room. A single tree beside a tiny deer can look more magical than a crowded holiday traffic jam. The jar acts like a frame, and the best scenes respect that frame.
There is also a very real emotional charm to this project. A mason jar snow globe feels small, but it carries a lot of mood. Making one for yourself is fun; making one for someone else can feel oddly meaningful. A family photo globe for grandparents, a tiny winter village for a friend who loves vintage decor, or a simple white-and-green globe for a teacher can feel more personal than something pulled off a store shelf. It says, “I made this with my hands,” which still matters in a world full of overnight shipping.
Then there is the practical side. Snow globes are excellent teachers of patience. You cannot bully glue into drying faster. You cannot argue a leaking lid into becoming watertight. You cannot pour in half the glitter bottle and then act shocked when your beautiful woodland scene disappears behind a sparkling blizzard. The project gently insists that you slow down, test the fit, wipe the rim, let things cure, and think one step ahead. In other words, it is a holiday craft with sneaky character-building skills.
And finally, there is the payoff: the first good shake. When the glitter lifts, swirls, and drifts exactly the way you hoped, the whole thing feels ridiculously satisfying. Suddenly your little jar has atmosphere. It has motion. It has a tiny winter story inside it. That moment is why people keep making mason jar snow globes year after year. They are easy enough for beginners, customizable enough for experienced crafters, and charming enough to become part of your holiday tradition. Not bad for a jar, some water, and a little seasonal ambition.
Conclusion
If you have been wondering how to make mason jar snow globes that feel polished instead of homemade in the wrong way, the formula is simple: choose a clear theme, keep the scene compact, use waterproof materials, go easy on the glitter, and seal everything carefully. Once you make one successful globe, the second is easier, the third is more creative, and before long you are the kind of person who has strong opinions about bottle brush trees. Welcome. We saved you a seat.
SEO Metadata
Editorial note: This article was synthesized from widely used U.S. craft and home-lifestyle guidance, then fully rewritten for original web publication in standard American English.