Table of Contents >> Show >> Hide
- Why Baking Soda Works for Oven Cleaning
- What You Need
- How to Clean an Oven with Baking Soda: 11 Steps
- Step 1: Make Sure the Oven Is Off and Completely Cool
- Step 2: Remove Oven Racks, Thermometer, and Loose Debris
- Step 3: Mix a Baking Soda Paste
- Step 4: Spread the Paste Inside the Oven
- Step 5: Let the Paste Sit
- Step 6: Soak the Oven Racks Separately
- Step 7: Mist the Dried Paste with Water or Vinegar
- Step 8: Wipe Out the Paste from Top to Bottom
- Step 9: Scrape Stubborn Spots Gently
- Step 10: Clean the Oven Door Glass Carefully
- Step 11: Dry, Reassemble, and Run a Short Warm-Up
- Tips for Better Results
- Common Mistakes to Avoid
- How Often Should You Clean Your Oven?
- Real-Life Experience: What People Learn After Cleaning an Oven with Baking Soda
- Conclusion
Cleaning an oven is one of those chores people postpone until the baked-on splatters start looking like modern art. The good news is that you do not need a hazmat suit, a chemistry degree, or a can of super-intense fumes to get the job done. If you want a gentler, pantry-based method, cleaning an oven with baking soda is a practical way to loosen grease, lift stains, and freshen up the place where your lasagna dreams are supposed to come true.
This method works especially well for routine buildup, everyday spills, and ovens that are dirty but not apocalyptic. Baking soda is mildly abrasive, easy to spread into a paste, and surprisingly good at helping loosen grime when you give it enough time to work. Add a little patience, a damp cloth, and some strategic scrubbing, and your oven can go from “crime scene” to “company-ready” without a lot of drama.
Below, you will learn exactly how to clean an oven with baking soda in 11 straightforward steps, plus a few expert tips on racks, glass doors, stubborn spots, and how to keep your oven from getting scary again.
Why Baking Soda Works for Oven Cleaning
Before we dive into the steps, here is the quick science without making it feel like a pop quiz. Baking soda is a mild abrasive, which means it can help scrub away stuck-on food without being as harsh as aggressive chemical cleaners. It also mixes easily with water to form a spreadable paste that clings to greasy surfaces. That matters because oven messes are rarely polite enough to slide off on request.
For many households, this natural oven cleaning approach is appealing because it is simple, affordable, and lower-fume than many traditional oven cleaners. That said, if your oven has years of neglect, thick carbonized buildup, or manufacturer restrictions, a manual or approved cleaner may still be necessary. Think of baking soda as the reliable friend who shows up with snacks and elbow grease, not a magic wand.
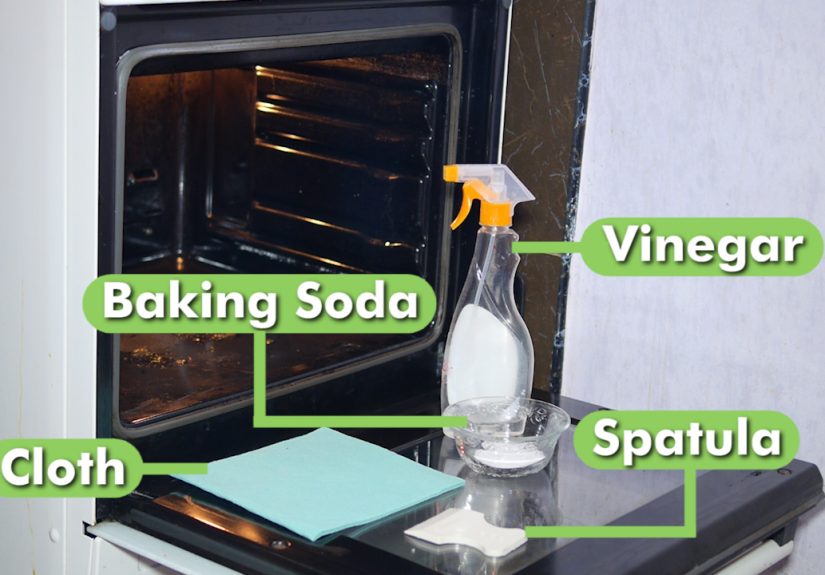
What You Need
- Baking soda
- Water
- A small bowl
- A sponge or microfiber cloth
- A spray bottle with water or white vinegar
- A plastic or silicone spatula for spreading paste
- A non-abrasive scrub pad or soft brush
- Rubber gloves
- A plastic scraper for stubborn spots
- Trash bag or old towel for protecting the floor
How to Clean an Oven with Baking Soda: 11 Steps
Step 1: Make Sure the Oven Is Off and Completely Cool
Start with the obvious-but-worth-saying rule: never clean a hot oven. Turn the oven off and make sure it is fully cool before you begin. This makes the job safer and keeps your cleaning paste from drying too fast. If you just finished roasting a chicken, now is a great time to walk away, hydrate, and emotionally prepare.
Step 2: Remove Oven Racks, Thermometer, and Loose Debris
Take out the oven racks and anything else removable, such as an oven thermometer or pizza stone if your manufacturer says it should not stay inside during cleaning. Then use a dry paper towel, brush, or handheld vacuum to remove loose crumbs and burnt bits from the oven floor. This step may feel small, but it keeps you from turning dry debris into muddy oven confetti later.
Step 3: Mix a Baking Soda Paste
In a bowl, combine baking soda with just enough water to make a thick, spreadable paste. A common starting point is about half a cup of baking soda with a few tablespoons of water, though you can scale up if your oven is large or especially grimy. You want the consistency of frosting that is not trying too hard. Too runny, and it drips. Too dry, and it crumbles like sad beach sand.
Step 4: Spread the Paste Inside the Oven
Using a spatula, gloved hands, or a sponge, spread the paste over the interior surfaces of the oven, including the bottom, side walls, back wall, and the inside of the door. Avoid coating the heating elements, gas openings, fans, or door gasket unless your owner’s manual specifically says it is safe. Concentrate extra paste on greasy patches, burnt spills, and dark splatters that look like they have signed a long-term lease.
Step 5: Let the Paste Sit
This is the part where patience earns its paycheck. Let the baking soda paste sit for at least several hours. Overnight is even better for heavier messes. The longer it sits, the more time it has to soften residue and loosen stuck-on grease. This waiting period is what makes baking soda oven cleaning more effective and less scrub-heavy the next day.
Step 6: Soak the Oven Racks Separately
While the paste is doing its thing, tackle the oven racks. Place them in a sink, tub, or large bin lined with an old towel to help prevent scratches. Add hot water, dish soap, and a sprinkle of baking soda if you like. Let the racks soak for a few hours or overnight, then scrub with a non-abrasive pad or brush. Be sure to check your appliance manual first, because some racks have finishes that should not be soaked or cleaned a certain way.
Step 7: Mist the Dried Paste with Water or Vinegar
When you are ready to remove the paste, lightly mist it with water or a little white vinegar. This helps soften the dried baking soda and can make wiping easier. Do not flood the oven. You want damp, not swamp. A light spray is enough to loosen the paste without sending gritty runoff into every corner of the kitchen.
Step 8: Wipe Out the Paste from Top to Bottom
Using a damp microfiber cloth or sponge, wipe out the paste section by section. Start near the top of the oven and work downward so debris falls onto areas you have not cleaned yet. Rinse your cloth often in clean water. This part can take several passes, especially if you were generous with the paste or your oven was in a committed relationship with grease.
For the best results, do not rush. Residual baking soda can leave a chalky film if you only half-wipe it. A clean, damp cloth and a little persistence will leave the interior much cleaner and ready for the final polish.
Step 9: Scrape Stubborn Spots Gently
If a few baked-on spots remain, use a plastic scraper or non-abrasive scrubber to loosen them. Avoid metal tools that can scratch enamel or damage glass. The goal is to coax the mess off, not declare war on your appliance. If necessary, reapply a bit of paste to especially stubborn stains and let it sit again before scrubbing.
Step 10: Clean the Oven Door Glass Carefully
The oven door glass is where grime likes to put on a show. Spread a small amount of baking soda paste on the inside glass, let it rest, then wipe it off with a damp cloth. For stubborn spots, use a plastic scraper carefully and wipe in one direction for a cleaner finish. Keep moisture and cleaner away from the door gasket and do not soak the edges of the glass panel.
If your glass still looks cloudy, another rinse with clean water and a dry microfiber buff usually helps. This is often the moment when people suddenly realize their oven light still works and their appliance has not, in fact, been permanently beige all these years.
Step 11: Dry, Reassemble, and Run a Short Warm-Up
Once all the baking soda residue is gone, dry the interior with a clean cloth. Dry the racks thoroughly and return them to the oven. Then run the oven on low heat for 10 to 15 minutes if needed to evaporate any leftover moisture. This can also help reveal whether any baking soda residue remains. If you notice white streaks, wipe again with a damp cloth before cooking.
Tips for Better Results
Clean Spills Before They Become Fossils
The easiest oven to clean is the one you do not let turn into a geological dig site. If cheese bubbles over or sauce splatters, wipe it up once the oven has cooled enough to do so safely. Regular spot cleaning makes deep cleaning much easier.
Check the Owner’s Manual First
Not every oven interior, rack finish, or self-cleaning feature should be treated the same way. Your manufacturer’s instructions matter, especially for coated racks, door gaskets, hidden elements, and steam-clean or self-clean models. A quick manual check can save you from accidental damage.
Do Not Expect Miracles from a Five-Minute Clean
One of the biggest mistakes people make with how to clean an oven naturally methods is not giving the paste enough time to work. Baking soda is effective, but it is not a movie montage. A longer dwell time usually means less aggressive scrubbing.
Know When to Upgrade the Strategy
If your oven has thick, blackened buildup that has survived several cleaning attempts, you may need a manufacturer-approved cleaner or professional-grade method. Baking soda is excellent for many messes, but it is not required to be a superhero every single time.
Common Mistakes to Avoid
- Cleaning while the oven is still warm
- Using metal scrubbers or razor blades on enamel or glass
- Getting cleaner on the gasket, heating element, or gas openings
- Forgetting to wipe away all baking soda residue
- Soaking racks without checking the owner’s manual
- Using too much water and turning the job into a puddle problem
How Often Should You Clean Your Oven?
A good rule of thumb is to deep clean your oven every three months if you cook regularly, with light spot cleaning in between. If you bake often, roast greasy foods, or love casseroles that bubble over like they are auditioning for a disaster film, you may need to clean it more often. The goal is not perfection. The goal is preventing buildup from becoming a full-time resident.
Real-Life Experience: What People Learn After Cleaning an Oven with Baking Soda
The most common lesson people learn is that oven cleaning is usually less horrible than the anticipation of oven cleaning. The dread is enormous. The actual method is mostly spreading paste, waiting, wiping, and discovering that time does a lot of the heavy lifting. In real homes, the difference between a frustrating clean and a satisfying one usually comes down to two things: patience and realistic expectations.
For example, someone cleaning an oven after a busy holiday season might find that the first wipe-down removes the easy stuff, but the corners and door glass still need a second round. That does not mean the method failed. It usually means the oven had multiple layers of buildup from repeated roasting, pie overflow, and one unfortunate cheese incident. Reapplying the baking soda paste only to those trouble spots often works better than starting over on the entire oven.
Another common experience is realizing that the racks are the real villains. Many people focus on the oven cavity and then discover the racks still look like they survived a barbecue competition. A long soak, followed by gentle scrubbing, usually makes the biggest visual difference. Once the racks are clean, the whole oven feels newer, even if the interior still has a tiny amount of staining that no reasonable human should lose sleep over.
People also learn that microfiber cloths are worth their weight in gold. Paper towels tend to shred, basic sponges get grimy fast, and rough scrubbers can be too aggressive. A damp microfiber cloth, rinsed often, removes more paste than people expect and leaves fewer streaks on the glass. It is not glamorous advice, but neither is oven cleaning, so we are keeping it honest.
There is also a mental shift that happens after doing this once. The oven stops being a mysterious appliance that cleans itself through sheer intimidation and becomes just another surface you can manage. That confidence matters. Once people realize they can clean the oven with ingredients already in the pantry, they are more likely to handle spills sooner. That means less smoke, fewer weird smells when preheating, and less panic when guests are on the way.
One especially useful takeaway is that “clean” and “brand-new” are not the same thing. Older ovens may keep some discoloration, especially around the bottom or near heavily used areas. That is normal. The goal of DIY oven cleaning is to remove grease, food residue, and odors so the oven works better and looks dramatically improved. Chasing a factory-fresh finish on a decade-old appliance can waste time and enthusiasm.
Finally, people often say the best part is the next time they cook. A cleaner oven tends to smell better, smoke less, and feel less chaotic overall. There is a small but real joy in sliding dinner into an oven that no longer looks judgmental. And once you have done the full 11-step routine, future cleanings get easier because you know exactly what works, what tools you actually need, and how long to let the baking soda sit before the grime finally gives up and moves out.
Conclusion
If you have been avoiding this chore, how to clean an oven with baking soda is one of the simplest places to start. It is affordable, practical, and well-suited to routine oven grime. With the right paste, enough dwell time, and a gentle wipe-down, you can clean the oven interior, racks, and glass without filling your kitchen with harsh fumes or making the task more dramatic than it needs to be.
The secret is not brute force. It is letting the baking soda do its job, working carefully, and knowing that even a big improvement counts as a win. Your oven does not need to look showroom perfect. It just needs to stop looking like it has seen things.