
Table of Contents >> Show >> Hide
- Before You Start: Choose the Right Vase, Ribbon, and Adhesive
- Way 1: Wrap the Middle of the Vase for a Clean, Classic Look
- Way 2: Add a Ribbon Collar and Big Bow at the Neck
- Way 3: Create a Layered Ribbon Sleeve for a Designer Look
- Extra Tips to Make Your Ribbon Vase Look Better Than “Homemade”
- Final Thoughts
- My Experience With Ribbon Vase DIYs: What Actually Happens in Real Life
A plain flower vase is a little like plain toast: perfectly fine, but clearly begging for toppings. Ribbon is one of the easiest, cheapest, and most charming ways to dress up a vase without turning your dining table into a full-blown craft disaster zone. Whether you want a soft farmhouse look, a polished party centerpiece, or something cute enough to make your guests ask, “Wait, did you buy that?” decorating a flower vase with ribbon is a simple DIY that delivers big visual payoff.
The best part is that this craft works with almost anything you already have at home: a glass cylinder, a mason jar, a thrift-store vase, leftover satin ribbon from last holiday season, or that random spool you swore you would use someday. Today is that day. Below, you’ll learn three fun ways to decorate a flower vase with ribbon, plus practical tips for choosing materials, making the design look intentional, and avoiding the classic “hot glue spiderweb” problem that haunts crafters everywhere.
Before You Start: Choose the Right Vase, Ribbon, and Adhesive
Before you start wrapping ribbon around anything that stands still long enough, take two minutes to set yourself up for success. A little prep makes a huge difference, especially if you are decorating glass.
Pick a vase shape that matches your idea
Tall cylinder vases are the easiest for clean ribbon bands, while mason jars and round jars look especially cozy with bows, twine, or layered trims. If your vase has a wider mouth, it also gives you more flexibility for fuller flower arrangements later on. For simple DIY ribbon projects, straight-sided glass containers are the friendliest choice because the ribbon lies flat and behaves itself for once.
Match ribbon width to the size of the vase
Thin ribbon works beautifully on bud vases and narrow-neck bottles. Medium or wide ribbon usually looks better on mason jars, chunky cylinders, and short centerpiece vases. A tiny ribbon on a big vase can disappear visually, while an extra-wide ribbon on a tiny bottle can look like the vase is wearing a winter scarf in July.
Clean the surface first
If you are working with glass, clean it and let it dry completely before adding tape, glue, or decoupage. This matters more than people think. Dust, oils, and fingerprints can keep adhesives from sticking well, which is a very rude thing for invisible grime to do.
Choose the right adhesive for the job
If you want a removable design, use clear double-sided adhesive squares or mounting tape in tiny pieces. If you want a stronger hold on glass, hot glue can work well, especially for heavier trims or textured wraps. For ribbon fully wrapped around the outside of a vase, a decoupage medium can help secure the ribbon and create a sealed finish.
Keep flowers in mind, too
If you plan to use fresh flowers, leave enough space to actually hold water and stems comfortably. For wide-mouth jars, a simple clear tape grid across the top can help keep blooms upright and evenly spaced. That tiny trick makes even beginner arrangements look more organized.
Way 1: Wrap the Middle of the Vase for a Clean, Classic Look
If you want the easiest possible ribbon vase DIY, this is your starter project. It is quick, pretty, and surprisingly versatile. You can make it look elegant, rustic, festive, romantic, or cheerfully overachieving depending on the ribbon you choose.
What you need
- A clean glass vase or mason jar
- One or two ribbons
- Scissors
- Double-sided tape, craft glue, or decoupage medium
How to do it
Measure the widest part of your vase where you want the ribbon to sit. Cut your ribbon so it wraps around the vase with just a little overlap. If you want a polished finish, place the ribbon around the center of the vase and secure the seam at the back. For a softer handmade look, let the overlap show slightly and cover it with a tiny bow, button, or faux flower.
You can keep it simple with one satin ribbon band, or layer a narrower ribbon over a wider one for more dimension. For example, a cream grosgrain ribbon under a skinny floral-print ribbon looks sweet and vintage. A black velvet ribbon on a clear cylinder looks dramatic and modern. A gingham ribbon on a mason jar says, “Yes, I absolutely own a pie dish.”
Why this method works
This design frames the vase without overwhelming it. It is especially good if the flowers are the main attraction and you only want the container to look more intentional. It also works well for gifts, baby showers, spring brunch tables, and casual home décor because it feels decorated but not fussy.
Style ideas
- Farmhouse: burlap-style ribbon with a thin lace overlay
- Romantic: blush satin ribbon with a pearl pin or tiny bow
- Holiday: red velvet ribbon with evergreen stems
- Everyday: neutral cotton ribbon on a recycled jar
If you want a slightly more durable finish, brush decoupage medium onto the outside of the vase, lay the ribbon in place, and smooth it carefully. That works especially well when you want the ribbon to look like part of the vase instead of a temporary accessory.
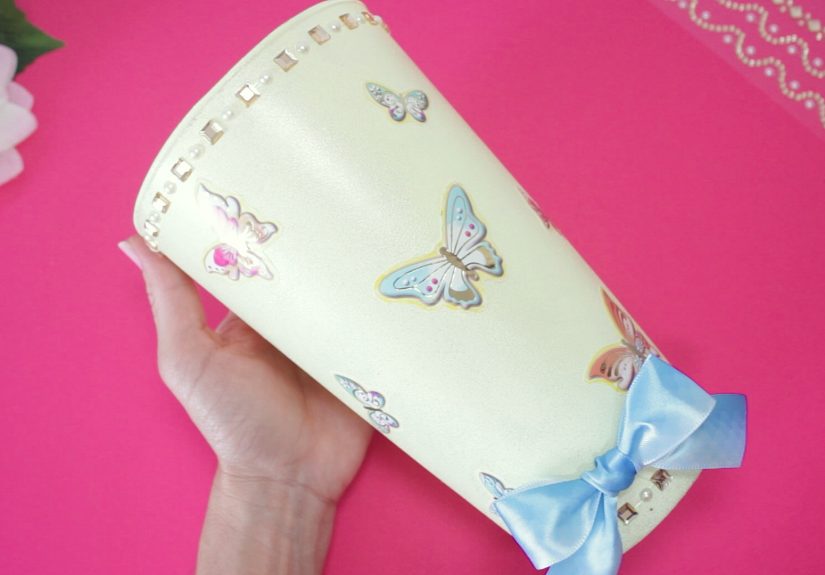
Way 2: Add a Ribbon Collar and Big Bow at the Neck
This method is for people who believe crafts should have personality. A ribbon collar at the neck of the vase, finished with a full bow and flowing tails, instantly makes the piece feel festive and giftable. It is wonderful for centerpieces, party décor, weddings, birthdays, or just cheering up a shelf that has been emotionally beige for too long.
What you need
- A vase with a neck or defined upper area
- Ribbon in one or two widths
- Narrow ribbon or floral wire to tie the bow center
- Scissors
- Optional: charms, tags, faux greenery, mini bells, or dried flowers
How to do it
Wrap a ribbon around the neck of the vase and tie or glue it in place. Then make a separate bow. A classic florist-style bow looks best when you twist the ribbon as you form loops, keep the pretty side facing outward, and alternate the loops for fullness. Secure the center with narrow ribbon or wire, fluff the loops, and then attach the bow to the collar with glue or by tying it directly onto the vase.
Let the tails hang naturally, or trim them into angled ends for a neater finish. If your vase is short and round, shorter tails look balanced. If it is tall and slim, longer tails can make it feel elegant and vertical.
Why this method works
The neck of the vase is a natural focal point, so decorating that area looks intentional. It also keeps most of the vase body visible, which is great if you are using clear glass and want the stems, water, or vase shape to show. This method feels polished without requiring much skill. In craft terms, that is called winning.
Style ideas
- Wedding or shower: ivory satin bow with long tails
- Birthday party: bright striped ribbon with a gift tag
- Rustic centerpiece: twine collar plus soft ribbon bow
- Seasonal décor: plaid ribbon with faux berries or tiny bells
This is also a great method if you are making several matching vases for a table. Use the same main ribbon on all of them, but vary the bow size or add little details like tags, sprigs, or dried lavender for a collected-but-coordinated look.
Way 3: Create a Layered Ribbon Sleeve for a Designer Look
If you want your DIY flower vase to look a bit fancier, make a layered sleeve effect. Think of it as giving the vase an outfit instead of a single accessory. This technique combines ribbon with texture, pattern, or contrast so the finished piece feels custom and more decorative.
What you need
- A plain vase or mason jar
- Wide ribbon or multiple narrow ribbons
- Optional accents: lace, patterned fabric strips, twine, or paper trim
- Mod Podge or strong craft adhesive
- Scissors
How to do it
Start with a base layer. This can be a wide ribbon wrapped around the lower half of the vase, a few vertical ribbon strips, or a decorative band near the bottom. Then add a second layer in a different texture or width. For example, you can place lace over a satin ribbon, cross a skinny ribbon over a wider neutral band, or pair a floral fabric strip with a coordinating ribbon around the middle or neck.
One particularly pretty approach is to use patterned fabric or decorative paper for the base and finish it with a matching ribbon tied around the top or middle. That combination adds color and softness without making the vase look cluttered. Another good option is to create evenly spaced vertical ribbon lines from top to bottom, then wrap one horizontal ribbon band around the center to hold the pattern together visually.
Why this method works
Layering adds depth. Instead of looking like you simply tied ribbon around a jar five minutes before guests arrived, it looks like you actually planned something. Shocking, I know. This method works especially well for seasonal centerpieces, bridal brunch décor, giftable flower jars, and upcycled home décor projects.
Style ideas
- Vintage: faded floral fabric plus cream ribbon
- Coastal: natural woven ribbon with white cotton trim
- Boho: mixed ribbons in earthy tones with twine
- Party décor: shiny satin base ribbon with a glitter accent ribbon
Just remember to keep a little restraint. This is a vase, not a tiny marching band uniform. Pick two or three coordinated materials, repeat your colors, and stop before the design starts asking for its own zip code.
Extra Tips to Make Your Ribbon Vase Look Better Than “Homemade”
Stick to a simple color palette
Two or three colors are usually enough. A limited palette helps the vase look styled instead of random. If your flowers are bold, keep the ribbon subtle. If the flowers are simple, the ribbon can do more of the visual heavy lifting.
Hide the seam
Place ribbon seams at the back whenever possible. If the vase will be seen from all sides, hide the seam under a bow, tag, flower embellishment, or vertical trim strip.
Use the vase for the right flowers
A short wrapped mason jar is charming with daisies, tulips, or peonies. A tall ribbon-banded cylinder works nicely with roses, lilies, or branches. If the arrangement feels floppy, use the tape-grid trick across the opening to keep stems in better positions.
Know when to go removable
If you like changing décor often, use removable adhesive squares or tiny dots of clear tape so you can switch ribbons by season. If this is a gift or permanent decorative piece, stronger glue or a sealed outer layer makes more sense.
Do a quick dry fit first
Before gluing anything, wrap the ribbon loosely around the vase and step back. Sometimes what looks adorable on the table looks oddly tiny once it is attached. Better to learn that before the glue enters the chat.
Final Thoughts
Decorating a flower vase with ribbon is one of those rare DIY crafts that is easy, affordable, customizable, and actually useful afterward. You are not making an object that will quietly live in a drawer next to abandoned pom-poms and suspicious pipe cleaners. You are creating something that can hold flowers, brighten a room, decorate a table, or become a sweet handmade gift.
If you want the fastest option, go with a classic ribbon wrap around the middle. If you love a cheerful, party-ready style, add a collar and a full bow at the neck. If you want something with more personality and texture, build a layered ribbon sleeve with fabric, lace, or trim. No matter which route you choose, a plain vase gets a serious glow-up with very little effort.
In other words, ribbon is doing a lot of work here, and frankly, it deserves the recognition.
My Experience With Ribbon Vase DIYs: What Actually Happens in Real Life
The first time I decorated a flower vase with ribbon, I was wildly confident for someone who had not measured anything. I wrapped a satin ribbon around a glass jar, tied a bow, stepped back to admire my masterpiece, and realized the bow was so large it looked like the vase had entered a beauty pageant. Was it elegant? Not exactly. Was it memorable? Absolutely. That was the moment I learned that ribbon has a personality of its own, and that personality is occasionally dramatic.
After making more ribbon vases for dinners, birthdays, and random “my table looks sad” afternoons, I started noticing what worked best in real homes. The easiest projects were always the ones that kept the design simple. A single ribbon band around the middle of a vase somehow made grocery-store flowers look more thoughtful. It was like putting lipstick on an ordinary Tuesday. Nothing revolutionary happened, but the mood definitely improved.
I also learned that different ribbons behave very differently. Satin looks polished, but it can slide around like it has somewhere better to be. Grosgrain is easier to control and stays put nicely, especially for bows. Wired ribbon can be a lifesaver when you want loops that look full instead of tired. Burlap-style ribbon brings texture, but it can shed little fibers everywhere, which is fine if you enjoy crafting in the company of invisible hay.
One of my favorite discoveries was how useful decorated vases are as gifts. A bouquet is lovely on its own, of course, but a bouquet in a ribbon-trimmed vase feels more complete. It says, “I planned this,” even if you assembled it while listening to a podcast and eating crackers over the sink. I once gave a friend peonies in a mason jar wrapped with cream ribbon and a tiny handwritten tag, and she asked which boutique I bought it from. I considered becoming extremely mysterious, but I eventually admitted the truth.
There were also failures, and I believe in honoring them. I have glued ribbon on crooked. I have used too much adhesive and created shiny weird spots. I have chosen a ribbon color that looked charming in the spool and strangely aggressive once it met the flowers. But every small mistake made the next project easier. That is the nice thing about this craft: it is forgiving. Even when the design is not perfect, it usually still looks warm, handmade, and cheerful.
More than anything, ribbon vase projects taught me that decorating does not have to be expensive or complicated to feel special. A leftover jar, a scrap of ribbon, a few stems, and fifteen quiet minutes can change the whole feeling of a room. That is a pretty good return on investment for a craft that mostly involves wrapping things around other things and hoping for the best.


