Table of Contents >> Show >> Hide
- Why This Minty Pea and Spiced Beef Pitas Recipe Works
- Recipe Overview
- Ingredients for Minty Pea and Spiced Beef Pitas
- How to Make the Best Minty Pea and Spiced Beef Pitas
- Tips for Better Spiced Beef Pitas
- Flavor Variations
- What to Serve with Minty Pea and Spiced Beef Pitas
- Storage and Meal Prep
- Common Mistakes to Avoid
- Nutrition Notes
- Personal Kitchen Experience: What Makes This Recipe a Keeper
- Conclusion
- SEO Tags
Fresh, savory, bright, and ready for weeknight glory: this minty pea and spiced beef pitas recipe turns humble ingredients into a handheld dinner that tastes like it took far more effort than it did. Think crispy browned beef, sweet peas, fresh mint, creamy yogurt, warm pita, crunchy vegetables, and a little citrusy sparkle. Basically, it is the dinner equivalent of putting on a clean shirt and suddenly feeling wildly responsible.
Why This Minty Pea and Spiced Beef Pitas Recipe Works
The best pita recipes succeed because they balance texture, temperature, and flavor. Soft warm pita alone is nice. Spiced beef alone is delicious. Minty peas alone are bright and springy. But tuck them together with tangy yogurt, crisp cucumber, pickled onion, and lemon, and suddenly dinner has layers. You get richness from the beef, freshness from the mint, sweetness from the peas, and a creamy sauce that keeps every bite from feeling dry.
This recipe takes inspiration from Mediterranean and Middle Eastern-style pita fillings without pretending to be a traditional dish from one specific region. The seasoning blend leans warm and aromatic: cumin, coriander, smoked paprika, garlic, black pepper, and a pinch of cinnamon. Optional sumac adds a tangy, lemon-like edge that makes the beef taste brighter. The minty pea spread acts almost like a lighter, greener cousin of hummuscreamy, fresh, and scoopable.
It is also practical. Ground beef cooks quickly, frozen peas are affordable and reliable, and pita bread turns everything into a neat little pocket of joy. Well, mostly neat. Pitas have their own structural opinions, so keep napkins nearby.
Recipe Overview
- Prep time: 15 minutes
- Cook time: 15 minutes
- Total time: 30 minutes
- Servings: 4
- Main keyword: Minty Pea and Spiced Beef Pitas Recipe
- Best for: Weeknight dinner, meal prep, lunch wraps, casual entertaining
Ingredients for Minty Pea and Spiced Beef Pitas
For the Spiced Beef
- 1 tablespoon olive oil
- 1 pound lean ground beef
- 1 small yellow onion, finely chopped
- 3 garlic cloves, minced
- 1 teaspoon ground cumin
- 1 teaspoon ground coriander
- 1 teaspoon smoked paprika
- 1/2 teaspoon kosher salt, plus more to taste
- 1/4 teaspoon black pepper
- 1/4 teaspoon ground cinnamon
- 1 teaspoon sumac, optional but excellent
- 1 tablespoon tomato paste
- 1 tablespoon lemon juice
- 2 tablespoons chopped fresh parsley or mint
For the Minty Pea Spread
- 1 1/2 cups frozen peas, thawed or quickly blanched
- 1/3 cup plain Greek yogurt
- 1/4 cup cottage cheese or ricotta for extra creaminess
- 2 tablespoons fresh mint leaves
- 1 tablespoon fresh lemon juice
- 1 teaspoon lemon zest
- 1 small garlic clove, grated
- 1 tablespoon olive oil
- Salt and black pepper to taste
For Serving
- 4 large pita breads or 8 pita halves
- 1 cup chopped cucumber
- 1 cup shredded lettuce or baby arugula
- 1/2 cup pickled red onions
- 1/2 cup crumbled feta, optional
- Extra mint leaves
- Lemon wedges
- Hot sauce or chili crisp, optional
How to Make the Best Minty Pea and Spiced Beef Pitas
Step 1: Make the Minty Pea Spread
Add the peas, Greek yogurt, cottage cheese, mint, lemon juice, lemon zest, garlic, olive oil, salt, and pepper to a food processor. Pulse until the mixture is creamy but still has a little texture. You are not making baby food; you want a spread with personality. Taste and adjust with more lemon, salt, or mint as needed.
If you do not have a food processor, mash the peas with a fork or potato masher, then stir in the remaining ingredients. The texture will be chunkier, but it will still taste fresh and delicious.
Step 2: Brown the Beef Properly
Heat a large skillet over medium-high heat. Add the olive oil, then add the ground beef in a loose, even layer. Let it cook undisturbed for 2 to 3 minutes before breaking it apart. This helps the beef develop browned, crispy edges instead of steaming into gray sadness. Once the bottom is browned, break it up with a wooden spoon and continue cooking.
Step 3: Add Aromatics and Spices
Add the chopped onion and cook for 3 to 4 minutes, until softened. Stir in the garlic, cumin, coriander, smoked paprika, cinnamon, salt, pepper, and sumac. Cook for about 30 seconds, just until fragrant. This brief blooming step wakes up the spices and makes the whole kitchen smell like you have your life together.
Step 4: Build Flavor with Tomato Paste and Lemon
Stir in the tomato paste and cook for 1 minute, letting it darken slightly. Add the lemon juice and scrape up any browned bits from the pan. Those browned bits are flavor confetti. Continue cooking until the beef is fully cooked and reaches a safe internal temperature of 160°F. Stir in chopped parsley or mint at the end for freshness.
Step 5: Warm the Pitas
Warm the pita bread in a dry skillet, toaster oven, or regular oven until soft and flexible. If using pita pockets, cut them carefully so they do not split down the sides. If they do split, congratulations: you now have pita tacos. Nobody needs to know this was not the plan.
Step 6: Assemble
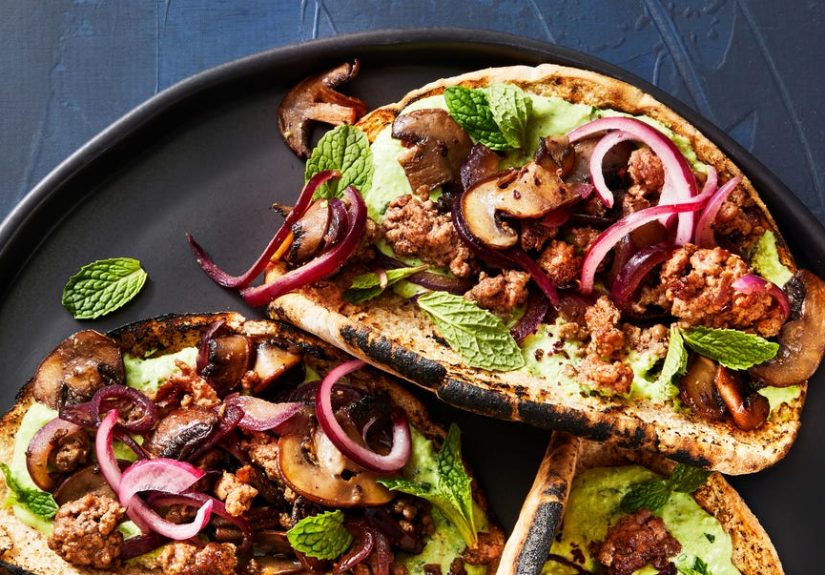
Spread a generous spoonful of minty pea mixture inside each pita. Add the spiced beef, cucumber, greens, pickled onions, feta, extra mint, and a squeeze of lemon. Serve immediately while the beef is warm and the vegetables are still crisp.
Tips for Better Spiced Beef Pitas
Do Not Crowd the Pan
If your skillet is small, cook the beef in batches. Crowding traps steam, and steam is the enemy of browning. A hot pan and a little patience give you beef with crisp edges and deeper flavor.
Use Frozen Peas Without Shame
Frozen peas are picked and frozen quickly, which means they often taste sweeter and fresher than tired peas sitting around in the produce section. For this minty pea spread, frozen peas are not a shortcut; they are a smart move.
Add Acid at the End
Lemon juice, pickled onions, and sumac all bring acidity. That brightness cuts through the richness of the beef and keeps the pita from tasting heavy. If the filling tastes flat, it probably needs either salt or lemon.
Keep the Pita Flexible
Dry pita cracks. Warm pita bends. Wrap warmed pitas in a clean kitchen towel while you finish the filling, and they will stay soft enough to stuff without staging a bread-based rebellion.
Flavor Variations
Greek-Inspired Version
Use oregano in the beef, add diced tomato, and finish with feta and a garlicky yogurt sauce. This version tastes like a gyro took a vacation in a pea garden.
Spicy Harissa Version
Stir 1 to 2 teaspoons of harissa paste into the beef with the tomato paste. Add extra cucumber and yogurt to cool things down. This is the version for people who believe dinner should arrive with a tiny warning label.
High-Protein Version
Use lean beef, whole-wheat pita, Greek yogurt, and cottage cheese in the pea spread. Add extra greens and skip the feta if you want to keep the recipe lighter while still satisfying.
Vegetable-Loaded Version
Add sautéed mushrooms, diced zucchini, or chopped spinach to the beef mixture. Mushrooms are especially good because they bring savory depth and help stretch the beef without making the filling feel less hearty.
What to Serve with Minty Pea and Spiced Beef Pitas
These pitas are filling enough to stand alone, but they also pair beautifully with simple sides. Try a cucumber-tomato salad, roasted carrots, crispy potatoes, lemony couscous, or a bowl of soup. For a casual dinner spread, serve everything family-style: warm pitas in a towel, beef in a skillet, pea spread in a bowl, and toppings arranged like a tiny salad bar. People love building their own pitas because it gives them control over the important things in life, such as how much feta is too much feta. The answer is personal.
If you are serving these for guests, add a few bowls of extras: olives, shredded cabbage, chili oil, hummus, chopped herbs, and toasted pita chips. The meal will feel colorful and abundant without requiring you to roast an entire animal or spend the afternoon alphabetizing spices.
Storage and Meal Prep
Store the spiced beef, minty pea spread, pita, and fresh toppings separately. The beef will keep well in an airtight container in the refrigerator for 3 to 4 days. Reheat it in a skillet or microwave until hot. The pea spread is best within 2 to 3 days because fresh mint can darken over time, though the flavor remains pleasant.
For meal prep, portion the beef and pea spread into containers, then pack pita and vegetables separately. Assemble just before eating so the pita does not get soggy. If you want a lunchbox-friendly version, turn the recipe into a bowl: rice or greens on the bottom, beef and pea spread on top, then cucumber, onion, feta, and lemon. It is less handheld, but your shirt may appreciate the upgrade.
Common Mistakes to Avoid
Using Too Much Mint
Mint is wonderful, but too much can make the spread taste like toothpaste wandered into dinner. Start with a modest amount, taste, and add more only if needed.
Skipping the Lemon
Without lemon, the pea spread can taste sweet but slightly dull. Lemon juice and zest make it lively, fresh, and balanced.
Breaking the Beef Too Soon
Let the beef sear before stirring. If you constantly move it around, it releases moisture and steams. Give it a minute to brown, then break it apart.
Overstuffing the Pita
We all want maximum filling. Unfortunately, pita bread has physics. Stuff generously but reasonably, or serve extra filling on the side and call it a bonus salad.
Nutrition Notes
This minty pea and spiced beef pitas recipe offers a satisfying mix of protein, fiber, and fresh produce. Ground beef provides protein and richness, peas add fiber and natural sweetness, Greek yogurt contributes creaminess and extra protein, and vegetables bring crunch and freshness. Choosing whole-wheat pita can increase fiber, while using lean beef can reduce excess fat.
For a lighter plate, use less beef per pita and add more cucumber, lettuce, and pea spread. For a heartier dinner, add roasted potatoes or a grain salad on the side. The recipe is flexible enough to fit different appetites without losing its main charm: warm spiced beef plus cool minty peas tucked into soft pita.
Personal Kitchen Experience: What Makes This Recipe a Keeper
The first time you make minty pea and spiced beef pitas, the biggest surprise is how quickly the flavors come together. On paper, peas and ground beef may not sound like a dramatic culinary partnership. One is sweet and green; the other is savory and rich. But that contrast is exactly what makes the recipe work. The pea spread cools and brightens the beef, while the beef gives the peas a deeper, more satisfying purpose than simply sitting politely beside a chicken breast.
One useful experience from testing this style of pita is that texture matters as much as flavor. A smooth pea spread is nice, but a slightly chunky one feels more homemade and gives the pita better body. The same goes for the beef. If it is cooked until merely gray, it fills the pita, but it does not excite anyone. When the beef is allowed to brown properly, those crispy bits bring the kind of savory flavor that makes people hover near the skillet with a spoon and suspicious intentions.
Another lesson: toppings should not be treated as decoration. Pickled red onions are not just pretty pink confetti; they sharpen the whole bite. Cucumber is not just filler; it adds water-rich crunch. Fresh mint is not there to look fancy for the camera; it gives the recipe its cool, clean finish. Even a quick squeeze of lemon at the end can turn a good pita into a great one. Small details do a lot of heavy lifting here.
This recipe is also forgiving, which is one reason it belongs in regular rotation. If the pita tears, serve it as an open-faced flatbread. If you run out of Greek yogurt, use sour cream or labneh. If you do not have sumac, add extra lemon zest. If someone at the table dislikes peas, call the spread “green lemon-mint sauce” and see how far confidence gets you. Cooking is not lying; it is branding.
For busy nights, the best strategy is to make the pea spread ahead of time. It takes only a few minutes, but having it ready makes dinner feel almost instant. The beef can also be cooked in advance and reheated in a skillet with a splash of water or broth. Once the pita is warm and the toppings are chopped, assembly takes less time than deciding what to watch while eating.
These pitas also make excellent leftovers because the components can become something new. The next day, spoon the beef and pea spread over rice, tuck them into a wrap, or pile them onto toasted pita wedges for a snacky lunch. Add a fried egg and suddenly it becomes brunch with ambition. Add extra greens and it becomes a salad that does not taste like punishment.
The real charm of the best minty pea and spiced beef pitas recipe is that it feels fresh without being fussy. It is colorful, filling, and lively, but it does not demand rare ingredients or restaurant-level patience. It is the kind of meal that makes a weeknight feel a little more intentional, even if the kitchen counter is messy and someone forgot to chill the drinks. Warm pita, crispy beef, cool peas, bright lemon, and crunchy toppings: that is a dinner plan worth repeating.
Conclusion
The best minty pea and spiced beef pitas recipe is all about balance. Warm spiced beef brings savory depth, minty pea spread adds freshness, and crisp toppings keep every bite lively. It is quick enough for a weeknight, colorful enough for guests, and flexible enough for meal prep. Whether you serve it as stuffed pita pockets, open-faced flatbreads, or hearty bowls, this recipe delivers big flavor without making dinner complicated.