Table of Contents >> Show >> Hide
- What Is a Half Windsor Knot?
- When Should You Use the Half Windsor?
- Before You Start: Set Up the Tie Correctly
- How to Tie a Tie Half Windsor: 14 Steps
- Step 1: Raise Your Collar
- Step 2: Drape the Tie Around Your Neck
- Step 3: Position the Wide End Lower
- Step 4: Cross the Wide End Over the Narrow End
- Step 5: Bring the Wide End Behind the Narrow End
- Step 6: Lift the Wide End Up Toward the Neck Loop
- Step 7: Pull the Wide End Down Through the Neck Loop
- Step 8: Bring the Wide End Across the Front
- Step 9: Keep a Finger Inside the Front Loop
- Step 10: Bring the Wide End Up Behind the Knot
- Step 11: Pull the Wide End Down Through the Front Loop
- Step 12: Tighten the Knot Gently
- Step 13: Add a Tie Dimple
- Step 14: Lower Your Collar and Adjust
- Common Half Windsor Mistakes and How to Fix Them
- Best Shirts and Collars for a Half Windsor
- Best Tie Fabrics for the Half Windsor
- Half Windsor vs. Full Windsor vs. Four-in-Hand
- Style Tips for Making the Half Windsor Look Better
- Practice Routine for Beginners
- Real-Life Experiences: What Learning the Half Windsor Teaches You
- Conclusion
Learning how to tie a tie Half Windsor style is one of those small life skills that quietly saves the day. Job interview? Half Windsor. Wedding invitation? Half Windsor. Business presentation where your slides are doing their best but your confidence needs backup? Absolutely Half Windsor. This knot is polished without looking stiff, formal without shouting “I own three briefcases,” and easy enough to master with a mirror, a tie, and five minutes of patience.
The Half Windsor knot sits beautifully between the casual Four-in-Hand and the larger Full Windsor. It creates a neat triangular shape, gives the tie a balanced appearance, and works especially well with medium-spread collars, standard collars, and most light-to-medium fabric ties. If the Full Windsor is the grand speech at the banquet, the Half Windsor is the charming toast that everyone actually remembers.
In this guide, you will learn how to tie a Half Windsor in 14 clear steps, how to adjust the length, how to add a sharp dimple, which shirts and ties work best, and how to avoid the common mistakes that make a tie look like it survived a wrestling match with a laundry basket.
What Is a Half Windsor Knot?
The Half Windsor knot is a classic necktie knot known for its clean, symmetrical, triangular shape. Despite the name, it is not simply “half” of the Full Windsor in every technical sense, but it does use less fabric and produces a smaller, more versatile knot. That makes it a favorite for office wear, interviews, weddings, graduations, formal dinners, and any occasion where you want to look intentional but not overly dramatic.
Compared with the Four-in-Hand, the Half Windsor looks more balanced and formal. Compared with the Full Windsor, it is less bulky and easier to pair with everyday shirts. It gives structure without swallowing the collar space, which is why many people consider it the perfect “grown-up but not trying too hard” knot.
When Should You Use the Half Windsor?
The Half Windsor is a great choice when you want a tie knot that looks polished, centered, and professional. It works especially well for:
- Business meetings and office presentations
- Job interviews and networking events
- Weddings, graduations, and semi-formal events
- Dress shirts with medium-spread or standard collars
- Lightweight and medium-weight silk, cotton, linen, or microfiber ties
If your tie is extremely thick, the knot may become too large. If your collar is very narrow, the knot may look crowded. But for most standard dress shirts and traditional ties, the Half Windsor is a reliable, handsome option.
Before You Start: Set Up the Tie Correctly
Stand in front of a mirror and flip up your collar. Place the tie around your neck with the wide end on your right side and the narrow end on your left side. The front side of the tie should face outward. Start with the wide end hanging about 12 inches lower than the narrow end, though you may need to adjust based on your height, tie length, torso length, and whether your tie likes to behave like a gentleman or a rebellious scarf.
The goal is for the tip of the finished tie to land around the top of your belt buckle. If it ends too short, start again with the wide end lower. If it ends too long, start with the wide end slightly higher. Tie length is not magic; it is trial, adjustment, and occasionally a quiet sigh.
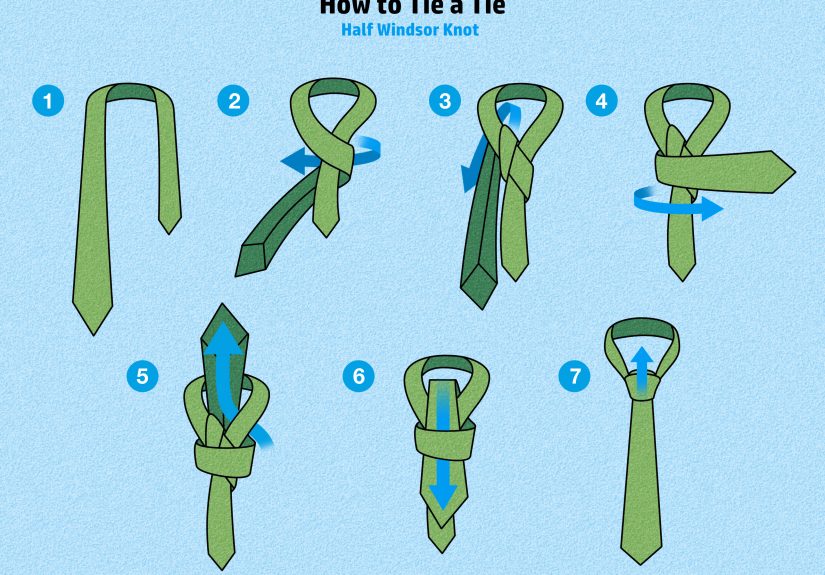
How to Tie a Tie Half Windsor: 14 Steps
Step 1: Raise Your Collar
Start by lifting your shirt collar so the tie can move freely around your neck. Button the top button if you plan to wear the tie formally. If the top button feels like it was designed by a medieval gatekeeper, make sure your shirt actually fits before blaming the tie.
Step 2: Drape the Tie Around Your Neck
Place the tie around your neck with the wide end on your right and the narrow end on your left. The seam should face your shirt, and the smooth front of the tie should face outward.
Step 3: Position the Wide End Lower
Let the wide end hang roughly 12 inches below the narrow end. This gives you enough fabric to build the knot and still finish with the proper tie length.
Step 4: Cross the Wide End Over the Narrow End
Bring the wide end across the front of the narrow end from right to left. This creates the first “X” shape just below your neck. Hold this crossing point gently with one hand.
Step 5: Bring the Wide End Behind the Narrow End
Wrap the wide end behind the narrow end from left to right. Keep the fabric flat as you move it. Twisted fabric is the enemy of a clean Half Windsor.
Step 6: Lift the Wide End Up Toward the Neck Loop
Bring the wide end upward toward the loop between your collar and the tie. This is the opening around your neck where the tie sits.
Step 7: Pull the Wide End Down Through the Neck Loop
Pass the wide end down through the neck loop so it comes out on your left side. This creates one side of the triangular shape that makes the Half Windsor look structured and balanced.
Step 8: Bring the Wide End Across the Front
Move the wide end horizontally across the front of the knot from left to right. This creates the smooth front band of the knot. Use your fingers to keep this front layer neat because it will be the most visible part.
Step 9: Keep a Finger Inside the Front Loop
Before tightening the front band, place one finger inside the loop you just created. This keeps space open for the final pass-through. Think of your finger as a tiny construction worker holding the doorway open.
Step 10: Bring the Wide End Up Behind the Knot
Take the wide end upward from underneath, passing it behind the knot and through the neck loop again. The wide end should now point upward near your chin.
Step 11: Pull the Wide End Down Through the Front Loop
Guide the wide end down through the front loop you held open with your finger. Pull it carefully, keeping the front smooth and flat.
Step 12: Tighten the Knot Gently
Hold the narrow end with one hand and use the other hand to slide the knot upward. Tighten slowly. A Half Windsor should look firm and clean, not strangled like it just heard bad quarterly earnings.
Step 13: Add a Tie Dimple
For a polished look, pinch the fabric just under the knot as you tighten. This creates a small dimple in the center of the tie. A dimple adds depth, shape, and that little finishing touch that says, “Yes, I did look in the mirror before leaving.”
Step 14: Lower Your Collar and Adjust
Fold your collar down, center the knot, and check the final length. The wide end should cover the narrow end and land near the top of your belt buckle. If the narrow end is longer than the wide end, use the keeper loop on the back of the tie or a tie bar to keep everything tidy.
Common Half Windsor Mistakes and How to Fix Them
The Tie Ends Too Short
If your finished tie lands above your belt line, start again with the wide end hanging lower. Taller people may need extra-long ties, especially when using knots that consume more fabric than the Four-in-Hand.
The Tie Ends Too Long
If the wide end drops below your belt buckle, begin with the wide end slightly higher. Small starting adjustments make a big difference by the end.
The Knot Looks Crooked
A crooked knot usually happens when the front wrap is twisted or pulled unevenly. Keep each pass flat and hold the knot lightly while tightening. Do not yank one side like you are starting a lawn mower.
The Knot Looks Too Bulky
If the knot is too large, your tie may be too thick for a Half Windsor. Try a lighter silk tie, a narrower tie, or switch to a Four-in-Hand for heavy wool or knit ties.
The Knot Looks Too Small
If the knot looks tiny, choose a wider tie or a fabric with more structure. You can also tighten less aggressively to preserve volume.
Best Shirts and Collars for a Half Windsor
The Half Windsor pairs best with standard collars, semi-spread collars, and medium-spread collars. These collar types give the knot enough room to show its triangular shape without leaving too much empty space. A very narrow collar may make the knot look squeezed, while an extreme cutaway collar may need a larger knot, such as a Full Windsor, to fill the gap.
For business wear, try a white or light blue dress shirt with a navy, burgundy, charcoal, or patterned silk tie. For weddings, a Half Windsor works well with softer colors, textured ties, and elegant patterns. For interviews, keep it classic: a crisp shirt, conservative tie, clean knot, and no novelty print unless the job description specifically says “professional magician.”
Best Tie Fabrics for the Half Windsor
Light-to-medium fabrics usually produce the best Half Windsor. Silk is the classic choice because it drapes well and forms a smooth knot. Cotton and linen can work beautifully in warmer months, although they may wrinkle more easily. Microfiber ties are affordable and practical, especially for frequent use. Heavier wool, thick knit, or heavily textured ties may create a bulky knot, so use them carefully.
Half Windsor vs. Full Windsor vs. Four-in-Hand
The Half Windsor is more symmetrical than the Four-in-Hand and less bulky than the Full Windsor. The Four-in-Hand is narrow, slightly asymmetrical, and casual. It is excellent for beginners and heavier ties. The Full Windsor is larger, broader, and more formal, making it better for wide-spread collars and occasions where a strong knot is appropriate. The Half Windsor lands in the sweet spot: neat, balanced, and adaptable.
If you only learn two tie knots, learn the Four-in-Hand and the Half Windsor. The first covers casual and narrow-collar looks; the second covers professional and semi-formal situations. Together, they are the peanut butter and jelly of neckwear skills, only with fewer lunchbox memories.
Style Tips for Making the Half Windsor Look Better
Match Knot Size to Your Face and Collar
A medium knot like the Half Windsor works well for many face shapes and body types. If you have a broader face or wear wider collars, the Half Windsor can create visual balance. If you have a very slim face or narrow collar, a smaller knot may look more natural.
Use a Tie Bar the Right Way
A tie bar should usually sit between the third and fourth shirt buttons. It should clip both the tie and the shirt placket, keeping the tie in place. Avoid wearing it too high, too low, or at a diagonal unless you are intentionally auditioning for “chaotic office guy.”
Check the Dimple
The dimple is optional, but it makes the tie look more intentional. Pinch the tie just below the knot while tightening, then gently shape the dimple with your fingers.
Untie Your Tie After Wearing It
Do not leave your tie knotted for days. Untie it carefully, hang it up, and let the fabric relax. This helps prevent deep wrinkles and keeps the tie looking fresh longer.
Practice Routine for Beginners
If you are learning how to tie a Half Windsor for the first time, practice when you are not in a rush. Tying a tie five minutes before a wedding ceremony or an interview is how people discover new forms of panic. Instead, practice the night before. Use a mirror, move slowly, and repeat the steps three or four times. Your hands will begin to remember the sequence.
Here is a simple practice routine: tie the knot once while reading the steps, untie it, tie it again from memory, then check the guide only when you get stuck. On the third try, focus on length. On the fourth try, focus on the dimple. By the fifth try, you may start feeling suspiciously sophisticated.
Real-Life Experiences: What Learning the Half Windsor Teaches You
The first time many people learn the Half Windsor, they expect it to be complicated. It has loops, crossings, direction changes, and that mysterious moment when the wide end disappears behind the knot and somehow returns as a respectable triangle. But after a few attempts, the pattern becomes surprisingly logical. Cross, wrap, loop, front, loop, pull through, tighten. It is almost like learning a handshake with fabric.
One of the most useful experiences with the Half Windsor is discovering how much the starting length matters. Two people can follow the same instructions and get totally different results because one person started with the wide end too high. This is why mirrors are helpful but patience is essential. The Half Windsor teaches you that style is often about small adjustments, not dramatic changes.
Another common experience is the “almost perfect but not quite” knot. The tie is centered, the length is good, but the front looks flat. That is when the dimple becomes your best friend. Pinching the fabric under the knot creates shape and personality. Without it, the tie may look fine. With it, the tie looks finished. The dimple is tiny, but it has the confidence of a man who knows where the good parking spots are.
The Half Windsor is also forgiving. If you are dressing for an interview, it gives you a professional look without appearing flashy. If you are attending a wedding, it looks elegant in photos. If you are going to a business lunch, it says you made an effort without looking like you spent the morning consulting a royal tailor. That flexibility is why the Half Windsor remains one of the most practical knots to learn.
People who wear ties often eventually develop personal preferences. Some like the Four-in-Hand because it is fast and casual. Some prefer the Full Windsor because it creates a strong, formal presence. But many return to the Half Windsor because it handles most situations well. It is the reliable friend of tie knots: not loud, not fussy, always appropriately dressed.
There is also a confidence factor. When you know how to tie your own tie properly, you feel more prepared. You are not dependent on a clip-on, a helpful relative, or a panicked online video watched at 7:42 a.m. before a meeting. You can stand in front of the mirror, build the knot, adjust the length, smooth the collar, and walk out knowing the details are handled. That confidence may not close the deal, land the job, or make the wedding toast funnier, but it certainly helps you look ready for the moment.
The best advice from experience is simple: practice with more than one tie. A thin silk tie, a thick textured tie, and a standard business tie will each behave differently. Once you learn how fabric affects the knot, you can adjust quickly. Start the wide end lower for shorter ties, use lighter fabrics for a cleaner triangle, and do not over-tighten. A good Half Windsor should look controlled, not crushed.
In the end, learning how to tie a Half Windsor is not just about neckwear. It is about mastering a small ritual of presentation. It is a useful skill that travels with you from school events to first jobs, from weddings to conferences, from awkward family photos to important handshakes. And once you get it right, you will wonder why it ever seemed difficult. The tie was not the problem. It was just waiting for you to learn the dance steps.
Conclusion
The Half Windsor knot is one of the best tie knots for anyone who wants a clean, balanced, and professional look. It is easier than it appears, more polished than the Four-in-Hand, and less bulky than the Full Windsor. With 14 simple steps, a little practice, and attention to length, fabric, collar shape, and dimple placement, you can create a tie knot that works for interviews, weddings, office days, formal events, and nearly every dressed-up moment in between.
If you are new to ties, start slowly and practice before the big day. If you already know the basics, focus on refining the details: center the knot, smooth the front, add a dimple, and land the tip near your belt buckle. The Half Windsor proves that good style does not have to be complicated. Sometimes it is just one smart knot, tied well.
Note: This article is written in original language for web publication and is based on established, real-world menswear guidance about Half Windsor knot technique, tie length, collar pairing, and formal styling.