Table of Contents >> Show >> Hide
- Why Yoga Helps Improve Flexibility
- Before You Begin: Safety Tips for Flexibility Yoga
- 1. Cat-Cow Pose for Spinal Mobility
- 2. Downward-Facing Dog for Hamstrings and Calves
- 3. Child’s Pose for Back and Hip Release
- 4. Low Lunge for Hip Flexibility
- 5. Lizard Pose for Deep Hip Opening
- 6. Half Pigeon Pose for Glutes and Outer Hips
- 7. Seated Forward Bend for Hamstrings and Back
- 8. Triangle Pose for Side Body and Hamstrings
- 9. Wide-Legged Forward Fold for Inner Thighs
- 10. Puppy Pose for Shoulders and Upper Back
- 11. Cow Face Arms for Shoulder Flexibility
- 12. Reclined Twist for Spinal Flexibility
- A Simple 15-Minute Yoga Routine for Flexibility
- How Often Should You Practice Yoga for Flexibility?
- Common Mistakes That Slow Flexibility Progress
- Real-Life Experience: What Flexibility Yoga Actually Feels Like
- Conclusion
Flexibility is one of those things many people only think about when something suddenly feels tighter than jeans fresh out of the dryer. You bend down to tie your shoes, reach for something on a high shelf, or try to sit cross-legged on the floor, and your body sends a polite but firm message: “Absolutely not.” The good news? You do not need to be naturally bendy, young, or able to twist yourself into a human pretzel to improve flexibility. Yoga offers a practical, gentle, and surprisingly enjoyable way to loosen tight muscles, improve range of motion, and move through daily life with less stiffness.
The best yoga poses for flexibility combine stretching, breathing, balance, and body awareness. Unlike rushed stretching, yoga encourages you to slow down, notice where your body feels tight, and gradually create more space. It is not about forcing your forehead to your knee or winning an imaginary Olympic medal in hamstring length. It is about helping your muscles, joints, and connective tissues move more comfortably over time.
Below, you will find beginner-friendly yoga poses to improve flexibility in the hips, hamstrings, back, shoulders, chest, calves, and spine. You will also learn how to practice safely, how long to hold each pose, and how to build a simple flexibility routine that does not require incense, chanting, or leggings that cost more than your grocery bill.
Why Yoga Helps Improve Flexibility
Yoga improves flexibility by encouraging muscles to lengthen gradually while joints move through a healthy range of motion. Many poses use static stretching, which means you hold a position for a short period while breathing steadily. Other poses involve gentle movement, such as Cat-Cow, which helps warm the spine and improve mobility.
Flexibility matters because it supports better posture, easier movement, and reduced muscle tension. Tight muscles can affect how you walk, sit, exercise, and even sleep. For example, tight hip flexors may pull on the pelvis and contribute to lower-back discomfort. Tight hamstrings can make bending forward feel like negotiating with a locked door. Tight shoulders may turn reaching overhead into a dramatic event.
Yoga also improves body awareness. Instead of yanking yourself into a stretch, you learn to listen. A good stretch should feel like mild to moderate tension, not sharp pain. If your body starts speaking in all caps, back off.
Before You Begin: Safety Tips for Flexibility Yoga
Before jumping into yoga poses for flexibility, remember that cold muscles are not big fans of sudden stretching. Warm up first with light movement, such as walking in place, shoulder rolls, gentle squats, or a few rounds of Cat-Cow. Five minutes can make a big difference.
Keep These Rules in Mind
- Do not bounce. Bouncing can strain muscles and irritate joints.
- Breathe slowly. Exhaling helps your nervous system relax and allows the stretch to soften.
- Use props. Yoga blocks, pillows, folded blankets, and straps are not cheating. They are smart assistants.
- Avoid pain. Sensation is fine. Pain is a stop sign wearing a flashing neon jacket.
- Be consistent. Ten minutes several times a week is better than one heroic stretch session followed by three weeks of forgetting yoga exists.
If you are pregnant, recovering from surgery, managing chronic pain, or have joint problems, talk with a qualified healthcare professional or certified yoga instructor before starting a new routine.
1. Cat-Cow Pose for Spinal Mobility
Best for: spine, back, neck, shoulders, and posture
Cat-Cow is a gentle yoga flow that wakes up the spine and prepares the body for deeper stretches. It is especially helpful if you sit for long hours and your back feels like it has been folded into an office chair shape.
How to Do It
- Start on your hands and knees with wrists under shoulders and knees under hips.
- Inhale as you drop your belly, lift your chest, and look slightly forward. This is Cow Pose.
- Exhale as you round your spine, tuck your chin, and draw your belly in. This is Cat Pose.
- Move slowly for 8 to 12 rounds.
Flexibility tip: Focus on moving one vertebra at a time. Imagine your spine is a wave, not a rusty garage door.
2. Downward-Facing Dog for Hamstrings and Calves
Best for: hamstrings, calves, shoulders, back, and ankles
Downward-Facing Dog is one of the most famous yoga poses for flexibility because it stretches the entire back side of the body. It can feel intense at first, especially if your hamstrings are tight. The solution is simple: bend your knees. Straight legs are optional, not a moral achievement.
How to Do It
- Start on your hands and knees.
- Spread your fingers wide and press into your palms.
- Tuck your toes and lift your hips up and back.
- Keep your knees bent if needed and lengthen your spine.
- Hold for 30 to 60 seconds while breathing steadily.
Modification: Place your hands on a chair or wall for a gentler version. This is excellent for beginners or anyone with wrist discomfort.
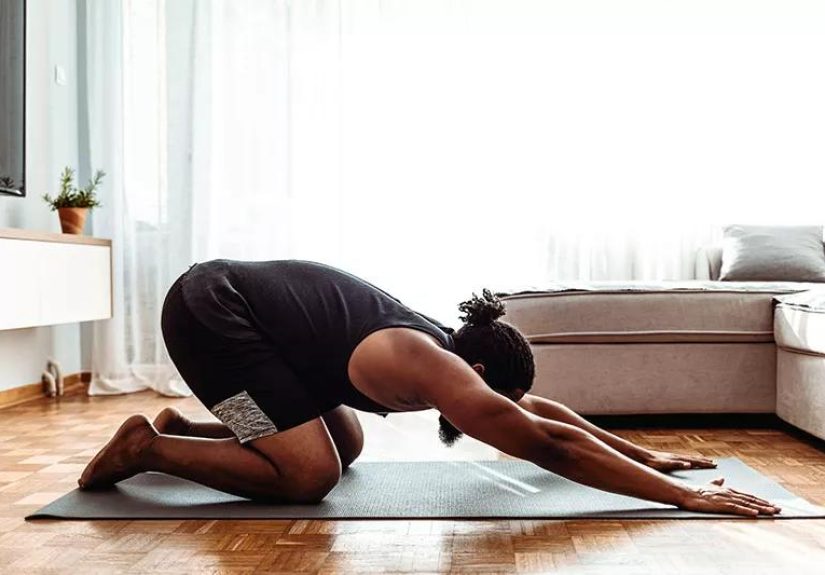
3. Child’s Pose for Back and Hip Release
Best for: lower back, hips, thighs, shoulders, and relaxation
Child’s Pose is the yoga equivalent of pressing the reset button. It gently stretches the back and hips while encouraging slow breathing. It is also a great resting pose between more active stretches.
How to Do It
- Kneel on the floor with your big toes touching.
- Separate your knees slightly wider than your hips.
- Fold forward and rest your torso between your thighs.
- Stretch your arms forward or rest them alongside your body.
- Hold for 1 to 2 minutes.
Modification: Place a pillow or folded blanket under your chest, forehead, or hips for support.
4. Low Lunge for Hip Flexibility
Best for: hip flexors, quadriceps, groin, and thighs
If you spend much of your day sitting, Low Lunge may become your new best friend. Sitting keeps the hip flexors shortened for hours, and this pose helps open the front of the hips. It is especially useful for runners, cyclists, desk workers, and anyone whose chair has become a second home.
How to Do It
- Start in a kneeling position.
- Step your right foot forward between your hands.
- Lower your left knee to the mat and untuck your back toes.
- Keep your front knee stacked above your ankle.
- Gently shift your hips forward until you feel a stretch in the front of the left hip.
- Hold for 30 to 60 seconds, then switch sides.
Alignment tip: Engage your glutes slightly and avoid collapsing into your lower back.
5. Lizard Pose for Deep Hip Opening
Best for: hips, groin, hamstrings, and inner thighs
Lizard Pose is a deeper hip opener that can look intimidating, but it is easy to modify. This pose targets areas that often become tight from sitting, driving, and intense workouts.
How to Do It
- Begin in Low Lunge with your right foot forward.
- Walk your right foot to the outside of your right hand.
- Keep your back knee down or lift it for more intensity.
- Stay on your hands or lower onto forearms if comfortable.
- Hold for 30 to 60 seconds, then switch sides.
Modification: Use yoga blocks under your hands or forearms. Your hips do not need to reach the floor. They did not receive that assignment.
6. Half Pigeon Pose for Glutes and Outer Hips
Best for: glutes, piriformis, outer hips, and lower back tension
Half Pigeon Pose is a classic yoga stretch for tight hips. It can feel wonderful, but it can also be too intense for some knees or hips. The key is to support yourself and never force the front shin into a shape your body is not ready for.
How to Do It
- Start in Downward-Facing Dog or on hands and knees.
- Bring your right knee toward your right wrist.
- Angle your right shin comfortably across the mat.
- Extend your left leg behind you.
- Keep your hips supported and level.
- Stay upright or fold forward over your front leg.
- Hold for 1 minute, then switch sides.
Modification: Try Reclined Figure Four Pose instead if Pigeon bothers your knee. Lie on your back, cross one ankle over the opposite thigh, and gently draw the legs toward your chest.
7. Seated Forward Bend for Hamstrings and Back
Best for: hamstrings, calves, spine, and lower back
Seated Forward Bend is simple but powerful. It stretches the back of the legs and encourages the spine to lengthen. However, the goal is not to grab your feet at all costs. Rounding aggressively just to touch your toes is like using a crowbar to open a teacup.
How to Do It
- Sit with your legs extended in front of you.
- Sit on a folded blanket if your lower back rounds.
- Flex your feet gently.
- Inhale and lengthen your spine.
- Exhale and hinge forward from your hips.
- Rest your hands on your legs, ankles, or a strap around your feet.
- Hold for 30 to 90 seconds.
Flexibility tip: Bend your knees slightly to reduce strain and help your pelvis tilt forward.
8. Triangle Pose for Side Body and Hamstrings
Best for: hamstrings, hips, spine, chest, shoulders, and side waist
Triangle Pose builds flexibility and stability at the same time. It stretches the legs and opens the chest while improving balance and posture. It is a strong pose, but it should still feel spacious rather than strained.
How to Do It
- Stand with your feet wide apart.
- Turn your right foot out and angle your left foot slightly inward.
- Extend your arms at shoulder height.
- Reach your right hand forward, then lower it to your shin, ankle, block, or the floor.
- Reach your left arm upward and open your chest.
- Hold for 30 seconds, then switch sides.
Modification: Place your lower hand on a yoga block. This helps you lengthen the spine instead of collapsing downward.
9. Wide-Legged Forward Fold for Inner Thighs
Best for: hamstrings, inner thighs, calves, and back
Wide-Legged Forward Fold is excellent for stretching the inner thighs and hamstrings. It also gives the back a chance to release, especially when practiced with support.
How to Do It
- Stand with your feet wide apart and toes pointing forward.
- Place your hands on your hips.
- Inhale and lengthen your spine.
- Exhale and hinge forward from your hips.
- Place your hands on blocks, the floor, or a chair.
- Hold for 30 to 60 seconds.
Safety tip: Keep a slight bend in your knees if your hamstrings feel tight or your lower back feels uncomfortable.
10. Puppy Pose for Shoulders and Upper Back
Best for: shoulders, chest, upper back, arms, and spine
Puppy Pose is like Child’s Pose and Downward Dog had a very stretchy baby. It opens the shoulders and chest while lengthening the spine. This pose is especially helpful for people who spend hours typing, scrolling, driving, or perfecting the modern “tech neck” posture.
How to Do It
- Start on your hands and knees.
- Keep your hips stacked over your knees.
- Walk your hands forward and lower your chest toward the mat.
- Rest your forehead or chin down if comfortable.
- Hold for 30 to 60 seconds.
Modification: Place a blanket under your chest or forehead if the stretch feels too intense.
11. Cow Face Arms for Shoulder Flexibility
Best for: shoulders, triceps, chest, and upper back
Cow Face Arms is a wonderful shoulder stretch, particularly for people who carry tension in the upper body. If your hands do not meet behind your back, congratulations: you are normal. Use a strap, towel, or belt.
How to Do It
- Sit or stand tall.
- Reach your right arm overhead and bend your elbow so your hand moves down your upper back.
- Reach your left arm behind your back and bend the elbow upward.
- Hold a strap between your hands if they do not touch.
- Hold for 30 seconds, then switch sides.
Posture tip: Keep your ribs from flaring forward. Stay tall through the spine.
12. Reclined Twist for Spinal Flexibility
Best for: spine, lower back, hips, chest, and relaxation
Reclined Twist gently stretches the spine and outer hips while helping the body relax. It is a great pose near the end of a flexibility routine because it feels calming and grounding.
How to Do It
- Lie on your back with knees bent.
- Draw your knees toward your chest.
- Lower both knees to the right side.
- Extend your arms out in a T-shape.
- Turn your head left if comfortable.
- Hold for 1 minute, then switch sides.
Modification: Place a pillow between or under your knees for support.
A Simple 15-Minute Yoga Routine for Flexibility
You do not need a long practice to see progress. A short, consistent routine can help you improve flexibility without overwhelming your schedule. Try this sequence three to five times per week:
- Cat-Cow Pose: 1 minute
- Downward-Facing Dog: 1 minute
- Low Lunge: 1 minute per side
- Lizard Pose: 45 seconds per side
- Half Pigeon or Reclined Figure Four: 1 minute per side
- Seated Forward Bend: 1 minute
- Puppy Pose: 1 minute
- Reclined Twist: 1 minute per side
- Child’s Pose: 1 minute
Move slowly and breathe through each pose. If you are short on time, choose three poses that target your tightest areas. For many people, that means hips, hamstrings, and shoulders.
How Often Should You Practice Yoga for Flexibility?
For better flexibility, consistency is more important than intensity. Practicing yoga for 10 to 20 minutes three or more times per week can help you notice gradual improvements. Some people feel looser within a few sessions, while deeper changes may take several weeks or months.
Hold most flexibility-focused poses for 30 to 60 seconds. For gentler restorative poses, you may stay for 1 to 3 minutes. The goal is to give your muscles time to relax without forcing them. If you feel your breath become tense, your jaw clench, or your mind start composing complaint emails to your hamstrings, ease out a little.
Common Mistakes That Slow Flexibility Progress
Forcing the Stretch
More intensity does not always mean better results. Pushing too hard can trigger muscle guarding, which makes your body tighten instead of release.
Skipping the Warm-Up
Stretching cold muscles can increase discomfort and reduce effectiveness. Start with gentle movement before holding deeper poses.
Ignoring Props
Props make poses more accessible and safer. A yoga block can turn a frustrating stretch into a productive one.
Comparing Yourself to Others
Your flexibility depends on anatomy, activity level, age, history of injuries, and daily habits. Your yoga practice is not a group project. Stay in your own lane, preferably one with a mat and a water bottle.
Real-Life Experience: What Flexibility Yoga Actually Feels Like
Starting a flexibility-focused yoga routine can be humbling. On day one, you may discover muscles you did not know existed. Your hips might feel like old door hinges, your hamstrings may file a formal protest, and Downward-Facing Dog might feel less like a peaceful yoga pose and more like negotiating with gravity. That is completely normal.
One of the most common experiences beginners have is realizing that flexibility is not evenly distributed. Maybe your right hip feels open while your left hip seems to have signed a long-term lease in Stiff City. Maybe your shoulders are tight from computer work, but your calves are surprisingly cooperative. Yoga helps you notice these differences without judging them. That awareness alone can change how you move throughout the day.
After a week or two of consistent practice, many people notice small but meaningful changes. Getting out of bed may feel easier. Reaching down to pick something up may require less dramatic sound effects. Sitting on the floor may become less of a full-body negotiation. These wins may seem minor, but they add up. Flexibility is not just about impressive poses; it is about making ordinary life feel smoother.
The emotional side of flexibility yoga is also worth mentioning. When you hold a hip-opening pose like Low Lunge or Half Pigeon, you may feel impatient at first. The mind wants to escape. It starts suggesting useful activities like checking your phone, reorganizing your sock drawer, or suddenly remembering an email from 2019. But when you stay with the breath, the body often softens. The stretch becomes less like a battle and more like a conversation.
Props can completely transform the experience. Sitting on a folded blanket in Seated Forward Bend may help your pelvis tilt forward, making the stretch feel cleaner and less strained. Placing blocks under your hands in Triangle Pose can help your chest open instead of collapsing toward the floor. Using a strap in Cow Face Arms lets you work on shoulder mobility without turning the pose into a wrestling match with your own elbows.
Another real-world lesson: flexibility improves faster when you stop treating yoga as punishment. You do not need to “earn” mobility through discomfort. The most effective sessions often feel steady, patient, and almost boring in the best way. You breathe, stretch, adjust, breathe again, and repeat. Then one day, you realize your heels are a little closer to the mat in Downward Dog or your hips feel less cranky after sitting. Tiny progress is still progress.
A helpful approach is to connect your routine to daily habits. Try five minutes of yoga after brushing your teeth in the morning or a short stretch sequence before bed. Keep a mat visible, not buried in a closet behind holiday decorations and abandoned exercise dreams. The easier it is to start, the more likely you are to continue.
It also helps to track how you feel rather than how you look. Instead of asking, “Can I touch my toes yet?” ask, “Does my back feel less tight?” “Can I breathe more comfortably in this pose?” “Do my hips feel better after practice?” These questions keep the focus on function, comfort, and long-term mobility.
The best experience with yoga for flexibility comes from patience. Your body is not a microwave; it is more like a slow cooker. Give it time, warmth, and consistency, and it will gradually respond. Some days you will feel open and graceful. Other days you will feel like a folding chair with opinions. Both days count.
Conclusion
Yoga is one of the most accessible ways to improve flexibility because it meets you where you are. Whether you are working with tight hamstrings, stiff hips, rounded shoulders, or a back that complains after too much sitting, the right yoga poses can help you move with more ease. Start with gentle poses like Cat-Cow, Child’s Pose, Downward-Facing Dog, Low Lunge, Seated Forward Bend, Puppy Pose, and Reclined Twist. Use props, breathe slowly, and avoid forcing your body into shapes it is not ready for.
The secret is not doing the hardest pose. The secret is showing up consistently. A few minutes of mindful stretching several times a week can improve range of motion, reduce stiffness, and help your body feel more cooperative during everyday activities. Flexibility is not about becoming a circus performer. It is about moving better, feeling better, and maybe tying your shoes without making dramatic noises. That is a victory worth stretching for.