
Table of Contents >> Show >> Hide
- Why Growing Apple Seeds Is Fun (and Why It’s Also a Bit of a Gamble)
- What You Need Before You Start
- The Most Important Step: Cold Stratification
- Step-by-Step: How to Plant Apple Seeds from Grocery Store Fruit
- How to Care for Apple Seedlings After Planting
- Will You Need More Than One Tree?
- How Long Until You Get Apples?
- Common Mistakes to Avoid
- Should You Grow Apple Seeds or Buy a Tree?
- Experience Section: What This Project Feels Like in Real Life (About )
- Final Thoughts
- SEO Tags
If you’ve ever sliced open a grocery store apple and thought, “Wait… can I grow a tree from this?” yes, you absolutely can. It’s one of those wonderfully old-school gardening experiments that feels part science project, part patience test, and part “I guess I’m a fruit farmer now.”
But let’s be honest before we go full Johnny Appleseed: growing an apple tree from seed is not the fastest way to get delicious apples. In fact, it’s usually the slowest, weirdest, and most unpredictable route. Still, it’s fun, educational, and surprisingly rewarding especially if you like the idea of growing something from scratch and seeing what happens.
This guide walks you through exactly how to plant apple seeds from store-bought fruit, how to cold-stratify them (that’s the “fake winter” trick they need), how to care for the seedlings, and what to realistically expect over the next few years. Spoiler: the fruit probably won’t taste like the apple you bought. But the story will be better.
Why Growing Apple Seeds Is Fun (and Why It’s Also a Bit of a Gamble)
Let’s start with the biggest truth: apple trees grown from seed do not grow “true to type.” In plain English, if you plant seeds from a Gala apple, you should not expect a Gala apple tree. Think of apple seeds like siblings in a big family related, but definitely not identical.
That’s because apple seeds are genetically mixed. The fruit you bought came from a flower that was pollinated (usually) by a different apple variety, so the seed carries traits from two parents. The result is a brand-new genetic combination. Sometimes that combination is decent. Sometimes it’s amazing. Sometimes it produces fruit that tastes like disappointment and lawn clippings.
This is also why commercial growers don’t grow apples from seed when they want a specific variety. They use grafting instead. Grafting copies a known variety onto a root system (rootstock), which helps control tree size, vigor, and fruiting behavior. In other words, nurseries like predictability. Seeds are more like horticultural roulette.
So why do it anyway?
- It’s a great gardening project for beginners and kids.
- You can learn seed stratification, seedling care, and transplanting.
- You might grow a vigorous tree for shade, wildlife, or future grafting practice.
- And yes, there’s always a tiny chance you accidentally grow a fantastic apple.
What You Need Before You Start
You don’t need fancy gear. Your apple seed setup can be delightfully low-tech.
Basic Supplies
- Apples from the grocery store (use ripe ones)
- Apple seeds (collect several not all will germinate)
- Small pots or seed-starting containers
- Potting mix (light, well-draining)
- Plastic bags or a sealed container (for moisture retention)
- Paper towel, sand, peat, or vermiculite (optional for fridge stratification method)
- A refrigerator or unheated garage (for cold stratification)
- Patience (not sold in stores, sadly)
Collect more seeds than you think you need. Some seeds may be immature, some may not germinate, and some seedlings may fizzle out early. Starting with 8–12 seeds gives you better odds of ending up with a few healthy seedlings.
The Most Important Step: Cold Stratification
Apple seeds are dormant when you remove them from the fruit. In nature, they spend winter in cool, moist soil, then wake up in spring. To mimic that process indoors, you need to give them a cold, moist period called stratification.
For apple seeds, the standard window is about 60 to 90 days at refrigerator-like temperatures (roughly the mid-30s to 40°F range). During this time, the seeds need to stay moist not soggy, not dry, not forgotten behind last week’s leftovers.
Two Easy Stratification Methods
Method 1: Pot-and-Chill (Simple and neat)
- Remove seeds from the apple and gently clean off all fruit residue.
- Place each seed in a small pot with slightly damp potting mix.
- Cover the pot (loosely) with a plastic bag to hold moisture.
- Place the pots in an unheated garage or refrigerator.
- Keep the potting mix slightly damp for 60–90 days.
This method is great because you don’t have to re-plant the seeds later if they sprout in the pot. They’re already in growing media.
Method 2: Bag-and-Towel (Classic seed starter style)
- Clean the seeds thoroughly.
- Wrap them in a moistened paper towel (or use damp sand/peat/vermiculite).
- Place everything in a sealed plastic bag or container.
- Refrigerate at about 33–40°F.
- Check periodically for mold, excess water, or drying out.
When the chilling period is done or when you see a tiny root tip emerging plant the seeds in pots with potting mix and move them to a warm, bright spot.
A Grocery Store Apple Quirk You Should Know
Sometimes people skip stratification and still get germination. That’s not magic it’s usually because the apples were already kept in cold storage after harvest, and the seeds got an accidental “winter” while sitting in distribution and retail channels. So if your seeds sprout early, congratulations: the supermarket helped.
Step-by-Step: How to Plant Apple Seeds from Grocery Store Fruit
1) Pick Your Apples
Choose apples you like, but don’t overthink the variety. Gala, Fuji, Honeycrisp, Granny Smith all can produce viable seeds. If you want better odds for viable seeds, pick fully ripe fruit with mature brown seeds (pale seeds are often immature).
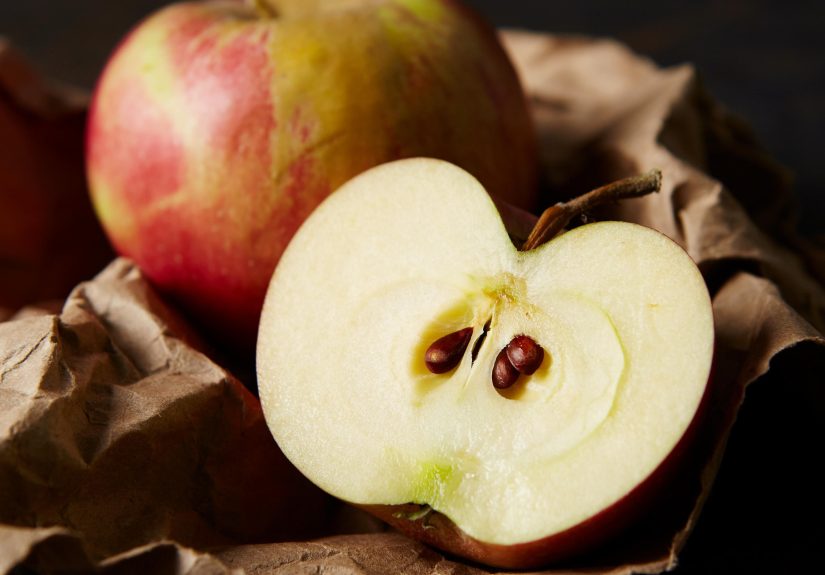
2) Remove and Clean the Seeds
Cut the apple carefully and remove the seeds from the core without nicking them. Rinse off any juice or flesh. Leftover sugars can encourage mold during stratification, and mold is not the roommate you want.
3) Stratify the Seeds
Use one of the two methods above and refrigerate (or chill) the seeds for 60–90 days. Keep them moist throughout the process. This is the part most people skip and then wonder why nothing happened.
4) Plant the Seeds in Pots
Once the seeds have been chilled long enough (or started to sprout), plant each seed in a small pot of damp potting mix. A general rule for small seeds is to plant them shallowly; around 1/2 inch deep works well for apple seeds in containers.
Use a light seed-starting or potting mix instead of heavy garden soil. Good drainage matters a lot at this stage, because soggy media can rot seeds and young roots.
5) Give Them Warmth and Light
Move the pots to a warm, bright location. A sunny windowsill can work, but a grow light is often more reliable (especially if your window light is weak in winter).
Keep the soil moist but not wet. Think “wrung-out sponge,” not “mini swamp.” In a few weeks to a month, the seedlings should emerge.
6) Thin or Separate Seedlings
If more than one seedling pops up in a pot, keep the strongest one or carefully separate them once they have a couple sets of true leaves. Handle the roots gently seedling roots are dramatic and hold grudges.
7) Harden Off Before Planting Outside
After the danger of frost has passed in your area, start hardening off the seedlings. That means introducing them to outdoor conditions gradually over 7–10 days:
- Day 1–2: 1–2 hours in bright shade
- Day 3–5: Longer outdoor time, some morning sun
- Day 6–10: More sun and wind exposure
This prevents shock. Indoor-grown seedlings can flop badly if you throw them straight into full sun and spring wind.
8) Transplant to the Ground (or a Larger Pot)
Plant seedlings in a sunny location with well-drained soil. Apples generally perform best in full sun (around 8 hours a day) and dislike wet, poorly drained spots. If your soil stays soggy after rain, choose another location or plant in a raised area.
If you’re not ready to commit to a permanent spot, you can grow the seedling in a larger container for a season while it gets stronger.
How to Care for Apple Seedlings After Planting
Sunlight
Apple trees are sun lovers. For healthy growth and future fruiting potential, aim for a site with full sun. Morning sun is especially helpful because it dries leaves and can reduce disease pressure.
Soil
Apple trees tolerate a range of soils, but they do best in well-drained, moderately fertile soil. Slightly acidic soil is generally preferred. The biggest enemy here is poor drainage. If roots sit in water, growth stalls and the tree may die.
Water
Young seedlings need consistent moisture while they establish. Water deeply, then let the top layer of soil dry slightly before watering again. Avoid frequent tiny splashes those encourage shallow roots and weak plants.
Feeding
Once the seedling is growing actively, you can use a balanced fertilizer lightly, but don’t overdo it. Too much fertilizer can burn roots or create lots of leafy growth without strong structure.
Protection
Young apple seedlings are tempting targets for pests, pets, and accidental lawnmower “incidents.” Use a simple tree guard, tomato cage, or small fenced ring to protect them.
Will You Need More Than One Tree?
Usually, yes if your goal is fruit someday.
Most apple trees are considered self-unfruitful, which means they produce better (or only reliable) fruit when pollinated by a different compatible apple variety nearby. That’s why many gardening guides recommend planting at least two apple trees, or having a crabapple in the neighborhood that blooms at the same time.
If you’re growing from seed, planting multiple seedlings gives you better odds for future pollination and also increases your chance that at least one tree grows well. Just remember: not all apples are ideal pollinators. Some triploid types (like Jonagold) have sterile pollen and need other trees around them.
How Long Until You Get Apples?
This is where the patience part gets real.
A seed-grown apple tree may take 5 to 10 years (sometimes longer) to produce fruit. Many home gardening sources quote the “up to a decade” timeline, and that’s a good mindset to have. Grafted dwarf trees are much faster, which is one reason they’re so popular.
So if your main goal is harvesting apples soon, buy a grafted tree. If your goal is the process, the experiment, and the joy of growing a tree from a seed you rescued from lunch then you’re in exactly the right project.
Common Mistakes to Avoid
1) Skipping stratification
This is the #1 issue. Apple seeds need a cold, moist period before they germinate reliably.
2) Letting seeds dry out
During stratification, apple seeds should stay consistently moist. Drying out can reduce germination.
3) Overwatering seedlings
Wet soil is not the same as healthy soil. Soggy roots rot fast.
4) Expecting the same apple variety
You’re growing a genetic mystery, not a clone. That’s part of the adventure.
5) Planting in shade or soggy soil
Apples need full sun and good drainage. A bad site will slow growth and increase disease problems.
Should You Grow Apple Seeds or Buy a Tree?
Honestly, do both if you have the space.
Buy a grafted apple tree if you want reliable fruit in a few years. Start apple seeds if you want a fun, low-cost experiment and a cool long-term project. One gives you predictability. The other gives you a story.
And if your seed-grown tree eventually produces delicious apples? Congratulations you didn’t just garden. You did a tiny bit of plant breeding in your backyard.
Experience Section: What This Project Feels Like in Real Life (About )
There’s a very specific kind of optimism that happens when you plant apple seeds from a grocery store apple. It usually starts with one sentence: “I’m just going to try it.” That sentence is how many gardeners end up with 14 seed pots on a windowsill and a spreadsheet they never planned to make.
In the first week, nothing happens. You check anyway. Then you check again, as if the seeds are going to respond to pressure. During stratification, the project feels quiet and invisible, which is honestly a good lesson in gardening. A lot of growth happens before you can see it. Roots, dormancy changes, and germination prep are all happening offstage while you stand there opening the fridge like a seed detective.
Then one day, a tiny root appears. It’s ridiculously exciting for something the size of a staple. If you’re doing this with kids, this is the moment the project becomes “real.” If you’re doing it solo, this is the moment you start narrating to the seed in an encouraging voice and pretending that’s normal behavior.
Once the seedlings emerge, they look fragile, but they’re also surprisingly determined. They’ll lean dramatically toward the nearest light source, which teaches you very quickly that “bright room” and “enough light” are not the same thing. Many people end up rotating pots daily or adding a grow light after watching their seedlings stretch like tiny green noodles.
The outdoor transition is another classic experience. Seedlings that looked perfectly happy indoors can act offended by wind, sun, or cool nights. Hardening off feels slow, but it works. After about a week of gradual exposure, they usually toughen up and stop acting like they were raised in a luxury spa.
The longer experience the months and years part is where expectations really matter. A seed-grown apple tree doesn’t rush. Some seasons it grows a lot, some seasons it just exists. And that can feel frustrating if you’re expecting fruit quickly. But if you treat it like a long-term gardening experiment, it becomes much more fun. You notice stem thickness, leaf color, branching patterns, and how the plant responds to weather. You start paying attention to the tree as a living thing, not just a future apple machine.
Another common experience: emotional attachment. A $30 nursery tree is nice, but a tree you started from a seed in an apple core? That feels personal. Even if it never produces spectacular fruit, it still becomes “your tree.” People name these trees. They protect them from rabbits like tiny bodyguards. They take progress photos. They brag when the trunk diameter increases by half an inch.
And if the tree does fruit one day, the first apple will be more than a snack. It will be proof of patience. It may be tart, weird, small, or unexpectedly wonderful. But either way, you’ll remember the whole process: the fridge stratification, the first sprout, the transplanting, the setbacks, and the wins. That’s what makes this project so satisfying. You’re not just planting an apple seed you’re growing a story.
Final Thoughts
Planting apple seeds from grocery store fruit is one of the best “why not?” projects in gardening. It’s inexpensive, educational, and surprisingly fun with just enough unpredictability to keep it interesting. The key is to go in with the right expectations: cold stratify the seeds, give the seedlings sun and drainage, and don’t expect an instant orchard.
If you want guaranteed fruit, buy a grafted tree. If you want a hands-on growing adventure, plant the seeds. And if you do both, you get the best of both worlds: apples sooner and a long-term mystery tree to cheer on.


