Table of Contents >> Show >> Hide
- First: What a Factory Reset Actually Does (and Doesn’t)
- Pick the Right Reset Level (So You Don’t Overreact)
- Before You Reset: A 5-Minute Prep Checklist
- How to Factory Reset the Nintendo Switch: 9 Steps
- Step 1: Decide whether you’re resetting to keep or to sell
- Step 2: Back up saves the smart way (cloud, transfer, or “sad trombone”)
- Step 3: Save your media (screenshots and videos)
- Step 4: Remove extras (optional, but calming)
- Step 5: Confirm your Parental Controls PIN (or reset it first)
- Step 6: Open System Settings
- Step 7: Navigate to the factory reset option
- Step 8: Keep the console online so it can unlink accounts cleanly
- Step 9: Confirm, initialize, and wait
- If You Can’t Reach Settings: Factory Reset via Maintenance Mode
- After the Reset: Set Up Like You Mean It
- Common Pitfalls (Learn From Other People’s Pain)
- FAQ
- Real-World Experiences: What People Wish They’d Known (Plus a Few Lessons Learned)
If your Nintendo Switch is acting possessed (freezing, refusing to connect, or turning every button press into a dramatic pause), a factory reset can be the “nuclear option” that finally fixes stubborn problems. It’s also the smartest thing you can do before selling or gifting your consolebecause nobody wants to hand over their eShop account, screenshots, and 300-hour Zelda save to a stranger.
This guide synthesizes Nintendo’s official support guidance plus practical advice from major U.S. tech and gaming outlets (think Digital Trends, How-To Geek, Tom’s Guide, Lifewire, Business Insider, WIRED, and more). The result: a safe, no-drama reset you can copy-paste into real life.
First: What a Factory Reset Actually Does (and Doesn’t)
On the Switch, a “factory reset” usually means Initialize Console (sometimes labeled Restore Factory Settings depending on region/language). Either way, it wipes the console’s system memory back to a like-new state: user profiles, save data stored on the console, downloaded games, screenshots/videos stored internally, and system settings.
- Cloud saves: If you use Nintendo Switch Online and your game supports Save Data Cloud, you can typically re-download backed-up saves after you create a new user and re-link your Nintendo Account.
- MicroSD reality check: Initializing doesn’t necessarily erase your microSD card, but installed software on the card becomes unusable until it’s re-downloaded or re-installed. Screenshots on the card generally remain accessible.
- Your Nintendo Account isn’t “deleted”: Your account still exists online. A proper initialization unlinks it from that console so you can link it again later (on the same Switch or a new one).
Bottom line: a factory reset is permanent for anything that wasn’t backed up elsewhere. If you’re only troubleshooting a glitch, you may not need to go full Godzilla.
Pick the Right Reset Level (So You Don’t Overreact)
Before we sprint toward the big red button, here are your “lighter” options:
1) Quick restart (for freezes)
If the Switch is stuck, hold the Power button until it fully powers off, then turn it back on. This is like telling your console to take a deep breath.
2) Clear the cache (for logins, weird web-ish issues)
In System Settings > System > Formatting Options, you can reset cache data for a specific user. This can help with stubborn connection/login behavior without touching your saves.
3) “Initialize Console Without Deleting Save Data” (troubleshooting without heartbreak)
Nintendo also offers a reset mode that keeps save data, screenshots, and user information, but it requires booting into Maintenance Mode. It’s meant for fixing problems when you’re keeping the consolenot for selling it.
If you’re selling/gifting, or you want a totally clean start, you want the full factory reset below.
Before You Reset: A 5-Minute Prep Checklist
- Back up what matters: Upload supported game saves to Save Data Cloud (if you have NSO) or do a system transfer if you’re moving to another Switch.
- Double-check games that don’t support cloud saves: Some titles have special rules. When in doubt, check the game’s Save Data Cloud screen on the console before you wipe anything.
- Sync screenshots/videos you want to keep: Copy them to a PC/phone or move them to microSD (and verify they’re there).
- Know your Parental Controls PIN: If a PIN is set, you’ll be asked for it to proceed with formatting.
- Plug in or charge up: You don’t want your Switch to die mid-amnesia.
How to Factory Reset the Nintendo Switch: 9 Steps
-
Step 1: Decide whether you’re resetting to keep or to sell
If you’re keeping the console and just troubleshooting, consider “Initialize Console Without Deleting Save Data” first (explained later). If you’re selling/gifting, do the full reset so your user info and saves are removed.
-
Step 2: Back up saves the smart way (cloud, transfer, or “sad trombone”)
Open System Settings and confirm whether your key games have cloud backups. If you’re moving to a new Switch, a system transfer is usually safer than relying on memory and vibes. For games that don’t support cloud backups, you may need a transfer method specific to that title.
Example: If you’re about to sell your Switch but plan to buy a new one next week, hold the sale until after you’ve transferred your saves. That’s the difference between “new console day” and “why is my Pokémon team gone?”
-
Step 3: Save your media (screenshots and videos)
Switch memories are adorable until you delete them. If you care about your highlight reel, move screenshots/videos to microSD and/or copy them off the console. Then spot-check a few files to confirm they’re readable.
-
Step 4: Remove extras (optional, but calming)
It’s not required, but many people like to eject the game card and remove the microSD card before resettingespecially if they’re handing the console to someone else. It also helps you remember which microSD card is yours (because tiny black cards love to vanish).
-
Step 5: Confirm your Parental Controls PIN (or reset it first)
If a Parental Controls PIN is enabled, the Switch will prompt for it before you can access formatting options. If you’ve forgotten it, Nintendo provides a PIN reset flow using an on-screen inquiry number and a master key.
-
Step 6: Open System Settings
From the HOME screen, select the System Settings gear icon.
-
Step 7: Navigate to the factory reset option
Scroll down the left menu to System, then scroll to the bottom and choose Formatting Options. Select Initialize Console (or Restore Factory Settings on some systems).
This is the point of no return. Take a breath. Maybe sip water. Hydration is important during data deletion.
-
Step 8: Keep the console online so it can unlink accounts cleanly
Nintendo recommends an internet connection during initialization because the console attempts to unlink any Nintendo Accounts on the system. If you reset while offline, the console may remain registered as your account’s primary console, which can be annoying later when you try to re-download purchases.
-
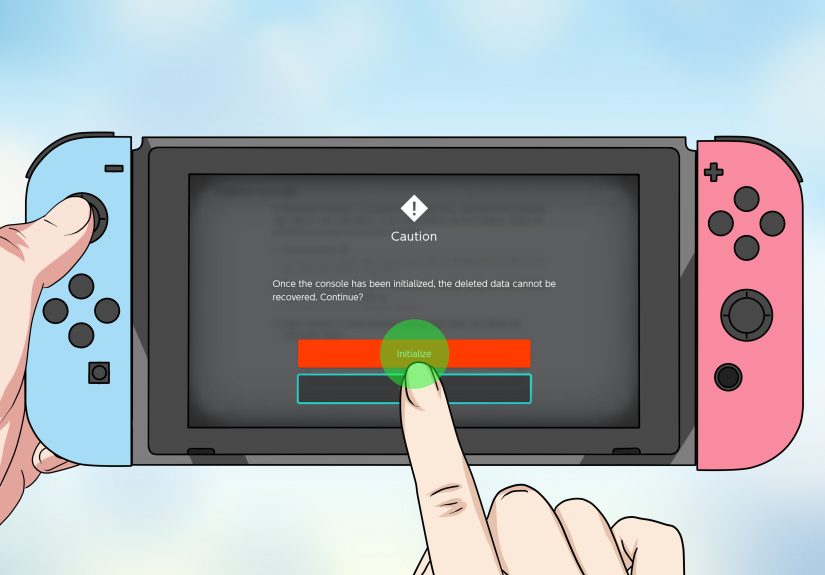
Step 9: Confirm, initialize, and wait
Read the warnings, confirm Initialize, and let the Switch do its thing. When it’s done, you’ll boot into the first-time setup screenready for a fresh start (or ready to be boxed up for its next owner).
If You Can’t Reach Settings: Factory Reset via Maintenance Mode
If your Switch won’t boot properly, is stuck in a loop, or System Settings is basically a rumor, you can reset using Maintenance Mode (sometimes called recovery mode). You’ll need the console fully powered offnot just asleep.
- Power the console off completely. If it’s unresponsive, hold the Power button for about 12 seconds to force a shutdown.
- Press and hold Volume Up (+) and Volume Down (-).
- While still holding both volume buttons, press the Power button once to turn the system on.
- Keep holding the volume buttons until the Maintenance Mode menu appears.
- Choose either Initialize Console (full wipe) or Initialize Console Without Deleting Save Data (troubleshooting reset). Follow the prompts.
Again: if you’re selling the console, choose the full initialization so your user info is removed.
After the Reset: Set Up Like You Mean It
- Re-link your Nintendo Account: During setup, create a new user and link the same Nintendo Account to regain your eShop purchases.
- Re-download games: Digital purchases can be re-downloaded from the eShop using that account.
- Restore saves: If you have Save Data Cloud backups (and the game supports it), download your save data after linking your account.
- Reconnect controllers: If Joy-Cons are acting weird, re-pair them after setup. (Sometimes a fresh start fixes “left Joy-Con thinks it’s a satellite” behavior.)
Common Pitfalls (Learn From Other People’s Pain)
You forgot one non-cloud-save game
This is the classic tragedy: you assumed everything was backed up, you wiped the console, and then you learn that one game had special rules. The safest habit is to check each “important” title inside its Save Data Cloud screen (or look up the game’s policy) before you reset.
Your microSD looks “empty” after the reset
Often the data is still on the card, but the console treats installed software as unusable until you re-download it under a user profile. Screenshots stored on the card usually remain accessible, so don’t panic-delete the card in frustration.
You reset offline and now your “primary console” situation is messy
If you initialize without internet, the old console may stay registered as your primary console, which can complicate re-downloads later. If possible, connect to Wi-Fi before you wipe.
Parental Controls PIN blocks you at the finish line
If you hit the PIN prompt and realize you don’t know it, don’t guess forever. Use Nintendo’s official PIN reset flow to avoid locking yourself out while you’re trying to do a responsible reset.
FAQ
Will a factory reset fix performance issues?
Sometimes. If the problem is corrupted settings, bad cached data, or a software mess, a reset can help. If the issue is hardware (overheating, damaged fan, failing storage), a reset won’t magically make physics stop. It will, however, make troubleshooting simpler.
Does factory reset delete my Nintendo Account?
No. It deletes users and unlinks the account from the console, but the Nintendo Account itselfand your purchase historystill exists online.
Do the steps work for Switch Lite and Switch OLED?
Yes. The menus are effectively the same across Nintendo Switch, Switch Lite, and Switch OLED; just remember there’s no dock on Lite, so “plug it into the dock” advice doesn’t apply.
What if I only want to wipe the console before selling, but keep my microSD card?
That’s normal. Resetting the console doesn’t necessarily wipe the card, but software on the card won’t be usable for the new owner unless it’s re-downloaded under their account. If you’re giving the microSD away too, consider formatting it separately on a computer or within the Switch after the reset.
Real-World Experiences: What People Wish They’d Known (Plus a Few Lessons Learned)
Experience #1: The “I’m selling it tomorrow” scramble. Someone lists their Switch on Facebook Marketplace, gets an eager buyer, and then realizes they never checked cloud backups. The night before the meetup becomes a frantic tour through settings menus: “Do I have cloud saves? Which games? Where are my screenshots?” The lesson here is boring but powerful: back up first, wipe second, sell third. If the buyer is serious, they’ll wait an extra day. Your 200-hour save file won’t respawn if you rush.
Experience #2: The Parental Controls plot twist. A parent buys a used Switch for a kid, tries to factory reset it, and gets stopped by a PIN they don’t knowbecause the previous owner had Parental Controls enabled. The console isn’t “broken”; it’s just doing its job. People who handle this smoothly follow Nintendo’s official reset process: generate a master key using the inquiry number, reset the PIN, and then proceed with formatting. The messy version is guessing codes until everyone’s stressed and the Switch becomes a tiny brick of resentment.
Experience #3: The microSD confusion spiral. After resetting, the new owner inserts a microSD card full of games and sees… nothing. Panic! But what’s really happening is licensing and user linkage: the software files may still be on the card, yet they’re not usable until the console is set up and the correct Nintendo Account re-downloads/validates the software. Screenshots often remain, which is a great clue that the card itself isn’t “dead.” The fix is usually re-downloading the titles (or downloading again under the correct account), not formatting the card in anger.
Experience #4: The “Maintenance Mode saved my weekend” moment. Sometimes the reason you’re resetting is that the console won’t load properly. Maintenance Mode is the unsung hero here: you can access reset options even when the normal interface is unusable. People are often surprised that the button combo is so simplehold both volume buttons, tap power, keep holding until the menu appears. It feels like a secret handshake, but it’s actually a standard recovery feature.
Experience #5: The cloud-save assumption that bites. Many players assume every game supports cloud backups. In reality, some games have exceptions or special transfer requirements. The practical takeaway isn’t “memorize the list,” it’s “verify your important games before you wipe.” Check the Save Data Cloud screen on your console, and if anything looks odd, research that one title specifically. This is especially crucial for long-running games where “starting over” isn’t charmingit’s a lifestyle change.
Experience #6: The post-reset glow-up. When a reset goes well, the Switch feels snappiernot because factory reset adds horsepower, but because you’ve cleared out clutter, weird settings, and corrupted leftovers. The best post-reset habit is to reinstall intentionally: only download the games you actually play, enable cloud backups where available, and set a reminder to export screenshots occasionally. Future-you will thank present-you, which is rare and beautiful.
In other words: a factory reset isn’t scaryit’s just irreversible. Treat it like moving apartments: label boxes (backups), don’t throw away your passport (Nintendo Account access), and maybe don’t do it at 2 a.m. while hungry.