Table of Contents >> Show >> Hide
- What “Add a Phone Number” in Apple Messages Actually Means
- Before You Start: 3 Fast Checks
- How to Add a Phone Number on Apple Messages: 12 Steps
- What to Do If Your Phone Number Does Not Show Up
- Common Scenarios and How This Plays Out
- Helpful Tips So You Do Not Have to Fix This Twice
- Final Thoughts
- Experiences Related to Adding a Phone Number on Apple Messages
- SEO Tags
If Apple Messages has ever decided to send your texts from an email address instead of your actual phone number, welcome to the club. It is a weird little digital identity crisis, and it usually shows up at the worst possible timelike when you text someone and they ask, “Who is this email person, and why are they acting so familiar?”
The good news is that fixing it is usually easy. The better news is that you do not need to wrestle with a hundred hidden settings or perform a rain dance over your iPhone. In most cases, adding your phone number to Apple Messages really means making sure your number is properly activated in iMessage, selected in Send & Receive, and chosen as the default for new conversations.
In this guide, you will learn exactly how to add a phone number on Apple Messages in 12 clear steps, plus what to do when your number is missing, grayed out, unchecked, or just being spectacularly unhelpful. We will also cover common mistakes, practical examples, and a few real-life experiences so you do not end up staring at your screen like it personally betrayed you.
What “Add a Phone Number” in Apple Messages Actually Means
Before jumping into the steps, let’s clear up one important detail. In Apple Messages, you usually do not manually type in a brand-new phone number and save it like a profile field. Instead, your iPhone detects the phone number connected to your active SIM or eSIM, links it to iMessage, and then lets you select that number in Messages settings.
So when people search for how to add a phone number on Apple Messages, they usually mean one of these things:
- They want Messages to use their phone number instead of their email address.
- They want their number to appear on a Mac or iPad too.
- They changed carriers, changed SIMs, or switched devices and now their number is missing or unchecked.
- They want to make sure new iMessages start from the right contact method.
That distinction matters because the fix depends on whether your number is simply unselected, not syncing across devices, or failing to activate entirely.
Before You Start: 3 Fast Checks
1. Make sure your line is active
If your cellular line is off, inactive, or attached to the wrong SIM, Apple Messages cannot work its magic. If you use dual SIM, double-check that the line you want to use is turned on.
2. Make sure you are signed in to the right Apple Account
Apple Messages plays best when your iPhone, iPad, and Mac are all signed in to the same Apple Account. If one device is freelancing with a different login, syncing gets messy fast.
3. Turn on iMessage
This sounds obvious, but obvious things are where tech problems love to hide. If iMessage is off, your number may not appear the way you expect in Messages settings.
How to Add a Phone Number on Apple Messages: 12 Steps
- Open Settings on your iPhone.
Yes, the humble gray gear icon. This is where Apple hides both great power and mild annoyance.
- Tap Apps, then tap Messages.
On current iOS versions, Apple tucks app settings inside the Apps section. If you are using an older version of iOS, you may see Messages directly in the main Settings list.
- Turn on iMessage.
If iMessage is off, switch it on. Give it a moment to activate. If your phone asks you to sign in with your Apple Account, do that now.
- Tap Send & Receive.
This is the control center for which phone numbers and email addresses can receive iMessages and which one is used when you reply.
- Look under “You Can Receive iMessages To and Reply From.”
Your phone number should appear there. If it does, tap it so it is selected. If your Apple Account email is there too, that is normal. Apple lets you use one or both.
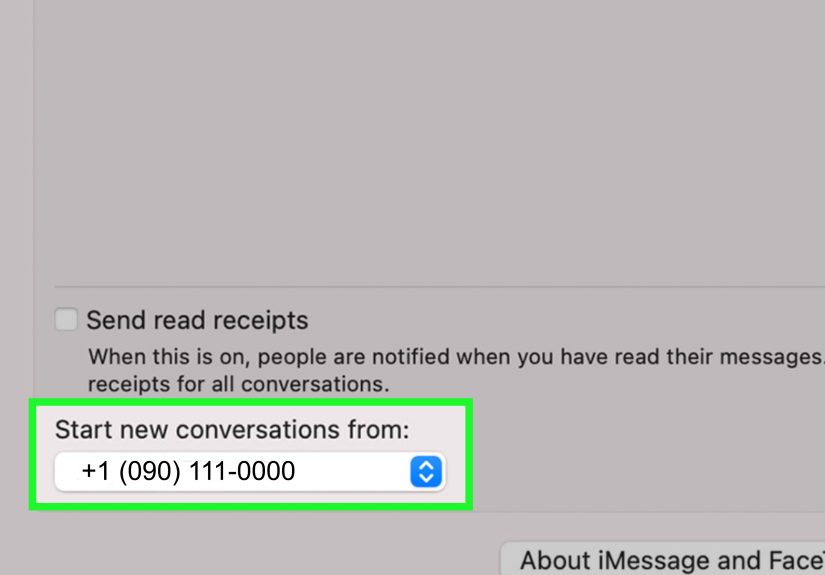
- Go to “Start New Conversations From.”
This setting matters more than many people realize. If your email address is selected here, new conversations may start from that email instead of your number. Choose your phone number if you want your messages to come from your number.
- Check FaceTime too.
Go back to Settings, tap Apps, then FaceTime. Make sure the same phone number is selected under the contact methods there as well. Messages and FaceTime often behave better when they agree with each other instead of acting like divorced roommates.
- Confirm your Apple Account on other Apple devices.
If you want your phone number to work in Messages on your Mac or iPad, make sure those devices are signed in to the same Apple Account as your iPhone.
- Turn on Text Message Forwarding if you use a Mac or iPad.
On your iPhone, go to Settings > Apps > Messages > Text Message Forwarding. Turn on the devices you want to include. This lets SMS and MMS texts from your iPhone appear on your other Apple devices too.
- Check Messages settings on your Mac.
Open Messages on your Mac, choose Messages > Settings > iMessage, and make sure you are signed in. Your Apple Account should match the one on your iPhone, and your phone number should appear as a reachable option.
- Send yourself a quick test message.
Try starting a new conversation with a trusted friend or family member. Ask them what shows up on their end. If your phone number appears instead of your email, congratulationsyou and Apple Messages are back on speaking terms.
- Start a new conversation if old threads still show your email.
This catches people all the time. Changing the “Start New Conversations From” setting affects new chats going forward. Existing conversations that began with your email may still reflect that earlier contact method. If you want the phone number to appear, start a fresh thread.
What to Do If Your Phone Number Does Not Show Up
If your number is missing entirely, do not panic and do not throw your phone into a decorative basket “for a while.” Work through these fixes instead.
Make sure the SIM or eSIM is active
If your number is not active on the iPhone, Messages cannot present it as an option. This is especially common after switching carriers, upgrading phones, or moving to eSIM.
Remove inactive duplicate SIMs
If you use dual SIM and the same number is somehow tied to an inactive SIM, Apple may get confused. In that case, remove the inactive physical SIM or delete the inactive eSIM, then go back to Messages and try again.
Sign out and sign back in
If your number is unchecked and you cannot select it, Apple’s recommended fix is basically a full reset of Messages and FaceTime sign-in on your devices. Sign out of Messages and FaceTime on your Mac, then sign out on your iPhone and iPad, then sign back in using the same Apple Account.
Update your software
Sometimes the issue is just outdated software. Not exciting, but very real. If Apple Messages is being weird, a software update can solve problems that no amount of button tapping will fix.
Check your trusted phone number settings
Your Apple Account security settings matter too. If your account details are outdated or your trusted number is wrong, you may run into activation hiccups, verification prompts, or login confusion that spills over into Messages.
Common Scenarios and How This Plays Out
Scenario 1: Messages send from your email address
This is the most common complaint. Usually, the fix is simple: go to Settings > Apps > Messages > Send & Receive and choose your phone number under Start New Conversations From. Then begin a new chat.
Scenario 2: Your Mac gets iMessages but not regular texts
Your Mac may be signed into iMessage just fine, but without Text Message Forwarding, standard SMS or MMS texts from non-iPhone users will not show up there. Turn on forwarding from the iPhone and make sure the Mac is enabled in the list.
Scenario 3: Your number appears, but it is grayed out
This usually points to an activation or sign-in issue. Check your active SIM, confirm the same Apple Account on all devices, and then use the sign-out/sign-in reset if needed.
Helpful Tips So You Do Not Have to Fix This Twice
- Keep your Apple Account consistent across your iPhone, iPad, and Mac.
- Use your phone number for new conversations if you want fewer identity mix-ups.
- After changing carriers or SIMs, revisit Messages settings to confirm the number is still selected.
- Do not judge old message threads too quickly; some still reflect the contact method used when they started.
- Test after every major change so you know exactly what fixed it.
Final Thoughts
Learning how to add a phone number on Apple Messages is really about understanding how Apple routes your identity across Messages, FaceTime, and your Apple Account. Once you know where the crucial settings live, the process is much less mysterious.
In most cases, the winning formula is simple: turn on iMessage, open Send & Receive, select your phone number, choose it under Start New Conversations From, and make sure all your devices use the same Apple Account. If the number still does not cooperate, check your SIM setup, FaceTime settings, software version, and sign-in status.
In other words, Apple Messages is not broken. It is just very committed to making you prove that you are, in fact, yourself.
Experiences Related to Adding a Phone Number on Apple Messages
One of the most common experiences people have with Apple Messages happens right after upgrading to a new iPhone. Everything seems normal at first. Contacts are there. Photos are there. Apps are there. Confidence is high. Then the first message goes out, and instead of the recipient seeing your phone number, they see your Apple Account email address. Suddenly, you look like a stranger who somehow knows where your friend keeps the good snacks. In most of these cases, the issue is not dramatic at all. The phone number is usually available, but the default setting for new conversations is still pointed at the email address. A quick visit to Send & Receive fixes the problem, but people often lose half an hour blaming the carrier, the phone, or the moon.
Another very real experience shows up when someone uses a Mac and an iPhone together for work. They love the convenience of answering texts from their laptop, especially during the day, but then notice that some messages appear on the iPhone only. The usual culprit is that iMessage is working on both devices, but Text Message Forwarding is not enabled, so regular SMS messages are not making the trip to the Mac. This is the kind of problem that feels random until you know the difference between iMessage and standard texting. Once forwarding is turned on, the setup suddenly feels polished and magical again, which is very on-brand for Apple after a brief period of chaos.
People who use dual SIM often have the most confusing experience of all. They may see two lines, old carrier information, or an inactive SIM still hanging around in settings like an ex who will not stop liking your posts. When that happens, Apple Messages can struggle to decide which number belongs at center stage. A user may tap around in Messages and feel convinced the app is broken, when the real issue is buried in the cellular settings. Once the inactive SIM is removed or the correct line is selected, the phone number usually becomes available right where it should have been all along.
There is also the classic family-tech-support scenario. Someone gets a new iPad, signs in, opens Messages, and expects everything to mirror the iPhone automatically. Sometimes it does. Sometimes it absolutely does not. Then begins the famous sentence: “It works on my phone but not on this thing.” Usually the solution is making sure the iPad uses the same Apple Account and that the phone number is enabled in the Messages settings. It is a small fix, but it feels huge in the moment, especially when three people are standing around offering unhelpful advice like, “Try turning it off and on again,” which, to be fair, occasionally works.
What all these experiences have in common is this: Apple Messages usually behaves logically once you know the system behind it. The tricky part is that Apple hides the logic behind friendly labels and tiny toggles. Once you learn the pattern, though, future fixes take minutes instead of frustration-fueled hours.