
Table of Contents >> Show >> Hide
- Why Build Kitchen Cabinets Instead of Buying Them?
- Choose Your Cabinet Style Before You Cut a Single Board
- Materials and Tools You Will Want Nearby
- How to Build Kitchen Cabinets, Step by Step
- 1. Measure the Room Like It Owes You Money
- 2. Build a Detailed Layout and Cut List
- 3. Break Down Sheet Goods and Cut Parts Dead Square
- 4. Build the Toe-Kick Bases or Platforms
- 5. Assemble the Cabinet Boxes
- 6. Add Backs, Shelf Pin Holes, and Interior Features
- 7. Build Face Frames or Finish the Front Edges
- 8. Make the Doors and Drawers
- 9. Sand, Finish, and Pre-Drill Hardware Locations
- 10. Install Upper Cabinets First
- 11. Install Base Cabinets and Final Trim
- Common Cabinet-Building Mistakes to Avoid
- Is Building Kitchen Cabinets Worth It?
- Real-World Experience: What Building Kitchen Cabinets Actually Feels Like
- Conclusion
Building your own kitchen cabinets sounds a little like deciding to cut your own bangs: bold, potentially glorious, and best done with a plan. The good news is that cabinet building is not wizardry. It is mostly careful measuring, square cuts, patience, and the emotional maturity to admit that your wall is not straight, your floor is not level, and yes, the problem is definitely the house and not your tape measure.
If you want custom storage, better materials, and a kitchen that fits your space instead of arguing with it, learning how to build kitchen cabinets can be a smart DIY move. Done right, homemade cabinets can look polished, work hard for years, and cost less than high-end custom options. Done wrong, they become expensive wooden life lessons. This guide walks you through the full process, from layout and materials to cabinet boxes, doors, drawers, and installation, so you can build with confidence and keep the panic sanding to a minimum.
Why Build Kitchen Cabinets Instead of Buying Them?
The biggest reason is control. When you build your own cabinets, you decide the widths, depths, storage features, door style, hardware, and finish. That matters in older kitchens where walls wander, corners misbehave, and standard stock sizes never quite land where you need them.
Building cabinets also lets you choose better materials. Many DIY builders use quality plywood for cabinet cases, solid wood for face frames, and durable concealed hinges and drawer slides. That combination can give you a stronger cabinet than bargain options built from thinner engineered parts. It also lets you tailor the layout to real life. Need deeper drawers for pots, a pullout trash cabinet, or a weirdly narrow spice cabinet next to the range? Welcome to custom territory.
That said, this project rewards accuracy more than bravado. If you can measure carefully, cut square parts, keep track of a cut list, and install cabinets level and plumb, you can build a kitchen that looks seriously professional.
Choose Your Cabinet Style Before You Cut a Single Board
Face-Frame Cabinets
Face-frame cabinets use a solid wood frame attached to the front of the plywood box. This is a classic American style and a favorite for traditional, farmhouse, and Shaker kitchens. The frame adds stiffness, helps hide plywood edges, and gives you a little forgiveness during installation. If you are building for the first time, face-frame construction can feel friendlier because it lets you fine-tune the front appearance.
Frameless Cabinets
Frameless, or European-style, cabinets skip the front frame and rely on the cabinet box itself for structure. Doors and drawer fronts overlay the box edges for a sleek, modern look. This style makes great use of interior space and can be efficient to build, but it demands more precision because the box edges remain visually important.
Neither style is “better” in every kitchen. Face-frame cabinets lean classic and forgiving. Frameless cabinets lean modern and streamlined. Pick the one that matches your design, tools, and tolerance for fine adjustments.
Materials and Tools You Will Want Nearby
Best Materials for DIY Kitchen Cabinets
- 3/4-inch plywood for cabinet sides, bottoms, tops, and fixed shelves
- 1/4-inch plywood for backs and door panels in some styles
- Solid hardwood for face frames, rails, stiles, and trim
- Wood glue and cabinet screws or pocket-hole screws
- Edge banding if you are building frameless cabinets or exposed plywood ends
- Concealed hinges for easier door adjustment
- Drawer slides, shelf pins, knobs, and pulls
- Primer and paint or stain and topcoat, depending on your finish
Helpful Tools for Cabinet Building
- Table saw or circular saw with a straight guide track
- Miter saw
- Pocket-hole jig, router, or dado setup depending on your joinery
- Drill and impact driver
- Clamps, lots of clamps, then probably two more
- Level, laser level if available, tape measure, square, and stud finder
- Sander and sanding blocks
- Jigsaw or hole saw for plumbing cutouts
One of the smartest moves is choosing cabinet-friendly sheet goods from the start. Good plywood costs more, but it usually cuts cleaner, stays flatter, and saves you from weird voids that make joinery and fasteners less reliable. Cheap plywood has a special gift for becoming expensive after it ruins your Saturday.
How to Build Kitchen Cabinets, Step by Step
1. Measure the Room Like It Owes You Money
Start by measuring the full kitchen, not just the wall where one cabinet goes. Mark appliance openings, window trim, outlets, plumbing, and any awkward bumps or corners. Check the floor for the highest point, because cabinet layout should work from that reference. Also find and mark wall studs early. This part feels boring, but it prevents thrilling surprises later, like discovering your dishwasher opening is now decorative.
Many cabinet layouts are based on standard base cabinet height and depth. A common target is about 34 1/2 inches high before the countertop and around 24 inches deep for base cabinets. Upper cabinet reference lines are often laid out from there. Even if you tweak the dimensions, use standards as your starting point because they keep countertops, appliances, and working height comfortable.
2. Build a Detailed Layout and Cut List
Sketch every cabinet. Then turn the sketch into a cut list with exact parts: sides, bottoms, tops, stretchers, backs, shelves, face frames, doors, drawer fronts, and toe-kicks. Label each cabinet with a code such as B1 for base cabinet one or W3 for wall cabinet three.
This step is where smart builders save time and money. A full layout lets you optimize plywood sheets, keep matching parts identical, and avoid the ancient DIY curse of cutting the same side panel twice and still getting the wrong size.
3. Break Down Sheet Goods and Cut Parts Dead Square
Cut large plywood sheets into manageable sections first, then trim parts to final size. Accuracy matters more than speed here. Cabinet parts that are even slightly out of square tend to multiply their mistakes later. Crooked cabinet boxes lead to crooked doors, sticky drawers, and the kind of language that alarms the neighbors.
Try to cut like parts at the same setup so they match exactly. If two cabinet sides should be identical, cut them as a pair whenever possible. Consistency is your best friend in cabinet work.
4. Build the Toe-Kick Bases or Platforms
Many builders make a separate base, often around 4 inches high, for lower cabinets rather than building the toe-kick into every box. This is a smart move, especially across a row of cabinets, because it is easier to level a platform first and then set the boxes on top.
In practical terms, this means less wrestling with individual base cabinets during installation. You can shim the platform until it is level, lock it in place, and then install the cabinet boxes above it. It is one of those unglamorous choices that pays off when your floor slopes like it was designed by a prankster.
5. Assemble the Cabinet Boxes
Now the fun starts. Build the cabinet cases by joining the sides, bottom, top, and back. There are several good joinery methods for this: dadoes and rabbets, glue-and-screw construction, locking joints, or pocket-hole joinery. The best choice depends on your tools and comfort level.
The key goals are simple: the box must be square, rigid, and sized correctly. Use clamps, check the diagonals, and keep the front edges flush. If you are using pocket holes, place them where they will be hidden. If the cabinet has an exposed end, adjust your assembly so the joinery stays out of sight.
For wall cabinets, add sturdy mounting strips or nailers near the top and bottom back edges. For base cabinets, include stretchers or a top rail system that keeps the box strong without blocking the sink or drawer area.
6. Add Backs, Shelf Pin Holes, and Interior Features
A full back panel helps keep cabinets square and adds strength. Before you attach it, drill shelf-pin holes if you want adjustable shelves. This is also the moment to plan pullouts, trash bins, spice racks, or deep drawer systems.
Think about real kitchen use, not fantasy-kitchen use. Most people do not need a shrine for three decorative platters. They need drawers that hold heavy pots, shelves that do not sag, and storage that does not require yoga-level flexibility to reach the slow cooker in back.
7. Build Face Frames or Finish the Front Edges
If you are making face-frame cabinets, build the frame from straight solid wood and attach it carefully to the front of the box. Make sure the reveals are consistent and the frame is flush where needed. Face frames can be assembled with pocket screws, dowels, mortise-and-tenon joints, or other strong joinery.
If you are building frameless cabinets, apply edge banding or finish exposed plywood edges cleanly. The front edge quality matters because it becomes part of the final look.
8. Make the Doors and Drawers
For many DIYers, this is the moment kitchen cabinets go from “large plywood storage cubes” to “actually beautiful cabinetry.” Shaker doors remain popular because they are clean, timeless, and fairly approachable to build. Slab doors are even simpler if you want a modern look.
Drawer boxes should slide smoothly and sit square in the opening. Whether you use side-mount or undermount slides, install the hardware with care. Small alignment errors here become big annoyances every time you open the drawer.
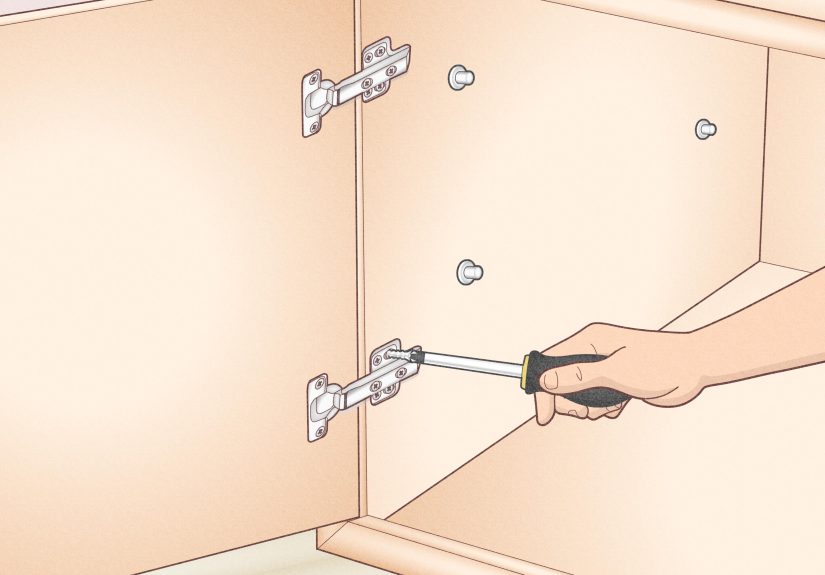
Concealed cup hinges are usually the easiest choice for kitchen cabinets because they offer useful adjustment after installation. That ability to tweak height, side-to-side alignment, and depth is pure gold when you are dialing in door reveals.
9. Sand, Finish, and Pre-Drill Hardware Locations
Sand all visible surfaces thoroughly before finish. If you are painting, fill imperfections and prime well. If you are staining, do sample boards first so you do not discover too late that your “warm honey” finish reads more like “aggressively orange regret.”
Prefinishing many parts before final installation can save time and produce cleaner results, especially inside cabinet boxes. Also mark and pre-drill hardware locations with a jig or template so knobs and pulls line up consistently.
10. Install Upper Cabinets First
Most installers hang the uppers before setting the base cabinets. That way you are not leaning over freshly installed lowers while lifting heavy wall cabinets. Mark your layout lines, locate the studs, and attach a temporary ledger board to support the uppers while you fasten them.
Clamp adjoining cabinets together, line up the faces, and screw them to one another before final fastening where appropriate. Then secure them to the wall studs. Work carefully, keep everything level, and use shims where the wall is uneven.
11. Install Base Cabinets and Final Trim
Start with a corner or end cabinet, set it on the leveled platform or shimmed floor, and fasten it to the studs. Add each neighboring cabinet one at a time, clamp the faces flush, and connect the units together. Check level across the tops as you go. Countertops are not interested in your excuses; they want a flat surface.
Cut plumbing openings in the sink base, add filler strips where needed, install the toe-kick trim, and then hang the doors and slide in the drawers. Finally, adjust the hinges until the reveals are even and the doors close cleanly.
Common Cabinet-Building Mistakes to Avoid
- Skipping the full layout: Cabinets are a system, not isolated boxes.
- Ignoring floor and wall irregularities: Your house is almost never perfectly square.
- Using poor sheet goods: Bad plywood creates bad results fast.
- Forgetting appliance clearances: Fridges, dishwashers, and ranges need breathing room.
- Rushing door and drawer alignment: Tiny errors become daily annoyances.
- Installing without enough shims and clamps: Hope is not a fastening system.
Is Building Kitchen Cabinets Worth It?
For many homeowners, yes. If you want custom sizing, better storage, and the satisfaction of building something that gets used every single day, kitchen cabinets are one of the most rewarding woodworking projects around. They are also one of the most demanding. This is precision work dressed up as home improvement.
But once you understand the system, the project becomes much less mysterious. You are really building a series of repeatable parts: square boxes, accurate fronts, well-fitted doors, smooth drawers, and a level installation. Nail those fundamentals, and the kitchen starts to come together in a way that feels almost magical. Expensive, heavy, slightly dusty magic, but magic all the same.
Real-World Experience: What Building Kitchen Cabinets Actually Feels Like
The first real experience most DIY builders have with kitchen cabinets is this: the first cabinet takes forever. You measure twice, cut once, panic three times, and then dry-fit every piece like you are defusing a bomb. That is normal. The first box is not just a cabinet; it is your practice round, your confidence test, and your introduction to how picky cabinetry really is. The second cabinet goes faster. By the fourth, you start walking around the garage like you host a woodworking show. Stay humble. The fifth one is where you accidentally drill a pocket hole on the visible side and remember that growth is not linear.
Another common experience is learning that the room, not the cabinet, is often the problem. Plenty of builders cut perfectly square cabinets only to discover the kitchen itself is a rebellious geometry project. Floors rise, walls bow, corners miss 90 degrees by enough to make you squint. This is why experienced cabinet builders talk so much about ledger boards, shims, and reference lines. They are not optional little extras. They are the reason a kitchen looks polished when the house beneath it is doing interpretive dance.
There is also the surprisingly emotional experience of handling sheet goods. Full plywood sheets are big, floppy, and deeply confident that they are in charge. Breaking them down into manageable parts is often the moment a project starts to feel real. It is also when many people realize that building kitchen cabinets is less about heroic strength and more about creating repeatable systems: good supports, clear labels, careful cuts, and smart sequencing. Labeling parts feels fussy until you are staring at eight nearly identical side panels and wondering which one belongs to the sink base with plumbing cutouts. Suddenly, labels become poetry.
Door and drawer fitting brings its own life lessons. You can build a sturdy cabinet box, but badly aligned doors will still make the whole kitchen look off. This is where concealed hinges earn their reputation. The first time you turn a screw and watch a door shift neatly into alignment, you feel like you have unlocked a cheat code. The first time you turn the wrong screw and make it worse, you discover character development. Either way, patience wins. Cabinet work rewards slow adjustments more than dramatic flourishes.
One of the most useful experiences people report is the value of mockups. Even a temporary cardboard template or a scrap-wood test piece can save expensive mistakes. Testing a drawer depth, a pull placement, or a filler strip width before committing to finish-grade material is not overthinking. It is what keeps your budget from quietly catching fire.
And finally, there is the deeply satisfying experience of seeing the cabinets installed, doors hung, hardware aligned, and toe-kicks in place. At that point, the project stops looking like a shop class and starts looking like a kitchen. You notice the custom details first: the drawer that perfectly fits your pans, the narrow pullout that uses dead space, the cabinet height that feels just right. Those small wins are why people build their own kitchen cabinets in the first place. Not because it is the easiest route, but because it lets the room fit your life instead of forcing your life to fit whatever happened to be in stock.
Conclusion
If you are serious about learning how to build kitchen cabinets, focus on the fundamentals: smart planning, accurate measurements, quality plywood, square boxes, and careful installation. Fancy details matter later. What matters first is that every cabinet fits the plan, sits level, and works smoothly.
Build one excellent cabinet before you worry about building ten. Develop a repeatable process. Label everything. Respect your cut list. Keep a pile of shims nearby. And remember: the goal is not to impress the plywood. The goal is to create a kitchen that looks custom, functions beautifully, and makes you absurdly proud every time you open a drawer.


