Table of Contents >> Show >> Hide
- Why People Delete Facebook Posts in the First Place
- How to Delete a Single Post on Facebook
- How to Delete Multiple Facebook Posts at Once
- Delete, Archive, Hide, or Move to Trash: What Is the Difference?
- What You Can and Cannot Delete on Facebook
- What Happens After You Delete a Facebook Post?
- Why You Might Not See a Delete Option
- How to Clean Up Old Facebook Posts Faster
- Best Practices Before Deleting Facebook Posts
- Real-World Examples of When Deleting Posts Makes Sense
- Experiences Related to “How to Delete Posts on Facebook”
- Conclusion
- SEO Tags
Let’s be honest: Facebook has been around long enough for most people to have at least a few digital fossils lying around. Maybe it is a blurry concert photo from 2014, a dramatic status update written at 1:13 a.m., or a “hot take” that aged like milk left on a radiator. The good news is that deleting posts on Facebook is not hard once you know where to look. The slightly less exciting news is that Facebook loves hiding important controls in menus, logs, and settings with names that sound like they were chosen during a committee meeting.
This guide breaks it all down in plain English. You will learn how to delete a single Facebook post, how to remove multiple posts in bulk, when to use archive instead of delete, what happens after something goes to Trash, and what to do if Facebook refuses to show a delete option. Whether you are cleaning up your profile for privacy, job hunting, or just trying to erase evidence of your “live laugh love” quote phase, this walkthrough has you covered.
Why People Delete Facebook Posts in the First Place
People delete Facebook posts for all kinds of reasons, and most of them are completely normal. Sometimes it is about privacy. Sometimes it is about professionalism. Sometimes it is about ending the public reign of an unflattering selfie that somehow collected 87 likes from relatives you barely know.
Here are a few common situations:
- You posted something years ago that no longer reflects your views.
- You want to clean up your timeline before applying for jobs or internships.
- You accidentally shared a post publicly and want it gone.
- You want to remove old relationship content without deleting your whole account.
- You are doing a general Facebook cleanup and want a profile that feels more current.
In other words, deleting Facebook posts is not always about regret. Sometimes it is just good digital housekeeping. Like finally cleaning out that kitchen drawer full of mystery cables.
How to Delete a Single Post on Facebook
If you only need to remove one post, Facebook usually makes it pretty simple. The exact labels can vary a little by device and app version, but the path is generally the same: find the post, open the menu, and choose the delete option.
Delete a Facebook Post on Mobile
- Open the Facebook app and go to your profile.
- Find the post you want to remove.
- Tap the three-dot menu in the top-right corner of the post.
- Select Delete, Delete Post, or in some versions Move to Trash.
- Confirm your choice.
If Facebook sends the post to Trash instead of instantly erasing it, that is normal. Think of Trash as Facebook’s “Are you really sure?” room. It gives you a short window to restore the post before it is permanently removed.
Delete a Facebook Post on Desktop
- Sign in to Facebook in your browser.
- Click your profile and scroll to the post.
- Click the three-dot menu on the post.
- Choose Delete or Move to Trash.
- Confirm the action.
That is the quick fix for one embarrassing post. One click, one confirmation, one less digital jump scare.
How to Delete Multiple Facebook Posts at Once
If you want to clean up a lot of old posts, deleting one by one can feel like mowing a football field with nail scissors. This is where Facebook’s Activity Log and Manage Activity tools become useful.
These tools let you review older posts in batches. Depending on the device and layout you see, Facebook may call the feature Manage Activity, Manage Posts, or simply show the controls inside Activity Log. The idea is the same: filter your content, select posts, and then archive or trash them in groups.
Bulk Delete on the Facebook App
- Open Facebook and go to your profile.
- Tap the three-dot button or profile options area.
- Open Activity Log.
- Look for Manage Activity or Manage Your Posts.
- Use filters such as date, category, or people to narrow the list.
- Select the posts you want to remove.
- Choose Trash or Delete, then confirm.
Bulk Delete on Desktop
- Go to your Facebook profile on a browser.
- Open Activity Log or click Manage Posts if it appears under your profile publishing box.
- Filter your content by year, privacy, tags, or creator.
- Select the posts you want to remove.
- Choose the delete or trash option and confirm.
This is especially helpful if you want to remove old status updates from a specific year, clean up posts involving a certain person, or clear out a category like shared memories, check-ins, or outdated photos.
Delete, Archive, Hide, or Move to Trash: What Is the Difference?
Facebook offers several similar-sounding options, and they are not the same. If you pick the wrong one, you may think a post is gone when it is really just taking a nap.
Delete
This removes the post. On some versions of Facebook, the post may first go to Trash before permanent deletion.
Move to Trash
The post is removed from public view and placed in Trash. Facebook typically keeps trashed content for up to 30 days before permanently deleting it, unless you manually delete it sooner.
Archive
Archive hides the post from everyone else but keeps it available to you. This is useful when you do not want a post visible on your profile but also do not want to lose it forever.
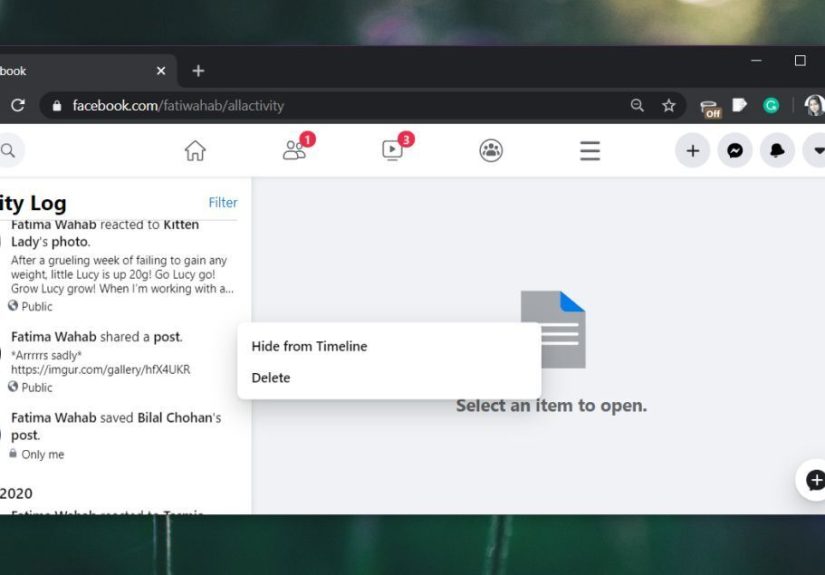
Hide from Timeline
This removes the post from appearing on your profile timeline, but it may still exist elsewhere depending on who posted it and who can see it. It is more of a visibility change than true deletion.
Rule of thumb: if you want something truly gone, choose delete or trash. If you might regret deleting it later, archive is the safer option.
What You Can and Cannot Delete on Facebook
This part matters because Facebook does not give every piece of content the same controls.
You Can Usually Delete:
- Your own status updates
- Your own photo posts
- Your own shared links
- Your own videos
- Many older posts through Activity Log
You Usually Cannot Delete:
- A post created by another person on their own profile
- Some tagged content you did not create
- Certain system-generated or older activity items through bulk tools
If someone else created the content, Facebook often lets you hide, untag, or report it, but not fully delete the original post. If it is on your own profile, you may be able to remove it from your timeline while the original still exists where it was first posted.
If you manage a Facebook Page, you can usually delete or hide Page posts as long as you have the proper Facebook access or task permissions. That is useful for brands, creators, and businesses cleaning up old promotions or outdated announcements.
What Happens After You Delete a Facebook Post?
In most cases, the post disappears from public view right away. If it was moved to Trash, you may still be able to restore it during Facebook’s retention window. After that window ends, or after you manually permanently delete it from Trash, it is gone for good from your side of the platform.
There are two practical takeaways here:
- If you are unsure, archive first and delete later.
- If you are absolutely sure, check Trash and permanently delete it there too.
Also remember that screenshots exist, because the internet never misses a chance to be dramatic.
Why You Might Not See a Delete Option
If Facebook refuses to show a delete button, do not panic. It usually means one of a few things:
- You did not create the original post.
- The item is a tagged post or system-generated activity.
- You are looking at a Page or group post without the right permissions.
- The app interface changed and the control is buried inside Activity Log.
- You are trying to bulk delete something Facebook only allows you to hide.
When that happens, try opening the content directly from your timeline instead of from Activity Log. Some posts that cannot be deleted in bulk can still be deleted individually through the post’s own menu.
How to Clean Up Old Facebook Posts Faster
If your Facebook profile has been active for years, the smartest cleanup strategy is not random scrolling. It is targeted filtering.
Try this approach:
- Open Activity Log.
- Filter by year first.
- Then narrow by category, privacy setting, or tagged people.
- Review content in batches.
- Archive what is mildly cringey, delete what is deeply cringey.
For example, if you are preparing for a job search, you might start with public posts from 2016 to 2020. If you are just doing a personal refresh, you may want to remove relationship-related posts, old memes, political rants, or anything that makes you mutter, “Wow, I really typed that with confidence.”
Best Practices Before Deleting Facebook Posts
- Review before you mass-delete: Sometimes an old post is funny in a good way, not a bad way.
- Use archive for sentimental content: You may want the memory without the public visibility.
- Check your Page separately: Personal profile cleanup and Page cleanup use different controls.
- Look in Trash afterward: That is where permanent deletion may still need a final step.
- Remember comments and tags: Cleaning up posts does not automatically clean up every old interaction.
Real-World Examples of When Deleting Posts Makes Sense
Example 1: The job-search cleanup. A college student reviews public Facebook posts before internship interviews and deletes old jokes, party photos, and angry late-night status updates. The profile immediately looks more polished.
Example 2: The breakup reset. Someone wants a fresh start without deleting years of memories. Instead of removing everything, they archive personal posts they may want later and permanently delete the ones tied to the relationship.
Example 3: The business owner refresh. A small business owner removes outdated Page posts about old promotions and events so visitors see current offers instead of a coupon that expired before some houseplants in the office were born.
Experiences Related to “How to Delete Posts on Facebook”
One of the most common experiences people have when trying to delete Facebook posts is surprise. Not because deleting is impossible, but because the platform often reveals just how much a person has posted over the years. You open Activity Log expecting to remove five old posts, and suddenly you are face-to-face with a digital time capsule full of quiz results, vague statuses, blurry food photos, and opinions you do not even remember having. The process becomes part cleanup, part archaeology.
Another common experience is realizing that not every post should be deleted. Many users begin with a “burn it all down” attitude and then quickly switch to a more thoughtful approach. A college memory might be a little embarrassing, but it can still be meaningful. A family photo may not belong on a public profile anymore, but it might be worth archiving instead of deleting. This is where Facebook’s archive feature becomes surprisingly useful. It gives people a middle path between total erasure and total exposure.
People also often report frustration with Facebook’s interface. A control that appears on desktop may look different on mobile. One version says “Delete,” another says “Move to Trash,” and another sends you hunting through Activity Log like you are on a scavenger hunt designed by a stressed software team. This can make users think the feature has disappeared when it has really just moved. Once they understand that Facebook tends to route post management through Activity Log, the process gets much easier.
There is also the emotional side. Deleting posts can feel oddly personal. Some people describe it as liberating, especially when they are cleaning up after a difficult period in life. Removing old relationship posts, outdated beliefs, or painful memories can feel like reclaiming control over your online identity. Others feel nostalgic while cleaning up, especially when they stumble across harmless posts that remind them of school, travel, or people they no longer see. In that sense, deleting Facebook posts is not always just about privacy. Sometimes it is about deciding what version of your past deserves a front-row seat in your present.
Another experience many users share is learning that privacy and deletion are not identical. A lot of people begin the process wanting everything gone, but later realize that changing visibility or using archive solves the real problem. If the issue is “I do not want strangers seeing this,” deleting is only one option. Hiding or archiving can be faster and less permanent. That is an important lesson because it turns a stressful cleanup into a strategic one.
Finally, people usually finish the process with the same thought: “I should have done this sooner.” A cleaned-up Facebook profile often feels lighter, more intentional, and easier to manage. The timeline stops looking like an attic and starts looking like a space you actually want guests to see. And honestly, that is a pretty satisfying result for a task that begins with clicking three tiny dots on a post you made when skinny jeans and vaguebooking ruled the earth.
Conclusion
Learning how to delete posts on Facebook is really about learning how to manage your digital footprint. You can remove one post in seconds, clean up years of content through Activity Log, archive memories you want to keep private, and use Trash as a short safety net before permanent deletion. Once you understand the difference between delete, hide, archive, and trash, Facebook becomes much less confusing and a lot more manageable.
So yes, that old post can go. The dramatic quote. The awkward check-in. The photo with the camera flash turned all the way up. Facebook may remember everything, but that does not mean your profile has to display it like a museum exhibit.