Table of Contents >> Show >> Hide
- Why Use Shapes in Photoshop?
- Before You Start
- How to Insert a Shape in Photoshop: 9 Steps
- Step 1: Open Photoshop and Create (or Open) a Document
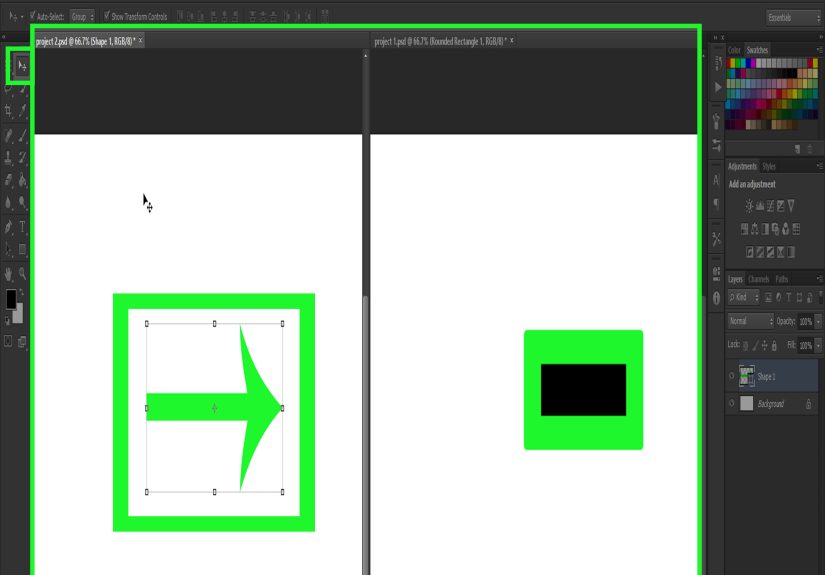
- Step 2: Select the Shape Tool Group
- Step 3: Set the Tool Mode to “Shape”
- Step 4: Choose the Shape Type You Want
- Step 5: Set Fill, Stroke, and Other Shape Properties
- Step 6: Click and Drag on the Canvas to Draw the Shape
- Step 7: Refine the Shape in the Properties Panel (or Contextual Task Bar)
- Step 8: Move, Align, or Combine Shapes
- Step 9: Save Your Work (and Export if Needed)
- Common Problems When Inserting Shapes in Photoshop (and How to Fix Them)
- Pro Tips for Better Shape Workflow
- Quick Recap
- Experience-Based Notes: What Usually Happens the First Few Times (and How to Get Better Fast)
- Conclusion
If you’ve ever opened Photoshop to add “just a simple rectangle” and then somehow ended up staring at 47 icons, three panels, and a tiny existential crisiswelcome. You’re in good company.
The good news: inserting a shape in Photoshop is actually easy once you know where the shape tools live and which settings matter. The even better news: shapes in Photoshop are usually vector-based, which means they stay clean, editable, and much less dramatic than raster doodles when you resize them.
In this guide, you’ll learn exactly how to insert a shape in Photoshop in 9 clear steps, plus practical tips for fill, stroke, layers, and common beginner mistakes. We’ll also cover the difference between Shape, Path, and Pixels mode so you don’t accidentally create a shape that behaves like a rebellious sticker.
Why Use Shapes in Photoshop?
Photoshop shapes are useful for more than basic boxes. You can use them to create:
- Buttons for web mockups
- Social media stickers and labels
- Banners, callouts, and icons
- Masks and design elements
- Simple logos and UI placeholders
Because shape layers are editable, you can change the fill color, stroke color, stroke width, and even alignment later. Translation: you don’t have to get everything perfect on the first try (which is excellent, because nobody does).
Before You Start
This tutorial works for modern Photoshop desktop versions. The exact interface can look slightly different depending on your version and workspace layout, but the core workflow is the same: choose a shape tool, set the options, drag on the canvas, then refine the shape in the Properties panel or Options bar.
How to Insert a Shape in Photoshop: 9 Steps
Step 1: Open Photoshop and Create (or Open) a Document
Launch Photoshop and either:
- Go to File > New to create a new canvas, or
- Go to File > Open to place a shape on an existing image/project.
If you’re practicing, a blank canvas is easiest. Something like 1200 x 800 pixels works great for testing shapes, colors, and stroke settings without clutter.
Step 2: Select the Shape Tool Group
In the toolbar (usually on the left), find the Shape Tools. By default, Photoshop often shows the Rectangle Tool icon first, but it’s actually part of a group.
Click and hold that icon to reveal the full set of shape tools, such as:
- Rectangle Tool
- Ellipse Tool
- Triangle Tool
- Polygon Tool
- Line Tool
- Custom Shape Tool
Shortcut tip: Press U to activate your most recently used shape tool. Press Shift + U to cycle through the shape tools in that group. This is one of those shortcuts that saves a shocking amount of time over a week.
Step 3: Set the Tool Mode to “Shape”
Now look at the Options bar at the top of Photoshop. One of the most important settings is the mode dropdown. You’ll typically see options like:
- Shape
- Path
- Pixels
To insert a normal editable shape, choose Shape. This creates a shape layer that you can modify later (best choice for most design work).
Quick explanation:
- Shape mode = vector shape layer (editable and scalable)
- Path mode = path only (no fill yet, useful for advanced workflows)
- Pixels mode = raster shape (less flexible for resizing)
If you accidentally choose Path or Pixels, don’t panic. Just switch back to Shape before drawing.
Step 4: Choose the Shape Type You Want
Next, pick the actual shape tool you want to use from the shape tool group:
- Use Rectangle for boxes, cards, buttons, and banners
- Use Ellipse for circles, badges, and rounded design elements
- Use Polygon for shapes with adjustable sides (great for hexagons)
- Use Line for dividers and arrows (with extra options)
- Use Custom Shape for prebuilt icons and reusable graphics
For beginners, the Rectangle Tool is the easiest place to start because it makes the fill and stroke settings obvious right away.
Step 5: Set Fill, Stroke, and Other Shape Properties
Before drawing, set the shape appearance in the Options bar. This is where Photoshop gets fun.
- Fill: The inside color of your shape (solid color, and in some workflows gradients/patterns may be available)
- Stroke: The outline color
- Stroke Width: Thickness of the outline (in px)
- Stroke Type: Solid, dashed, or dotted
- Alignment: Inside, Center, or Outside stroke alignment (depending on the shape/tool)
If you want a clean flat shape, start with:
- Fill: Any color you like
- Stroke: None (or a thin 2–4 px stroke)
If you’re making a button, label, or badge, try a bold fill and a contrasting stroke for better visibility.
Step 6: Click and Drag on the Canvas to Draw the Shape
Now the satisfying part: click and drag on your canvas to insert the shape.
Photoshop will create a new shape layer automatically in the Layers panel. That’s your sign you did it correctly.
Helpful modifier keys while drawing:
- Shift = constrains proportions (perfect square or circle)
- Alt/Option = draws from the center (great for centered badges and circles)
If your shape looks weird (too tiny, invisible, or only a path line appears), check these three things first:
- Mode is set to Shape
- Fill is not set to None (unless you want outline only)
- You are drawing on a visible canvas area
Step 7: Refine the Shape in the Properties Panel (or Contextual Task Bar)
Once the shape is selected, Photoshop lets you edit it after drawingone of the biggest advantages of using a shape layer.
You can refine the shape using:
- Properties panel
- Options bar
- Contextual Task Bar (if enabled)
Common edits after insertion include:
- Changing fill and stroke colors
- Adjusting stroke thickness
- Editing width and height precisely
- Changing corner radius (for rectangles)
- Changing polygon sides
- Duplicating the shape layer for reuse
This is the stage where a plain rectangle becomes a polished UI card, badge, banner, or label. In other words: don’t stop at “it exists.” Style it.
Step 8: Move, Align, or Combine Shapes
With your shape inserted, you’ll usually want to position it properly.
Use the Move Tool (V) to drag the shape where it belongs. If you’re building a layout, turn on guides or use the alignment tools in the Options bar.
You can also create more advanced designs by combining shapes using path operations (such as Add, Subtract, Intersect, or Exclude). This is super useful when you want to build custom icons or cutouts without switching to the Pen Tool.
Example: Want a donut shape? Draw one circle, then subtract a smaller circle from the center. Boominstant donut, zero bakery required.
Step 9: Save Your Work (and Export if Needed)
After your shape is in place, save your editable file as a PSD so the shape layer stays editable.
- File > Save As (or Save a Copy) → PSD for editing later
- Export a final image format like PNG or JPG if you’re publishing or sharing
If you used the Custom Shape Tool and built something unique, consider saving it as a reusable custom shape for future projects. That’s a nice productivity move when you create recurring design elements (icons, badges, labels, stamps, etc.).
Common Problems When Inserting Shapes in Photoshop (and How to Fix Them)
The Shape Isn’t Visible
This usually happens because the fill is set to None, the stroke is too thin, or the shape is being drawn off-canvas. Check your fill/stroke first, then confirm the layer is visible in the Layers panel.
I Drew a Path Instead of a Shape
Your mode is probably set to Path. Switch the mode to Shape in the Options bar and draw again.
The Shape Looks Pixelated
You may have used Pixels mode or rasterized the layer. For cleaner scaling and editing, stick with Shape mode whenever possible.
I Can’t Find the Shape Tools
They’re nested in the toolbar. Click and hold the visible shape icon (often Rectangle Tool) to open the shape tool group. If your toolbar is customized, you may need to restore it from Photoshop’s toolbar settings.
Pro Tips for Better Shape Workflow
Use the Custom Shape Tool for Fast Design Elements
The Custom Shape Tool is great when you need reusable graphics quickly. Photoshop includes built-in options, and you can import additional shape sets or define your own. This is perfect for social media graphics, presentation visuals, and mockups.
Duplicate Instead of Redrawing
Once you style a shape correctly, duplicate the shape layer and modify it. This keeps spacing, stroke, and style consistent across your design.
Use Precise Dimensions for UI or Print Layouts
If you’re making buttons, cards, labels, or placeholders, enter exact width and height values in the Properties panel for consistency. “Eyeballing it” is fun until you have six buttons and none of them match.
Keep Shapes Editable as Long as Possible
Resist the urge to rasterize shape layers too early. Editable vector shapes give you more flexibility for changes, especially when a client says, “Can we just make it slightly bigger?” five minutes before deadline.
Quick Recap
To insert a shape in Photoshop, you select a shape tool, set the mode to Shape, choose your fill and stroke, then drag on the canvas. After that, you can refine the shape in the Properties panel or Options bar, move it with the Move Tool, and save your file as a PSD for future edits.
Once you get comfortable with the workflow, shapes become one of the fastest tools in Photoshop for building clean design elements.
Experience-Based Notes: What Usually Happens the First Few Times (and How to Get Better Fast)
Here’s the part most tutorials skip: the actual experience of learning shape tools in Photoshop is rarely a perfect one-click success story. Most beginners go through a funny little sequence.
First, they select the Rectangle Tool and drag… and nothing seems to happen. Usually the fill is set to none, or the stroke blends into the background, or the mode is on Path. Then comes the classic move: zooming in and out like Photoshop is hiding the shape on purpose. It’s not. Photoshop just assumes you meant exactly what you clicked. (Bold assumption, honestly.)
Second, people discover that shapes are more powerful than expected. The moment you realize you can change the fill color, stroke thickness, and corner radius after drawing the shape, something clicks. Suddenly you stop redrawing the same rectangle over and over and start editing the one you already have. That’s a big milestone.
Another common experience is overusing the Custom Shape Tool for about ten minutes after discovering it. Totally normal. You’ll test stars, arrows, speech bubbles, random icons, and at least one shape that has no business being in your project. This phase is useful, thoughit teaches you how Photoshop treats custom shapes as reusable vector graphics and how the shape picker works.
People who work on social media graphics often report the biggest improvement once they start duplicating styled shapes instead of rebuilding them. For example, if you create one rounded rectangle badge with a 4 px stroke and the right brand color, duplicate it and adjust the text or size. Your designs instantly look more consistent and take less time to build.
UI mockup beginners usually have a different breakthrough: alignment. The shape tool itself is easy, but clean layouts come from spacing and consistent dimensions. Once you start using guides, alignment tools, and exact width/height values, your mockups stop looking “almost right” and start looking intentional.
One more real-world note: many users accidentally rasterize shapes too early when they begin adding effects. Later, they need to resize the element and it looks rough, or they lose easy control over fill and stroke. A better workflow is to keep the shape layer editable as long as possible and only rasterize if a specific effect truly requires it.
In short, the learning curve for Photoshop shapes is less about drawing and more about understanding settings. Once you learn where mode, fill, stroke, and properties live, the process becomes fast, reliable, and surprisingly fun. And yes, after a while you really will insert a shape in two seconds and wonder why it ever felt confusing.
Conclusion
Learning how to insert a shape in Photoshop is one of those small skills that pays off everywherefrom thumbnails and social graphics to web mockups and print layouts. Start with a basic rectangle or circle, practice editing fill and stroke, and then move into polygons and custom shapes. Once you understand the 9-step workflow, you’ll be able to create clean, professional-looking elements without fighting the interface.