Table of Contents >> Show >> Hide
- What Kind of Honey Bee Box Should You Make?
- Why Precision Matters: The Magic of Bee Space
- Materials and Tools for a DIY Honey Bee Box
- Standard Dimensions: Pick One Plan and Stay Loyal
- How to Make a Honey Bee Box Step by Step
- 1. Decide Whether You’re Building a Deep, Medium, or Shallow Box
- 2. Measure and Cut Your Boards
- 3. Cut the Frame Rests
- 4. Add Handholds or Handles
- 5. Dry Fit the Box
- 6. Glue and Fasten the Corners
- 7. Sand the Surfaces
- 8. Paint the Exterior Only
- 9. Add Frames and Foundation
- 10. Place the Box on a Proper Base
- Where to Put Your Finished Honey Bee Box
- Common Mistakes When Building a Honey Bee Box
- Should You Build or Buy a Honey Bee Box?
- Real-World Experience: What People Learn After Building Their First Bee Box
- Conclusion
If you have ever looked at a beehive and thought, “That’s just a fancy wooden box with a lot of opinions,” you are not completely wrong. A honey bee box is a wooden box, but it is also precision housing for thousands of tiny architects who absolutely will complain if your measurements are sloppy. Build it well, and your bees can raise brood, store honey, and stay easier to inspect. Build it badly, and the colony will respond with extra comb, sticky propolis, and the sort of chaos that makes beekeepers stare into the distance.
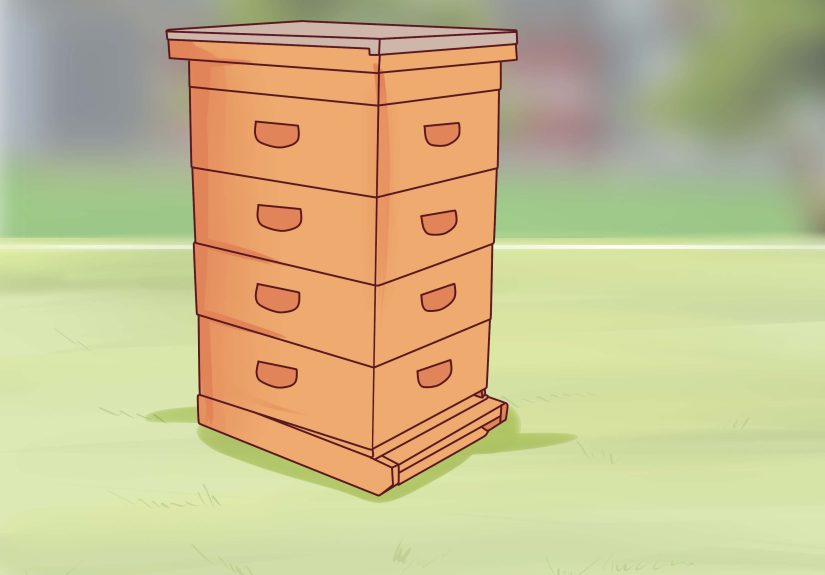
For most backyard and small-scale beekeepers in the United States, the standard choice is a Langstroth hive box. That is the classic stackable hive body with removable frames. It is popular for a reason: parts are standardized, inspections are simpler, and replacement equipment is easy to find. If your goal is to make a practical honey bee box for real beekeeping, this is the smart place to start.
What Kind of Honey Bee Box Should You Make?
When people search for how to make a honey bee box, they usually mean one of two things: a box for housing a colony or a decorative bee-themed craft that will never meet an actual honey bee. This article is about the real deal: a Langstroth hive box designed for living bees.
The most common choice for beginners is a 10-frame Langstroth box. You can build it in a few heights:
- Deep box: most often used as a brood box, where the queen lays eggs and the colony raises young.
- Medium box: often used for honey supers and sometimes for all-medium hive systems.
- Shallow box: lighter to lift, usually used for honey storage rather than brood.
If you are building only one box to start, make a deep brood box. It is the backbone of many hive setups and gives you the most flexibility later. Just know that a deep box full of honey can become surprisingly heavy. “I’ll just lift it” has ended many beekeeping workouts before they began.
Why Precision Matters: The Magic of Bee Space
The single most important concept in hive construction is bee space. Honey bees tolerate a narrow gap between wooden parts. If the gap is too small, they seal it with propolis. If it is too large, they fill it with burr comb. Either way, your elegant little project turns into a sticky rebellion.
That is why standard hive plans matter so much. A proper hive box is not just four boards nailed together. It is a carefully sized wooden shell that allows frames to hang correctly, keeps internal spacing consistent, and lets boxes stack without creating weird gaps. In practical terms, this means you should choose one standard plan and follow it faithfully instead of improvising with “close enough.” Honey bees are not famous fans of “close enough.”
Materials and Tools for a DIY Honey Bee Box
Best Wood for a Honey Bee Box
The usual material is untreated pine. It is affordable, widely available, and easy to cut. Cedar, cypress, or redwood can last longer in wet conditions, especially for bottom boards or parts exposed to more moisture, but they cost more. Avoid treated lumber for hive bodies because bees should not be living in a chemically treated wooden apartment complex.
Basic Materials
- 3/4-inch untreated lumber
- Exterior-grade wood glue
- Galvanized nails or exterior screws
- Sandpaper
- Primer and non-toxic exterior paint for outside surfaces
- Frames and foundation sized to match your box
Basic Tools
- Table saw or circular saw
- Router or dado blade for frame rests
- Drill/driver
- Clamps
- Tape measure
- Square
- Pencil
- Sander
- Safety glasses and hearing protection
Standard Dimensions: Pick One Plan and Stay Loyal
The easiest way to succeed is to build from a standard Langstroth hive plan. U.S. extension plans commonly show a deep box made from 3/4-inch lumber with long side pieces around 19 7/8 inches and end pieces around 16 1/4 inches, with a rabbet or frame rest cut near the top so the frames sit correctly. Medium and shallow boxes use the same footprint but different heights.
Here is the golden rule: all of your equipment should match the same standard. If you mix box sizes from random plans, stackability gets weird fast. A hive should fit together like a neat modular system, not like furniture assembled from three unrelated garage sales.
How to Make a Honey Bee Box Step by Step
1. Decide Whether You’re Building a Deep, Medium, or Shallow Box
For a beginner hive, a deep box is usually the best first project. If you already know you prefer lighter equipment, a medium box can also work. Just make sure your frames, foundation, inner cover, outer cover, and bottom board all match the footprint and frame count of the box you are building.
2. Measure and Cut Your Boards
Cut your four main wall pieces according to your chosen plan. A standard hive body uses two long sides and two shorter ends. Accuracy matters here. A board that is off by even a little can throw off the fit of the frames and the alignment of stacked boxes.
Check every cut with a square. If your box starts life as a parallelogram, the bees will not file a written complaint, but they will absolutely create one in wax.
3. Cut the Frame Rests
Near the top inside edges, you need a frame rest or rabbet so the frame lugs can sit level. This is one of the most important cuts in the entire project because it helps preserve proper internal spacing. Use a router or dado blade and test the fit with an actual frame before final assembly.
If the frame sits crooked, too low, or too tight, fix it now. Later is when bees are involved, and later is always more dramatic.
4. Add Handholds or Handles
Most hive boxes have handholds routed into the outer sides or attached handles on the ends. This is not just a convenience feature. Once bees, brood, honey, and summer heat get involved, that box will feel heavier than your optimism. Cut handles cleanly and place them consistently so lifting is safer and easier.
5. Dry Fit the Box
Before using glue or screws, assemble the four sides dry. Check that the corners meet cleanly, the box is square, and the top edges line up evenly. Test a frame again. It should hang properly with room for correct spacing above and below.
This step saves headaches. It is much nicer to say, “Good thing I checked,” than, “Well, I guess this one is modern art now.”
6. Glue and Fasten the Corners
Apply exterior-grade wood glue to the joints, clamp the box square, and fasten it with galvanized nails or exterior screws. Many beekeepers prefer screws for durability and easier repair. Nails are traditional and fast. Either can work if the joints are snug and the box stays square.
Wipe off excess glue and let the assembly cure fully before sanding or painting.
7. Sand the Surfaces
Sand all rough edges, especially around handles and top edges. You do not need furniture-grade perfection, but you do want clean surfaces that are comfortable to handle and less likely to splinter. Bees are tough. Human hands are surprisingly emotional about splinters.
8. Paint the Exterior Only
To protect the woodenware from weather, paint the outside surfaces with a good exterior paint after priming if needed. Light colors such as white or pastel shades are common because they reflect heat better than dark colors. Do not paint the inside surfaces of the hive body. Bees will coat interior wood with propolis, and interior paint can trap moisture or create an environment you do not want.
Let the paint cure completely before the box goes into service. A hive should smell like wood and air, not like you just redecorated a bathroom.
9. Add Frames and Foundation
Once your box is dry, install the correct number of frames for your setup. Frames hold wax or plastic foundation and guide bees to build straight comb. Matching frame size to box height is essential. A medium frame does not belong in a deep box unless your goal is abstract beekeeping.
10. Place the Box on a Proper Base
Your box needs more than a flat patch of dirt. A proper hive setup includes a bottom board, often a hive stand, and eventually an inner cover and top cover. Keeping the hive elevated helps reduce moisture problems and discourages pests. Many extension recommendations suggest using bricks, blocks, or a dedicated stand to keep the hive off the ground.
Where to Put Your Finished Honey Bee Box
A beautifully built bee box still needs a smart location. Good placement affects colony health, neighbor relationships, and your own stress level.
Choose a Calm, Sunny Spot
A hive entrance with morning sun is often recommended because it gets bees active earlier in the day. You also want a clear flight path in front of the hive and a location with lower foot traffic. Put the colony where it can be a hive, not the surprise entertainment for everyone walking by.
Keep It Off the Ground
Elevating the hive helps keep the bottom dry and can make it less inviting to skunks and other pests. A simple stand, blocks, or sturdy platform can extend the life of your equipment and make inspections easier on your back.
Check Local Rules Before You Add Bees
This part is not glamorous, but it matters. Local ordinances may regulate setbacks, visibility, barriers, neighbor notification, registration, or used hive equipment. In some places, one or two backyard hives are simple to keep. In others, you may need distance from property lines, fencing, or formal registration. Build your box first if you like, but do not install a colony until you know the rules where you live.
Common Mistakes When Building a Honey Bee Box
- Using treated lumber: fine for some hive stands, not a good choice for the hive body itself.
- Ignoring bee space: bees will “correct” your work with wax and propolis.
- Painting the interior: looks tidy to humans, not helpful to bees.
- Mixing incompatible box standards: leads to poor fit and frustration.
- Skipping the dry fit: a tiny alignment error becomes a giant annoyance later.
- Putting the hive directly on the ground: moisture and wear move in immediately.
Should You Build or Buy a Honey Bee Box?
If you enjoy woodworking, building your own honey bee box can save money, teach you how hive parts work, and make future repairs easier. It also gives you control over materials, joints, and finish.
Buying pre-cut or assembled equipment, however, is a perfectly reasonable choice. Beekeeping already comes with a learning curve that includes weather, mites, swarm control, and the occasional moment of wondering whether the bees are ignoring you on purpose. If building the box feels fun, do it. If it feels like one hobby too many, buying ready-made equipment is not cheating. It is time management.
Real-World Experience: What People Learn After Building Their First Bee Box
One of the most common experiences beginners report after building a DIY bee box is that the woodworking part feels simple right up until the moment they try to make every measurement match perfectly. On paper, a hive body looks like an easy rectangle. In practice, the smallest inconsistency shows up everywhere. A corner that is slightly out of square affects how the frames hang. A rough rabbet makes a frame sit awkwardly. A box that seems fine in the garage suddenly becomes stubborn once stacked with a bottom board, inner cover, and outer cover. That is why experienced builders become almost boringly obsessed with squareness, clean cuts, and repeatable dimensions. The box is simple, but it is not casual.
Another real lesson is how quickly people gain respect for standardized hive equipment. The first time you compare a hand-built box with factory-made frames, you realize that “close enough” is not really enough in beekeeping. When everything lines up well, inspections are smoother, frames lift out more easily, and bees build straighter comb. When things are slightly off, the colony improvises. Bees are great builders, but they are not always collaborative designers. They will happily fill an oversized gap with burr comb and glue a tight space shut with propolis, which turns every inspection into a sticky negotiation.
Many first-time beekeepers also discover that weatherproofing matters more than aesthetics. At first, people worry about color choices, neat edges, and whether the hive should look “rustic” or “professional.” After one wet season, the priority changes to durability. Exterior paint, good joints, and keeping the hive off the ground suddenly feel far more important than whether the box looked Instagram-ready on day one. A practical bee box ages better than a pretty but poorly protected one.
There is also the physical reality of lifting hive equipment. A new builder often handles an empty deep box with one hand and thinks, “This is nothing.” Then the box is filled with frames, bees, brood, nectar, and honey, and the same person starts making serious life choices. That experience is why many beekeepers eventually become very opinionated about deep versus medium boxes, handhold placement, and how many boxes they want to manage during peak season.
Perhaps the most useful experience-related lesson is this: the box is only the beginning. A well-made honey bee box does not guarantee success, but it removes one huge source of trouble. When your equipment is square, dry, properly painted on the outside, and built to a standard size, you have one less thing fighting against you. Then you can focus on the real work of beekeeping: helping a colony thrive, learning seasonal management, and discovering that thousands of tiny insects can make a human unexpectedly proud of a wooden box.
Conclusion
If you want to know how to make a honey bee box, the answer is part woodworking, part precision, and part respect for how bees use space. The best approach is to build a standard Langstroth hive box from untreated lumber, follow one proven set of dimensions, preserve proper bee space, paint only the exterior, and place the finished box on a stable, elevated base. Do that, and you will create equipment that works with the bees instead of against them.
In other words, make the box boring in the best possible way. Bees do their best work when the equipment is dependable. Leave the drama to the honey harvest stories.