Table of Contents >> Show >> Hide
- Before You Start: Know What Type of Vinyl Flooring You Have
- Safety First: Check for Asbestos Before Removing Old Vinyl
- Tools and Supplies You Will Need
- How to Remove Vinyl Flooring Step by Step
- Step 1: Clear the Room
- Step 2: Remove Baseboards or Quarter Round
- Step 3: Find a Loose Edge
- Step 4: Cut Sheet Vinyl Into Strips
- Step 5: Pull Up the Vinyl Slowly
- Step 6: Use Heat for Stubborn Areas
- Step 7: Remove Vinyl Tiles One at a Time
- Step 8: Disassemble Floating Vinyl Plank
- Step 9: Scrape Away Remaining Backing and Adhesive
- Step 10: Clean and Inspect the Subfloor
- How to Remove Vinyl Flooring From Different Subfloors
- How to Remove Vinyl Flooring Adhesive
- Common Mistakes to Avoid
- Can You Install New Flooring Over Old Vinyl?
- How Long Does Vinyl Flooring Removal Take?
- When to Call a Professional
- Experience-Based Tips for Removing Vinyl Flooring
- Conclusion
Vinyl flooring is the dependable old friend of home improvement: affordable, water-resistant, easy to live with, and somehow always under your refrigerator when you decide it is time for a change. But when that old sheet vinyl, vinyl tile, or luxury vinyl plank has worn out its welcome, removing it can feel like peeling a stubborn sticker off the world’s largest lunchbox.
The good news? Learning how to remove vinyl flooring is absolutely doable for many homeowners. The less-good news? Some vinyl floors come up like a dream, while others cling to the subfloor with the emotional intensity of a soap opera finale. The difference usually comes down to the flooring type, the adhesive, the age of the floor, and what is hiding underneath.
This guide walks you through the tools, safety checks, step-by-step removal process, adhesive cleanup, subfloor prep, and real-world lessons that make the job smoother. Whether you are replacing vinyl flooring in a bathroom, kitchen, laundry room, basement, or rental property, the goal is simple: remove the old floor without destroying the subfloor, your patience, or your lower back.
Before You Start: Know What Type of Vinyl Flooring You Have
Not all vinyl flooring is installed the same way, which means not all vinyl flooring is removed the same way. Before grabbing a scraper and declaring war, identify the floor type.
Sheet Vinyl Flooring
Sheet vinyl is installed in large rolls. It may be fully glued across the entire floor, glued only around the edges, or secured with tape in certain areas. Fully glued sheet vinyl is usually the toughest to remove because the backing can separate and leave fuzzy paper or felt stuck to the subfloor.
Vinyl Tile
Vinyl tile usually comes in squares. Older tiles may be glued down with heavy adhesive, while modern peel-and-stick tiles use pressure-sensitive adhesive. Tiles are often easier to remove one at a time, especially if heat is used to soften the glue.
Luxury Vinyl Plank
Luxury vinyl plank, often called LVP, may be floating, click-lock, glue-down, or peel-and-stick. Floating vinyl plank flooring is typically the easiest to remove because it is not bonded to the subfloor. Glue-down vinyl plank, however, can put up a heroic fight.
Safety First: Check for Asbestos Before Removing Old Vinyl
If your home was built or remodeled before the late 1980s, stop before cutting, sanding, scraping, or tearing out old vinyl flooring. Older vinyl tiles, sheet vinyl backing, and black cutback adhesive may contain asbestos. Asbestos is most dangerous when fibers become airborne, which can happen during aggressive demolition.
You cannot confirm asbestos by sight alone. Black adhesive, old 9-by-9-inch tiles, brittle flooring, or mystery layers under newer floors are all reasons to be cautious, not to guess. The safest move is to use a certified asbestos testing lab or hire an abatement professional. If asbestos is present, professional removal or safe encapsulation may be recommended.
Do not sand, dry scrape, grind, drill, saw, or pulverize flooring that may contain asbestos. This is one DIY shortcut that can become expensive, hazardous, and deeply regrettable. When in doubt, test it out.
Tools and Supplies You Will Need
Gathering the right tools before starting saves time and reduces the odds of using a butter knife because it was “right there.” Here is a practical toolkit for removing vinyl flooring:
- Utility knife with extra blades
- Floor scraper or long-handled scraper
- Putty knife or stiff taping knife
- Pry bar
- Hammer or rubber mallet
- Heat gun or hair dryer
- Oscillating multi-tool, if needed
- Pliers for pulling strips
- Knee pads
- Safety glasses
- Work gloves
- Respirator or dust mask appropriate for the task
- Trash bags or contractor bags
- Broom, vacuum, and damp cloths
- Warm water, mild dish soap, or approved adhesive remover
For large rooms or extremely stubborn glued vinyl, renting a walk-behind floor scraper may be worth it. Your knees will send you a thank-you card.
How to Remove Vinyl Flooring Step by Step
Step 1: Clear the Room
Remove furniture, rugs, freestanding appliances, trash cans, and anything else that will be in the way. If you are working in a kitchen or laundry room, turn off water connections before moving appliances. Take photos before disconnecting anything so reinstallation does not become a puzzle designed by a mischievous plumber.
Step 2: Remove Baseboards or Quarter Round
Use a utility knife to score the caulk line along the top of the trim. Then gently pry off baseboards or quarter round with a pry bar. Label each piece on the back so you can reinstall it in the same location later. This small step makes the finished project look cleaner and prevents chipped trim edges.
Step 3: Find a Loose Edge
Start at a doorway, floor vent, corner, or damaged area. Slide a putty knife or scraper under the vinyl to see how it is attached. If the flooring lifts easily, congratulationsyou have found the rare cooperative floor. If it refuses to budge, do not panic. That simply means adhesive is involved, and adhesive enjoys drama.
Step 4: Cut Sheet Vinyl Into Strips
If you are removing sheet vinyl, cut it into strips about 6 to 12 inches wide using a sharp utility knife. Narrow strips are easier to pull, control, and scrape beneath. Be careful not to cut deeply into the subfloor, especially if you have plywood underneath.
Step 5: Pull Up the Vinyl Slowly
Grip a strip with pliers and pull it back at a low angle. As you pull, use a scraper to separate the vinyl from the adhesive. Pulling straight up can tear the flooring and leave more backing behind. Pulling low and steady gives you better control and reduces damage.
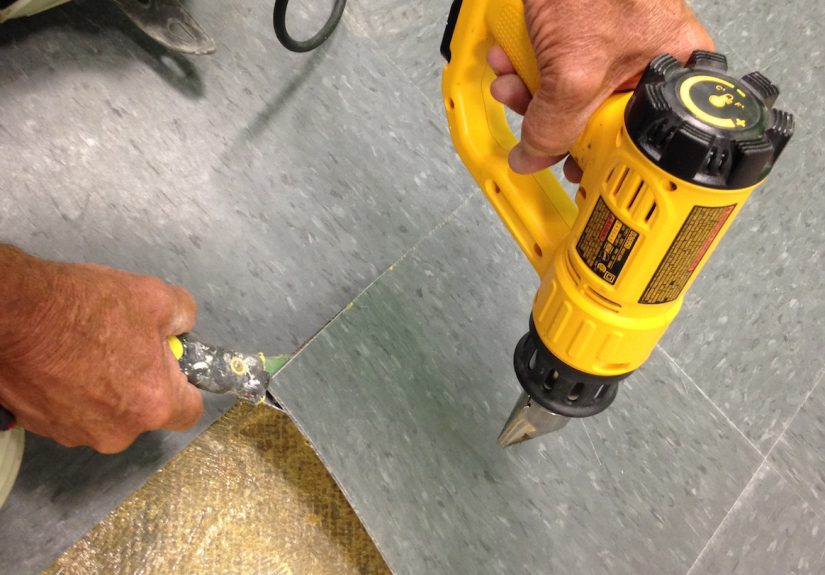
Step 6: Use Heat for Stubborn Areas
A heat gun or hair dryer can soften adhesive, especially on peel-and-stick vinyl tiles or vinyl plank. Warm a small area, then lift the corner with a putty knife and continue heating as you pull. Keep the heat moving so you do not scorch the flooring, burn the subfloor, or create fumes. Never use a blowtorch or open flame. Your floor project should not become a fire department anecdote.
Step 7: Remove Vinyl Tiles One at a Time
For vinyl tile, heat one tile, pry up a corner, and work the scraper underneath. If the tile breaks, continue removing it in sections. Once the first tile is out, the neighboring tiles are often easier because you have an exposed edge to attack.
Step 8: Disassemble Floating Vinyl Plank
If your vinyl plank floor is floating, remove baseboards or trim first, then start along a wall. Lift and angle the planks to unlock them. Work row by row. Floating floors often come apart quickly, but be gentle if you plan to reuse the planks. Click-lock edges can break if forced.
Step 9: Scrape Away Remaining Backing and Adhesive
After the vinyl layer is gone, you may find paper backing, felt, glue ridges, or sticky residue. Use a floor scraper at a low angle. For water-soluble adhesive, warm water mixed with mild dish soap may soften residue. Let it sit briefly, then scrape. Work in small sections so the area stays manageable.
Step 10: Clean and Inspect the Subfloor
Once the adhesive is removed or reduced to an acceptable level for your next flooring product, vacuum thoroughly. Inspect the subfloor for rot, swelling, loose fasteners, mold, cracks, high spots, or low spots. A beautiful new floor installed over a bad subfloor is like putting a tuxedo on a raccoon: impressive from a distance, chaotic up close.
How to Remove Vinyl Flooring From Different Subfloors
Removing Vinyl From Plywood
Plywood subfloors can be damaged by aggressive scraping, too much water, or harsh chemicals. Use shallow cuts, controlled scraping, and minimal moisture. If the vinyl is attached to a thin underlayment layer, it may be easier to remove the vinyl and underlayment together, especially if the underlayment is stapled or nailed down.
Removing Vinyl From Concrete
Concrete can handle more scraping pressure than plywood, but it still needs care. Avoid gouging or leaving adhesive lumps that could telegraph through new flooring. After scraping, check for moisture issues, cracks, and uneven areas. Concrete may need patching, leveling, or pH/moisture testing before new flooring is installed.
Removing Vinyl From Bathroom Floors
Bathrooms require extra attention because moisture may have sneaked under the flooring around toilets, tubs, and vanities. Remove the toilet if the vinyl runs underneath it. Check for soft spots, dark stains, swollen wood, or mildew odors. Repair water damage before installing new flooring, or the problem will return wearing a fresh outfit.
How to Remove Vinyl Flooring Adhesive
Removing vinyl flooring is often only half the battle. The adhesive is where many DIYers discover new vocabulary. The best method depends on the glue type and the next flooring you plan to install.
Wet Scraping
Wet scraping uses warm water or a mild cleaning solution to soften certain adhesives. Apply the solution in a small area, wait a few minutes, then scrape. Do not flood wood subfloors. Too much water can cause swelling, warping, and a brand-new problem you did not order.
Heat
Heat helps soften pressure-sensitive adhesives and peel-and-stick residue. Warm the glue with a heat gun, then scrape carefully. Wear gloves because heated adhesive can be sticky and surprisingly rude.
Adhesive Removers
Commercial adhesive removers can help, but read the label carefully. Some solvent-based products can leave residue that interferes with new flooring adhesives. Many manufacturers warn against using certain solvents because they may affect warranty coverage or bonding performance. Always test in a small area and follow ventilation instructions.
Mechanical Scraping
For large areas, a rented floor scraper can save hours. Use the correct blade angle and keep the tool moving. On concrete, mechanical scraping can be efficient. On plywood, use extra caution to avoid tearing up the surface.
Common Mistakes to Avoid
Skipping the Asbestos Check
This is the biggest mistake with older vinyl flooring. If the floor may contain asbestos, do not disturb it until you know what you are dealing with.
Cutting Too Deep
Utility knives are useful, but deep cuts can damage plywood, underlayment, radiant heating systems, or hidden materials. Cut only through the vinyl layer when possible.
Using Too Much Water
Water can soften some adhesives, but wood subfloors dislike puddles. Use moisture sparingly and clean it up quickly.
Forgetting About Ventilation
Adhesive removers, old flooring dust, and heated glue can create unpleasant air. Open windows, use fans when safe, and wear appropriate protection.
Installing New Flooring Too Soon
Before installing new flooring, the subfloor should be clean, dry, flat, and structurally sound. Rushing this stage can lead to bumps, gaps, lifting, or failure of the new floor.
Can You Install New Flooring Over Old Vinyl?
Sometimes, yes. If the existing vinyl is flat, clean, dry, well-bonded, and not cushioned or damaged, certain flooring products can be installed over it. Floating laminate, engineered flooring, and some luxury vinyl plank products may allow installation over existing vinyl, depending on manufacturer instructions.
However, removal is better when the vinyl is loose, curling, heavily textured, water-damaged, layered too high, or suspected of containing asbestos that could be disturbed during preparation. Always check the installation requirements for your new flooring. The new product gets the final vote.
How Long Does Vinyl Flooring Removal Take?
A small bathroom with peel-and-stick tile may take a few hours. A kitchen with fully glued sheet vinyl may take a full day or longer. A large room with stubborn adhesive can become a weekend project, especially if subfloor repairs are needed.
Plan more time than you think you need. Vinyl removal has a way of revealing surprises: mystery underlayment, extra glue, hidden water damage, or a previous homeowner’s bold decision to install flooring over flooring over flooring. Archaeologists would be proud.
When to Call a Professional
DIY vinyl floor removal is practical for many homeowners, but there are times when calling a professional is the smarter choice. Hire help if you suspect asbestos, find extensive water damage, need to remove a large glued floor, have limited ventilation, or are installing expensive new flooring that requires perfect subfloor prep.
A professional may also be worth it if you are on a tight timeline. Flooring pros have specialized scrapers, dust-control equipment, moisture meters, and enough experience to know when a floor is about to make everyone’s day worse.
Experience-Based Tips for Removing Vinyl Flooring
After you have removed vinyl flooring once, you understand that the job is less about brute strength and more about strategy. The first experience many DIYers have is realizing that the visible flooring is not the real enemy. The real enemy is the adhesive underneath, quietly waiting like a sticky little villain.
One practical lesson is to start small. Instead of ripping into the middle of the room, test a corner first. Lift a small section and study what happens. Does the vinyl peel cleanly? Does the backing separate? Is the adhesive hard, gummy, black, tan, or powdery? This tiny test tells you what method will work best. It can also warn you when the project needs professional evaluation, especially in older homes.
Another useful experience is to change blades often. A dull utility knife makes messy cuts, requires more pressure, and increases the risk of slipping. Fresh blades cut cleaner strips, and clean strips pull up more predictably. Keep a small container nearby for used blades so they do not end up hiding on the floor like tiny metal traps.
Heat is helpful, but patience is better. Many people wave a heat gun over vinyl for five seconds and expect the tile to leap off the floor politely. It will not. Warm the area gradually, lift one edge, and keep heating ahead of the scraper. The goal is to soften the adhesive, not cook the floor. If you smell burning, see smoke, or the vinyl starts deforming too much, back off and let the area cool.
Knee pads are not optional if you value your future self. Vinyl removal involves kneeling, leaning, scraping, pulling, and occasionally making dramatic sighing noises. A good pair of knee pads can turn a miserable afternoon into a merely sweaty one. Gloves matter too, especially when pulling sharp vinyl strips or handling tacky adhesive.
For adhesive cleanup, work in sections no larger than you can finish before the softened glue dries again. Spread warm water or an approved remover on a small zone, wait, scrape, wipe, and move on. Trying to treat the whole room at once usually creates a slippery, sticky mess that somehow attracts every speck of dust in the county.
Do not ignore the subfloor once the vinyl is gone. This is the moment when the floor tells the truth. Squeaks, soft spots, popped nails, uneven seams, water stains, and old patching compounds all matter. Fixing these issues before installing new flooring is far easier than fixing them after the new floor is down. Nobody wants to remove a brand-new floor because of one lazy afternoon with a scraper.
Finally, manage disposal as you go. Cut old vinyl into manageable pieces, bag debris regularly, and keep pathways clear. A clean work area is safer and faster. It also helps morale. There is something deeply encouraging about seeing the old floor disappear one bag at a time.
The best experience-based advice is simple: respect the prep work. Removing vinyl flooring is not glamorous, but it sets the stage for everything that comes next. A clean, flat, dry subfloor makes new flooring look better, last longer, and feel more solid underfoot. Take your time, use the right tools, stay safe, and remember that every stubborn strip you remove brings you one step closer to a floor that no longer looks like it has been through three decades of snack spills and chair legs.
Conclusion
Removing vinyl flooring can be a simple afternoon project or a full weekend workout, depending on the flooring type, adhesive, and subfloor condition. Start by identifying the vinyl, checking for asbestos risks, gathering the right tools, and working in small sections. Use heat, scraping, and careful adhesive removal to protect the subfloor. Most importantly, do not rush the final cleanup and inspection. The quality of your next floor depends on the surface beneath it.
When done correctly, vinyl floor removal gives you a fresh start. Yes, it may involve sticky glue, sore knees, and at least one moment where you question your life choices. But with patience and a smart plan, you can remove old vinyl flooring cleanly and prepare your room for a durable, beautiful upgrade.