
Table of Contents >> Show >> Hide
- Why Landscape Edging and Natural Mulch Work So Well Together
- What Counts as Natural Mulch?
- Benefits of Natural Mulch for Landscape Edging
- How Deep Should Natural Mulch Be?
- Step-by-Step: How To Edge a Bed and Apply Natural Mulch
- Step 1: Mark the Bed Line
- Step 2: Cut a Clean Edge With a Spade
- Step 3: Create a Mulch-Holding Lip or Trench
- Step 4: Weed, Smooth, and Water the Bed
- Step 5: Optional Sheet Mulching (Great for New Beds)
- Step 6: Spread Mulch Evenly
- Step 7: Keep Mulch Away From Trunks and Stems
- Step 8: Refresh and Maintain the Edge
- Best Natural Mulch Choices by Location
- Common Mistakes to Avoid
- Experience-Based Tips and Lessons From Real Yards (Extended Section)
- Conclusion
If your garden beds look like they’re slowly escaping into the lawn (and your lawn is returning the favor), you’re not alone. A crisp edge and the right mulch can make even a modest yard look professionally finished. The good news: you do not need a truckload of fancy materials or a weekend-long hardscape project to get there.
Natural mulch is one of the easiest ways to improve curb appeal and plant health at the same time. It helps your soil hold moisture, reduces weeds, softens temperature swings, and makes beds look tidy. Pair it with a clean edgeespecially a simple spade-cut trench edgeand suddenly your landscape goes from “nice yard” to “who did your landscaping?”
In this guide, you’ll learn how to use natural mulch for landscape edging, which mulch types work best, how deep to apply it, and how to avoid the classic mistakes (yes, including the dreaded mulch volcano). I’ll also share experience-based lessons from real yard situations so you can skip the trial-and-error phase and get a cleaner, healthier landscape faster.
Why Landscape Edging and Natural Mulch Work So Well Together
Edging and mulch are like coffee and mornings: each one helps, but together they solve a problem. A defined edge keeps mulch where it belongs. Mulch keeps the soil protected and the bed looking intentional. Without edging, mulch tends to migrate onto grass, sidewalks, and driveways. Without mulch, the edge may look sharp for a week, but the bed quickly turns patchy, weedy, and dry.
Natural mulch also supports the soil over time. Unlike decorative stone or plastic-heavy approaches, organic mulch gradually breaks down and adds organic matter. That means better soil structure, better moisture retention, and healthier roots. In other words, your bed border is doing double duty: it looks good and quietly improves your landscape from the ground up.
What Counts as Natural Mulch?
Natural mulch means mulch made from organic, plant-based materials. These are the most common options homeowners use in landscape beds:
- Wood chips (including arborist chips)
- Shredded bark or bark nuggets
- Pine needles (pine straw)
- Shredded leaves or leaf mulch
- Compost or compost-blend mulch
- Straw (best in certain beds, especially vegetable areas)
- Dry grass clippings (used carefully and in thin layers)
Each type has a personality. Wood chips are practical and great around trees and shrubs. Shredded bark looks polished in front beds. Pine needles are lightweight and easy to spread. Leaves are budget-friendly and great for soil health if shredded. Compost blends feed the soil faster but may need more frequent refreshing.
Organic vs. Inorganic Mulch (Quick Reality Check)
Inorganic options like gravel and rock have their place, especially in drought-adapted landscapes. But if your goal is natural mulch edging that improves the soil and supports long-term plant health, organic mulch is usually the better fit. Organic mulch decomposes and enriches the soil; rock does not. Just keep in mind that any mulch choice should match your climate, plant type, and maintenance style.
Benefits of Natural Mulch for Landscape Edging
1) Cleaner, More Defined Beds
A fresh layer of mulch makes the bed color more uniform and visually separates it from turf. When paired with a sharp edge, the bed line looks cleaner and more deliberatealmost like your plants got a haircut and a blazer.
2) Better Moisture Retention
Mulch reduces evaporation from the soil surface. That helps plant roots stay more consistently moist, especially during hot weather. This can reduce watering frequency and help plants handle heat stress more gracefully.
3) Weed Suppression
Mulch blocks light from reaching many weed seeds, which slows germination. It won’t eliminate every weed forever (if only), but it can dramatically reduce how many pop up and how often you need to pull them.
4) Improved Soil Over Time
As natural mulch decomposes, it contributes organic matter. This supports soil structure, improves aeration and water-holding capacity, and can gradually create better root conditions in compacted landscape areas.
5) Temperature Moderation
Mulch insulates the soil. In summer, it helps keep roots cooler. In winter, it helps reduce extreme temperature fluctuations. Plants prefer consistency, and mulch helps provide it.
6) Protection Around Trees and Shrubs
A mulched ring around trees and shrubs reduces mower and string-trimmer damage. This is one of the most overlooked benefits, and it matters. Many trees suffer more from repeated trunk injury than from lack of fertilizer.
How Deep Should Natural Mulch Be?
This is where many good intentions go wrong. More mulch is not better mulch.
For most landscape beds, the sweet spot is about 2 to 4 inches of mulch. That’s thick enough to suppress weeds and conserve moisture, but not so thick that it blocks air and water movement. In some cases (depending on mulch type and particle size), you may go a little lighter or a little deeperbut 2 to 4 inches is the safe, reliable target for most homeowners.
If the mulch is too thin, weeds get through and moisture escapes. If it’s too thick, mulch can mat together, slow water penetration, and create overly wet conditions near roots. Think “blanket,” not “burial.”
Special Note on Mulch Texture
Coarse mulch (like arborist wood chips) often performs better than very fine shredded material because it allows better airflow and water movement. Very fine mulch can knit together into a dense layer over time. If your mulch looks like a compressed sponge after rain, it’s probably time to loosen or refresh it.
Step-by-Step: How To Edge a Bed and Apply Natural Mulch
Step 1: Mark the Bed Line
Start by shaping the bed edge. Use a garden hose, rope, or even a line of flour to preview the curve. This helps you avoid the “I thought it would look better from this angle” moment after you’ve already started cutting turf.
Tip: Gentle, sweeping curves are easier to mow around and usually look more professional than tiny zig-zags.
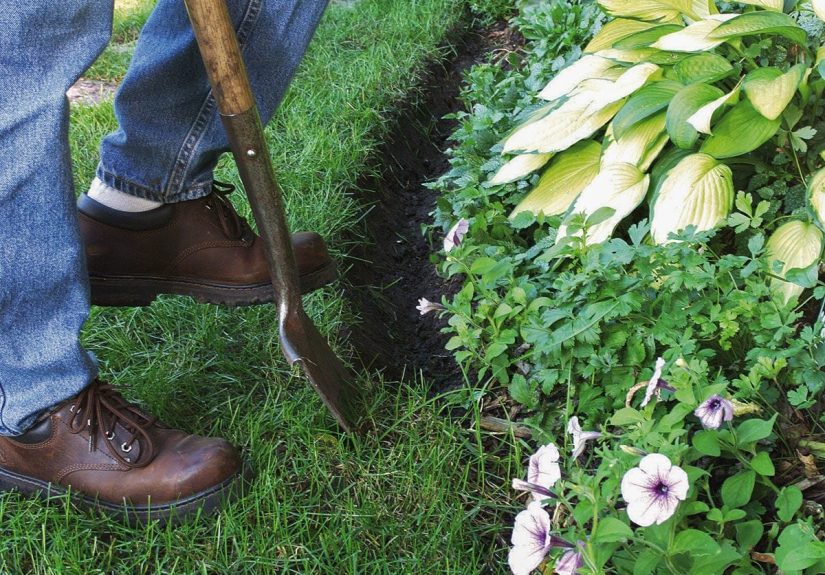
Step 2: Cut a Clean Edge With a Spade
Use a sharp, flat spade (or half-moon edger) to cut along the line. A good target is a 4- to 6-inch deep cut with a fairly vertical face. This creates a crisp wall between lawn and bed and helps stop grass from creeping in.
If you are creating a new bed, remove the turf just inside the edge after making the cut. The goal is a clean, defined border, not a fuzzy “kind of bed, kind of lawn” zone.
Step 3: Create a Mulch-Holding Lip or Trench
To keep mulch from washing into the lawn, create a shallow trench just inside the edge. A 2- to 3-inch trench can work surprisingly well. This acts like a small catch basin so mulch stays in the bed, especially after rain.
This is one of the best low-cost edging tricks because it uses the soil itselfno plastic strips, no brick, no hardware store crisis.
Step 4: Weed, Smooth, and Water the Bed
Remove weeds and debris before mulching. Rake the bed smooth and water the soil lightly if it’s dry. Mulch works best when it’s laid over weed-free, reasonably moist soil.
If you skip this step and mulch over dry, weedy ground, you may get the worst of both worlds: weeds and disappointment.
Step 5: Optional Sheet Mulching (Great for New Beds)
If you’re converting lawn or fighting persistent weeds, sheet mulching is a helpful add-on. Lay down plain cardboard or thick paper over the soil, overlap the pieces, wet them down, and then cover with mulch.
This method smothers existing weeds and grass by blocking sunlight and gradually breaks down over time. It’s especially useful when expanding beds without digging up every inch of turf.
Step 6: Spread Mulch Evenly
Spread natural mulch across the bed to a depth of roughly 2 to 4 inches. Use a rake to keep it even. Don’t pile it high in one area and leave another area bare. Aim for a smooth, level blanket with a slight natural contour.
For tree rings, extend the mulch outward rather than upward. A wider ring is better than a taller mound every time.
Step 7: Keep Mulch Away From Trunks and Stems
Always leave a small mulch-free gap around tree trunks, shrub stems, and plant crowns. Think of a donut shape, not a volcano. Mulch piled against bark or stems can trap moisture and encourage rot, insects, and disease problems.
If you see a volcano, fix it. Pull the mulch back so the base of the trunk or stem can breathe.
Step 8: Refresh and Maintain the Edge
Edging is not a one-time event. Recut the edge as needed during the growing season, especially if your grass is aggressive. Check mulch depth in spring and fall. Top up thin spots, but measure visually before adding moremany beds are already too deep because fresh mulch gets added every year without checking the existing layer.
Best Natural Mulch Choices by Location
Front Foundation Beds
Best picks: Shredded bark, medium bark mulch, or arborist wood chips (if you prefer a more natural look).
These give a neat appearance and hold up well in ornamental beds. If your area gets heavy rain, use a crisp edge and trench to keep mulch from wandering.
Around Trees and Shrubs
Best picks: Coarse wood chips, arborist chips, pine needles, or shredded leaves.
Wood chips are especially practical here and often inexpensive (sometimes even free) from tree services. Keep the mulch wide and flat, not piled up against the trunk.
Vegetable Gardens and Edible Beds
Best picks: Straw, shredded leaves, or compost-based mulches (depending on crop and season).
Use chemical-free material. Avoid contaminated grass clippings or hay that may contain weed seeds or herbicide residues. In food-growing spaces, mulch choice matters more than people think.
Budget-Friendly Beds
Best picks: Shredded leaves, chipped branches, or locally sourced arborist chips.
Free mulch is excellent mulch if it’s clean and appropriate for the plants. Many homeowners spend too much on bagged mulch when the best material is already in the yard every fall.
Common Mistakes to Avoid
1) The Mulch Volcano
This is the big one: piling mulch high against a tree trunk. It looks tidy for about five minutes, then starts causing problems. Excess moisture against bark can encourage rot and pests, and over time it may stress the tree’s root flare area.
2) Mulch That’s Too Deep
Thicker is not better. Excess mulch can reduce oxygen movement, shed water, or stay too wet. If you’re refreshing a bed, check what’s already there before adding more.
3) Mulch That’s Too Fine (or Matted)
Some very fine mulches compact into a dense layer. If water beads up or runs off instead of soaking in, the mulch may be matted. Coarser mulch often performs better for long-term root health.
4) Using the Wrong Material in the Wrong Place
Fresh arborist chips are great around trees and shrubs but not usually the best first choice for annual flower or vegetable beds. Grass clippings can work, but they should be dry and not from recently treated lawns. Straw is great in edible beds, but use strawnot hayif weed seeds are a concern.
5) No Edge at All
Without a defined edge, even good mulch can look messy fast. The bed line blurs, grass creeps in, and the whole area starts to look accidental. A simple spade edge is often enough to solve this.
6) Ignoring Fire Safety Near Structures
If you live in a wildfire-prone area, be strategic. Keep highly flammable organic mulch away from the house, deck, and other combustible structures, and use noncombustible materials closest to the home when recommended locally. This is one place where safety should beat aesthetics every time.
Experience-Based Tips and Lessons From Real Yards (Extended Section)
Here’s the part people usually learn the hard way: mulch and edging are simple, but yard conditions are not. Soil type, slope, trees, wind, and even how you mow will affect how well your mulch edge holds up. The following experience-based lessons come up again and again in real home landscapes.
First lesson: a sharp edge beats more mulch. Many homeowners try to stop mulch migration by adding a thicker layer. That usually backfires. On sloped beds, deep mulch can slide or wash out faster. A recut trench edge, even a shallow one, often fixes the problem better than adding another inch of material. If a bed constantly spills onto the lawn after storms, focus on the edge geometry first, not the mulch pile.
Second lesson: tree rings should grow outward, not upward. People tend to “refresh” tree mulch by dumping a new bag at the trunk every spring. After a few seasons, the tree looks like it’s wearing a turtleneck made of bark. The better approach is to rake the old mulch flat, pull it back from the trunk, and widen the ring a little if possible. A broad, flat mulch ring protects roots and keeps mowers away without smothering the base.
Third lesson: free mulch is fantasticif you match it to the bed. Arborist chips are one of the best budget options around trees and shrubs, and they’re often available for little or no cost. But in small annual flower beds, they can look chunky and may not match the visual style. In those front-entry areas, a medium shredded bark often gives a cleaner finish. Same benefit, different vibe. Think of mulch as both a soil tool and a design choice.
Fourth lesson: leaves are gold, but only if you prep them. Whole leaves can blow around, mat, or make a slick layer. Shredded leaves behave much better. Homeowners who run a mower over fall leaves and use them as mulch usually end up with healthier beds and lower mulch bills. It’s one of the easiest wins in yard care. The trick is to apply them evenly and avoid packing them directly against stems.
Fifth lesson: cardboard is helpful, not magical. Sheet mulching works very well for converting lawn to beds, especially when you don’t want to dig. But the cardboard still needs a good mulch layer on top, and the bed still needs maintenance. Weeds can eventually germinate in decomposed mulch above the cardboard. The method reduces labor a lotit doesn’t eliminate gardening forever. (If only.)
Sixth lesson: your maintenance rhythm matters more than your mulch brand. A beautiful bed can get messy in one season if the edge isn’t recut and the mulch isn’t checked. On the flip side, a basic natural mulch bed can look excellent year-round with a simple routine: recut the edge once or twice during active growth, fluff compacted areas, pull mulch away from stems, and top up only where it’s actually thin.
Seventh lesson: watch water flow after a heavy rain. This is the best time to diagnose edging problems. If mulch gathers in one corner, that’s where your bed needs a slightly deeper trench or a small contour adjustment. If water runs off instead of soaking in, the mulch may be too fine or matted. A few minutes of observation can save a lot of guesswork and rework later.
In short, the best landscape edging with natural mulch is not about perfection on day one. It’s about building a simple system that matches your yard: a clean edge, the right mulch, correct depth, and small seasonal touch-ups. Once that system is in place, your beds stay cleaner, your plants look better, and yard work becomes a lot less dramatic.
Conclusion
Landscape edging with natural mulch is one of the highest-impact upgrades you can make in a yard without spending a fortune. It improves plant health, suppresses weeds, protects soil moisture, and gives your beds a polished, intentional look. The formula is simple: define the bed edge, use a trench or crisp spade cut, apply natural mulch at the right depth, and keep it away from trunks and stems.
If you remember only three things, make it these: keep mulch 2 to 4 inches deep, keep it off the trunk, and maintain the edge. Do that, and your landscape will look betterand work betterseason after season.


