Table of Contents >> Show >> Hide
- Table of Contents
- Before You Split: Setup That Makes Hardwood Behave
- Way #1: Split by Hand With a Splitting Maul (or Splitting Axe)
- Way #2: Drive a Wedge With a Sledge (The “Stubborn Hardwood” Method)
- Way #3: Use a Hydraulic Log Splitter (Electric or Gas)
- Split It Right So It Burns Right: Seasoning & Moisture
- Quick Decision Guide: Which Method Should You Use?
- FAQ: Hardwood Splitting Questions People Actually Ask
- of Real-World “Yep, That Happened” Splitting Experiences
- Conclusion
Hardwood firewood is the “healthy salad” of the wood-burning world: it’s great once it’s ready, but it can be stubborn, stringy, and weirdly determined to ruin your Saturday. Oak, hickory, maple, and friends burn hot and longif you split and season them correctly. The good news: you don’t need superhero strength. You need smart technique, the right tools, and a little respect for wood grain (because it has opinions).
In this guide, you’ll learn three proven ways to split hardwood firewoodby hand with a splitting maul, with wedges for the gnarly stuff, and with a hydraulic log splitter when you want to trade sweat for horsepower. Along the way, we’ll cover safety, workflow, and how splitting ties directly to faster seasoning and cleaner burns.
Before You Split: Setup That Makes Hardwood Behave
Splitting hardwood is less about brute force and more about controlling the variables: stability, grain direction, swing mechanics, and safety. If you set things up correctly, you’ll split more wood with fewer missesand your lower back will stop writing angry reviews about you.
1) Pick the right work zone (flat, clear, and not a circus)
- Level ground so your footing doesn’t turn into a slapstick routine.
- Clear radius around youno kids, pets, or “helpful” bystanders within swinging range.
- Good light so you can actually see checks (cracks) and knots.
2) Use a chopping block (seriously)
A wide, stable stump (or thick round used as a block) absorbs impact and saves your tool edge when the maul passes through the woodor when you miss. Hardwood splitting on bare ground wastes energy and punishes handles.
3) Dress like you enjoy having toes and eyes
- Eye protection (chips fly; wedges can throw metal shards if abused)
- Work gloves for grip and splinter control
- Sturdy boots (ideally hard-toe)
- Long pants (because bark is basically nature’s sandpaper)
- Hearing protection if you’re running a gas log splitter or swinging a sledge for a while
4) “Read” the round before you swing
Hardwood rounds usually show you where they want to split. Look for:
- Checks: hairline cracks radiating from the center
- Grain runout: twisting grain means you’ll want wedges or smaller bites
- Knots and crotches: plan to split around them, not through them
5) Cut to a split-friendly length
If you’re processing your own wood, shorter rounds are typically easier to handle and split than long, heavy sections. Think in terms of what fits your stove or fireplace plus what you can safely lift. If a round is “technically liftable” but makes you question your life choices, it’s a perfect candidate for vertical splitting on a log splitter (more on that below).
Way #1: Split by Hand With a Splitting Maul (or Splitting Axe)
Hand-splitting is the classic method for a reason: it’s quiet, affordable, and oddly satisfying. For straight-grained hardwood (many oaks and maples), a splitting maul can be brutally efficient. For smaller rounds, a splitting axe can do the job with less fatigue.
Best for
- Small to medium rounds with decent grain
- Moderate quantities of firewood
- People who like exercise that ends with a stack of BTUs
Tools you’ll want
- Splitting maul (heavy head, wedge-like profile)
- Splitting axe (lighter, faster swings for smaller wood)
- Optional: “keep-it-together” trick like a tire on the block or a bungee/strap to reduce bending over
Step-by-step technique (the efficient, back-friendly version)
- Stand the round on end on your chopping block, stable and not wobbling like a shopping cart wheel.
- Find a check and aim your first strike along it. If there are no obvious cracks, aim for the center.
- Set your stance: feet about shoulder-width apart, body slightly angled (you’re not trying to win a staring contest with the log).
- Let the tool do the work: focus on a clean, controlled swing and speed rather than muscling it. A vertical, straight-down strike is your friend.
- Split into halves, then quarters: for many hardwood rounds, once you crack it, the rest is “follow the seam.” If a piece gets stubborn, don’t start inventing new physicsmove to the edge and work inward.
Pro tips for hardwood that “doesn’t feel like cooperating”
- Start where the wood is weakest: checks and edges are often easier than pounding dead-center on knotty rounds.
- Avoid knots when possible: knots reroute the grain; your tool can bounce, twist, or stick. Aim beside knots and peel the log apart in sections.
- Use a containment hack to reduce bending: placing rounds inside a tire on top of your block (or securing with a bungee/strap) can keep pieces from falling away after each split. Less bending = more splits and fewer “why is my spine yelling?” moments.
- Stop when tired: fatigue is when misses happen, and misses are when tools meet shins. Your firewood can wait. Your toes cannot be replaced by Amazon Prime.
Common mistakes
- Splitting on soft ground (absorbs energy and increases glancing blows)
- Standing too close (reduces control and makes overstrikes more likely)
- Chasing power instead of accuracy (speed + placement beats rage every time)
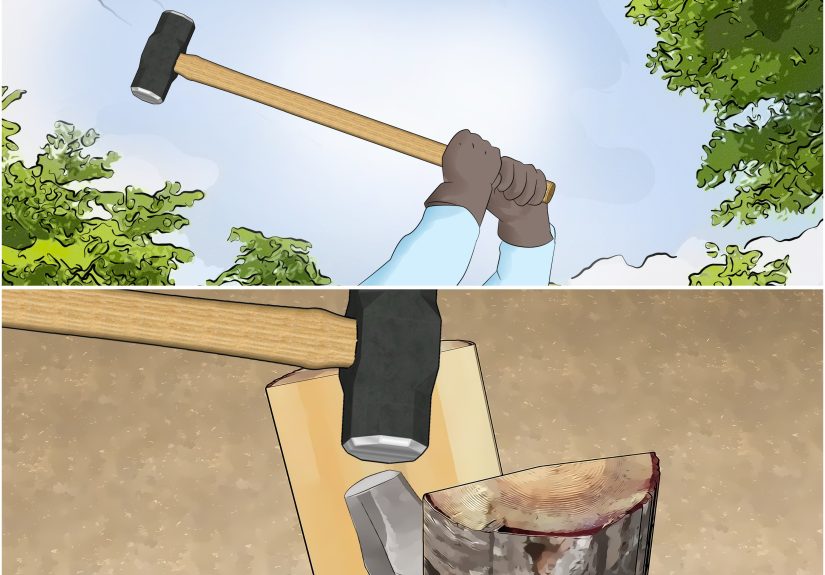
Way #2: Drive a Wedge With a Sledge (The “Stubborn Hardwood” Method)
Some hardwood rounds are basically a group project between knots, twisted grain, and pure spite. When a maul starts bouncing or sticking, wedges let you apply force exactly where it counts, gradually opening the split like a zipper that really doesn’t want to be a zipper.
Best for
- Knotty, gnarly hardwood rounds (oak crotches, twisty grain)
- Oversized rounds that laugh at a single maul strike
- Precision splittingsteering the split away from knots
Tools you’ll want
- Splitting wedges (steel; consider having 2–3 on hand)
- Sledgehammer (not a claw hammer; please don’t)
- Eye protection (non-negotiable)
Step-by-step: How to split hardwood with wedges
- Stabilize the round on a chopping block or firm base so it won’t rock while you’re striking.
- Choose your entry point: line up the wedge with an existing crack/check if possible. If the end grain is chaotic, start slightly off-center in a line that avoids major knots.
- Seat the wedge with light taps until it stands on its own.
- Drive it with solid sledge strikes. Let the wedge do the separating; you’re supplying steady impact, not trying to launch it into orbit.
- Add a second wedge if the first stalls. A common approach is to keep the first wedge in place and drive another wedge farther along the crack to keep spreading the fibers.
- Finish the split by continuing to open the crack until the round breaks into manageable pieces.
Wedge strategy for knotty hardwood (practical examples)
Example: knotty oak round (16–20 inches)
You strike with a maul, and it sticks halfway like it’s trying to become modern art. Switch to wedges:
- Find a check or the straightest grain line you can.
- Drive a wedge to start the split.
- When you hit a knot, don’t fight through itre-route. Drive a second wedge to open a different path that peels the log around the knot.
Safety notes (because wedges are not toys)
- Keep wedge heads in good shape: badly mushroomed metal can chip.
- One swinger at a time: no “team-building” by standing close while someone swings a sledge.
- Clear chips and debris so you don’t slip mid-strike.
Way #3: Use a Hydraulic Log Splitter (Electric or Gas)
If you’re splitting a lot of hardwoodor you’re staring down big rounds that require a forklift and a prayerhydraulic log splitters are the fastest path from “tree chunks” to “stacked firewood.” Electric models can be great for smaller logs and quiet operation; gas splitters bring serious force for large, knotty hardwood.
Best for
- High volume firewood processing
- Large diameter or heavy hardwood rounds
- People who prefer their back intact
What to look for (features that actually matter)
- Operating position: horizontal/vertical options can save your back with heavy rounds (vertical = less lifting).
- Cycle time: faster cycles mean more productivity, especially when processing a pile.
- Log length capacity: match it to how you cut your rounds (common max is around 24 inches for many units).
- Safety and controls: follow the manufacturer’s instructions and keep hands well clear of pinch points.
Step-by-step: safe, efficient splitter workflow
- Set up on level ground with stable footing and good clearance around the machine.
- Wear protective gear (eye/ear protection, gloves, boots, long pants).
- Stage your rounds so you’re not constantly lifting awkward pieces across the work zone.
- Place the log securely on the splitter bed, aligned so the wedge attacks along the grain. Crooked placement wastes force and can cause shifting.
- Operate the controls exactly as designedno shortcuts, no improvisations.
- Split in batches: split a set, clear and stack, then reset. This keeps the work area clean and reduces trip hazards.
Hardwood-specific splitter tips
- Go vertical for big rounds: roll the round into place instead of deadlifting it. Your future self will send a thank-you note.
- Take “bites” off the edges on knotty rounds rather than forcing a full center split immediately.
- Keep debris cleared so pieces don’t jam the work area or force awkward reaches.
Maintenance basics (the boring part that prevents the expensive part)
Every splitter is different, so the manual wins. But in general: keep the machine clean, check fasteners, follow service intervals for engine oil (gas units) and hydraulic fluid, and store it protected from weather. A splitter that’s maintained is safer, faster, and less likely to “retire” mid-pile.
Split It Right So It Burns Right: Seasoning & Moisture
Splitting hardwood isn’t just about making it fit in your stoveit’s about drying it to burn efficiently and cleanly. Wet wood wastes heat boiling off water, smokes more, and can contribute to creosote buildup. Most best-practice guidance for residential burning points to firewood that’s dry, split, and well-seasoned, often targeting under 20% moisture content as a practical goal.
Why splitting speeds drying
Drying happens from the outside in. A round log has limited surface area; split pieces expose far more area to air movement. More exposed surface = faster moisture loss. Denser hardwoods (like hickory and many oaks) generally take longer, which is why “I cut it last month” isn’t the same as “it’s seasoned.”
How to stack for seasoning (without trapping moisture)
- Get wood off the ground (pallets, rails, or a rack) to reduce ground moisture and improve airflow.
- Choose sun and breeze when possibleair movement is a drying superpower.
- Cover the top only so rain stays off but sides can breathe. Wrapping the whole stack is a moisture sauna.
- Split sooner rather than later if your goal is to burn next season.
How to know when hardwood is ready to burn
Old-school clues (lighter weight, end checking, a more hollow sound when knocked together) can help. But the most reliable approach for homeowners is a moisture meter.
- Measure on a freshly split face, not the weathered outside or end grain.
- Probe the middle of the split piece to estimate internal moisture.
- Aim for dry wood (commonly under ~20% for many appliances and best-practice guidance).
Bottom line: splitting hardwood well isn’t only about “breaking it apart.” It’s the start of making firewood that lights easier, burns hotter, and produces less smoke drama.
Quick Decision Guide: Which Method Should You Use?
If you’re splitting a small pile (or you like the workout)
Choose Way #1 (splitting maul / splitting axe). It’s low cost, low maintenance, and perfect for straight-grained rounds.
If the hardwood is knotty, twisted, or oversized
Choose Way #2 (wedges + sledge). Wedges let you “steer” splits and keep progress moving when a maul starts bouncing.
If you’re processing a lot of wood (or your back votes “no”)
Choose Way #3 (hydraulic log splitter). It’s the fastest route to volume, especially when combined with an efficient workflow and smart staging.
FAQ: Hardwood Splitting Questions People Actually Ask
Is it easier to split hardwood green or seasoned?
It depends on species and conditions, but many people find certain hardwoods split more easily when they’re freshly cut (green) because the fibers haven’t tightened up. The practical takeaway: if you can, cut, split, and stack early so it has maximum time to season before you burn it.
Why does my maul get stuck?
Usually it’s knots, twisted grain, or an off-target hit that wedges the head without opening the split enough. Fix it by re-aiming at checks, taking slices off the edge, or switching to wedges when the log is clearly “not in the mood.”
What’s the safest way to split hardwood firewood?
The safest way is the one you can control: stable footing, clear work area, proper PPE, and no rushing. Hand tools require swing control; splitters require keeping hands away from pinch points and following the machine’s instructions exactly.
How small should I split hardwood?
Split size depends on your appliance and how you burn. Smaller splits dry faster and ignite easier; larger splits can burn longer. Many people keep a mix: smaller pieces for shoulder season and starting fires, and medium pieces for long burns (once fully seasoned).
of Real-World “Yep, That Happened” Splitting Experiences
If you’re new to splitting hardwood firewood, here’s what the first few sessions usually feel like (and what you’ll learn fast). Not “movie lumberjack” fast. Real-life fastlike “why is this one piece of oak personally attacking me?” fast.
Experience #1: The ‘one-swing victory’ myth.
Your first straight-grained round might split cleanly, and you’ll think, “Oh! I’ve got this!” Then you hit a knotty section from the same log and your maul bounces like a trampoline. Lesson learned: hardwood can be consistent for three swings, then immediately become a different animal. When the bounce starts, don’t keep doubling down with anger. Step back, look for checks, and aim againor move to wedges. Your accuracy will improve faster than your biceps.
Experience #2: The bending-over tax.
Early on, you’ll spend a shocking amount of time resetting rounds and picking up split pieces that tumble off the block. That’s when people discover “contain the round” trickslike using a tire on the chopping block or securing the round so it stays together while you quarter it. The mood shift is immediate: less bending, more rhythm. It feels like you just unlocked a hidden level called “My Lower Back Is Grateful.”
Experience #3: The ‘this wedge is magic’ moment.
The first time you drive a wedge into gnarly hardwood and hear that satisfying crack, you’ll wonder why you ever tried to brute-force it with a maul. Wedges are especially helpful on crotches and twisted grain where splits want to wander. You learn to “steer” the splitstart a crack, open it, then add a second wedge when the first stops. It’s slower than a clean maul split, but it’s progress you can trust.
Experience #4: The workflow revelation.
Most people start by moving every piece of wood five times: pile it, carry it, split it, re-pile it, then stack it. After a few weekends, you’ll naturally rearrange your process. You stage rounds on one side, split in the middle, and stack immediately on the other side. If you’re using a hydraulic splitter, you’ll split in batches, clear the area, and keep the next round ready. The work becomes calmer and fasterlike your yard turned into a tiny firewood assembly line (with fewer corporate emails).
Experience #5: The seasoning ‘aha’ (and the moisture meter reality check).
Hardwood teaches patience. You’ll see beautiful splits stacked neatly and assume they’re ready soon. Then you measure the inside of a freshly split piece and realize: the outside may look dry, but the center still has a lot to say. That’s when stacking for airflow and covering only the top starts to feel less like “extra work” and more like the difference between clean heat and smoky disappointment.
If you take anything from these experiences, let it be this: the best splitter is the one that matches your wood, your volume, and your body. Technique and setup beat stubbornness. Hardwood will still be hardwoodbut it won’t have to win.
Conclusion
Splitting hardwood firewood gets dramatically easier when you stop trying to “out-muscle” the log and start working with grain, checks, and the right tool. Use a splitting maul for straight-grained rounds, wedges for knotty or twisted hardwood, and a hydraulic log splitter when volume or heavy rounds demand it. Then stack smart, season patiently, and verify dryness with a moisture meter so the wood burns hotter and cleaner.