
Table of Contents >> Show >> Hide
- What “Arles and Aztec” Means in This Project
- Why This Filing Cabinet Makeover Works
- Tools and Materials You’ll Need
- Step 1: Choose the Right Cabinet
- Step 2: Empty It, Clean It, and Remove What You Can
- Step 3: Sand and Repair the Surface
- Step 4: Prime for Durability
- Step 5: Finish the Top
- Step 6: Paint the Cabinet in Arles
- Step 7: Add the Aztec Stencil Pattern
- Step 8: Seal the Finish
- Step 9: Add Hardware That Matches the Style
- Step 10: Reassemble and Organize the Drawers
- Common Mistakes to Avoid
- How Much Does This Project Cost?
- Real-World Experience: What This Project Actually Feels Like
- Conclusion
If you’ve ever looked at a sad old filing cabinet and thought, “You could be fabulous, but right now you look like you manage expired warranties,” this project is for you. An Arles and Aztec filing cabinet is a creative furniture makeover that combines a warm ochre-yellow finish with a bold geometric stencil pattern. The result is equal parts office storage, accent furniture, and “Wait, that used to be metal?” magic.
This isn’t about building a filing cabinet from raw steel in your garage while dramatic sparks fly in slow motion. This is the smarter, friendlier version: take a sturdy old filing cabinet, prep it properly, paint it in an Arles-inspired yellow, add an Aztec-style stencil, and finish it so it can survive real life. Think home office, craft room, hallway storage, or that one corner of the house where paper multiplies at night.
What “Arles and Aztec” Means in This Project
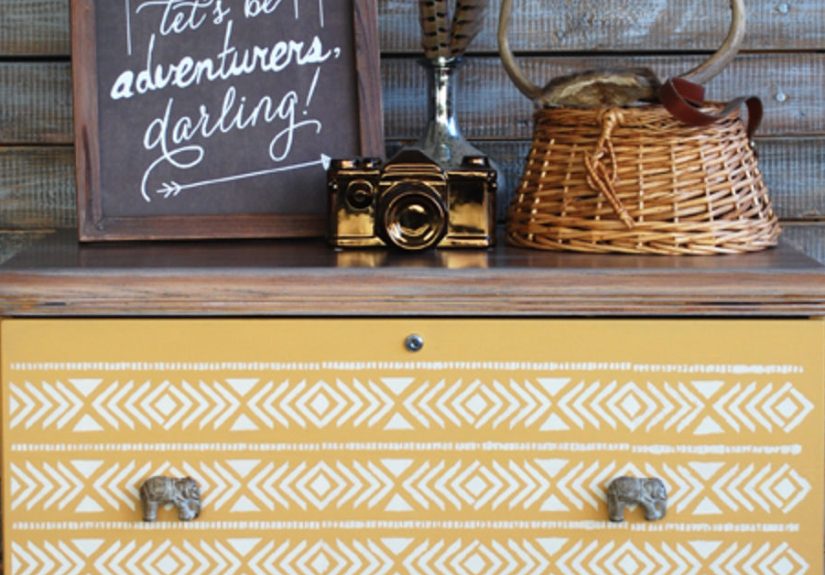
“Arles” usually refers to a rich, earthy yellow paint shade inspired by yellow ochres. It has more depth than a bright lemon and more personality than a timid beige. In plain English, it’s sunny without looking like a caution sign. “Aztec” in this context refers to a bold geometric stencil pattern that adds contrast, movement, and a bit of boho-meets-global style.
Put them together and you get a filing cabinet makeover that feels warm, artistic, and surprisingly high-end for something that may have once lived under fluorescent office lighting next to a dusty fax machine.
Why This Filing Cabinet Makeover Works
The best furniture DIY projects balance beauty with function, and this one nails both. Metal filing cabinets are durable, easy to thrift, and usually cheap. Their flat drawer fronts are perfect for stencils, and their boxy shape actually helps the pattern look intentional rather than chaotic. Add a wood or whitewashed top, new hardware, and a protective finish, and suddenly the cabinet becomes a feature piece instead of background clutter.
It also solves a real problem: paperwork is not glamorous, but hidden paperwork inside a great-looking cabinet is at least emotionally tolerable.
Tools and Materials You’ll Need
- An old two-drawer or three-drawer filing cabinet
- Degreasing cleaner or mild soap and water
- Microfiber cloths or lint-free rags
- Fine-grit sandpaper and a sanding sponge
- Rust-resistant or bonding primer for metal
- Arles-colored paint or a similar warm ochre furniture paint
- Small foam roller and angled brush, or spray paint setup
- Aztec-style stencil
- Stencil brush or dense foam pouncer
- White or cream paint for the stencil
- Painter’s tape
- Optional wood top, plywood top, or existing top surface
- Optional stain or whitewash supplies
- Clear wax, polycrylic, or clear furniture topcoat
- New knobs or drawer pulls if you want an upgraded finish
- Hanging file rails if the drawers need them
Step 1: Choose the Right Cabinet
Start with a cabinet that is structurally sound. Cosmetic ugliness is fine. In fact, it’s ideal. You want drawers that still slide, a body that isn’t bent like a soda can, and only light to moderate rust. Scratches, bad paint, and boring color are not problems. Those are opportunities wearing terrible outfits.
A two-drawer cabinet is easiest for this project because it gives you large, clean stencil areas and still fits in smaller rooms. If you want more storage, a three-drawer version works too, but the pattern may need extra planning so the design lines up from drawer to drawer.
Step 2: Empty It, Clean It, and Remove What You Can
Take everything out of the cabinet. Yes, everything. Old receipts, mystery keys, dried pens, paper clips from the Clinton administration, all of it. Remove the hardware, label holders, and drawers if your cabinet design allows it. If the drawers refuse to come out, don’t panic. You can still paint it assembled, but you’ll need to work more carefully around the slides.
Clean the cabinet thoroughly with a degreasing cleaner or soap and water. Pay extra attention to drawer handles and edges because those collect skin oils, dust, and office funk. Let the cabinet dry completely before moving on.
Step 3: Sand and Repair the Surface
You’re not trying to grind the cabinet into a new identity. You just want to scuff the surface so the primer and paint can grip. Use fine-grit sandpaper over all painted areas. If you find rust, sand it back until the flaky material is gone. Wipe away all dust with a damp cloth and let the cabinet dry again.
If the top is wood and you plan to keep it exposed, lightly sand that separately. If stain doesn’t take evenly, don’t force a bad relationship. A soft whitewash or painted finish often looks better and gives the cabinet a more custom feel.
Step 4: Prime for Durability
This is the step people skip when they want to live dangerously. Don’t. A good metal primer is what keeps your gorgeous cabinet from chipping the first time someone shoves a drawer shut with enthusiasm.
Use a rust-resistant or bonding primer made for metal. If your cabinet has lots of corners and recessed handles, spray primer is often easier. If the surfaces are smooth and flat, a foam roller can give you great coverage. Let the primer dry according to the label. If the finish feels rough afterward, lightly sand it again and wipe it clean.
Step 5: Finish the Top
This part is optional, but it’s what makes the cabinet look less “office surplus” and more “custom furniture.” You have three good choices:
Option A: Keep the original metal top
Paint it the same Arles shade as the rest of the cabinet for a seamless look.
Option B: Whitewash a wood top
If your cabinet already has a wood top or you’re adding one, a whitewash softens the bold yellow beautifully. Mix a little white paint with water, brush it on, then wipe back the excess. This lets the grain peek through instead of disappearing under a heavy coat.
Option C: Add a butcher-block or plywood top
A wood top instantly makes the cabinet feel more like furniture. Sand the edges smooth, seal all sides, and attach it carefully. Don’t overtighten screws if you mount it from below. Wood likes a tiny bit of room to move with the seasons, and it gets grumpy when trapped.
Step 6: Paint the Cabinet in Arles
Now for the star of the show. Apply your Arles or Arles-inspired ochre paint in thin, even coats. Chalk-style furniture paint can create that soft, artistic finish many people love, while a direct-to-metal or cabinet enamel can offer a more commercial-grade surface. Either works if the surface has been primed correctly.
Use a foam roller for the flat drawer faces and larger side panels. Use a brush for edges, handle recesses, and tight corners. Plan on at least two coats, and possibly three if you’re covering a dark cabinet or want that rich, velvety yellow to really show up. Let each coat dry fully before the next one. This is not the time to rush because impatience is how fingerprints become permanent design elements.
Step 7: Add the Aztec Stencil Pattern
Once the yellow paint is fully dry, it’s stencil time. This is where the cabinet stops being “cute” and becomes “Where did you buy that?”
Tape the stencil securely to one drawer front. Use a tape measure and level if you want the pattern centered and repeated evenly. Dip your stencil brush or foam pouncer lightly into the paint, then dab off the excess. This is important. Too much paint causes bleeding under the stencil, and then your bold geometric masterpiece starts looking like it was painted during an earthquake.
Use a mostly dry brush and build the color gradually. Remove the stencil carefully while the paint is still wet. Let it dry before repositioning it. Repeat across the drawers and sides if you want a fully wrapped look, or keep it just on the fronts for a cleaner design.
White, off-white, cream, charcoal, or muted black all work well over Arles. White gives the brightest contrast and tends to feel the most playful and bohemian.
Step 8: Seal the Finish
Once everything is dry, protect your hard work. For a chalk-style painted finish, clear wax creates a soft, classic look. For a tougher surface, use a clear furniture topcoat or a non-yellowing clear finish. Stenciled furniture especially benefits from protection because the pattern sits at the surface and can wear faster in high-touch areas.
Apply thin coats and let them cure properly. “Dry” and “fully cured” are not the same thing. Dry means it looks ready. Cured means it can survive you actually living with it.
Step 9: Add Hardware That Matches the Style
Fresh hardware is the jewelry of this project. You can go with simple black pulls for a modern look, brass knobs for warmth, or quirky themed hardware if you want more personality. Geometric pulls work beautifully with the Aztec pattern, but don’t overdo it. If the stencil is bold, the hardware should complement it, not challenge it to a duel.
If your cabinet already has built-in pulls, you can paint them the cabinet color for a cleaner finish or highlight them in a metallic accent.
Step 10: Reassemble and Organize the Drawers
Once the finish is cured, put the cabinet back together. If the drawers need file support, add hanging file rails. Many filing setups can hold letter or legal files, either front-to-back or side-to-side, depending on the drawer size and rail layout. Test the fit before filling the cabinet with every document you’ve avoided dealing with since 2018.
Add folders, labels, and drawer liners if you want the inside to look as finished as the outside. It’s a nice touch, even if only you will know it’s there. And honestly, that counts.
Common Mistakes to Avoid
- Skipping primer on metal and then wondering why the paint chips
- Using too much paint on the stencil and getting blurry lines
- Painting thick coats instead of multiple thin ones
- Ignoring rust instead of sanding it first
- Sealing too early before the paint has fully dried
- Choosing hardware that competes with the stencil pattern
- Forgetting to test your stencil placement before committing
How Much Does This Project Cost?
The beauty of this DIY filing cabinet makeover is that you can scale it to your budget. A thrifted cabinet is often inexpensive, and the biggest costs are paint, primer, topcoat, stencil, and optional new hardware. If you already own brushes, sandpaper, and cleaner, the price stays pleasantly reasonable. If you add a wood top and designer hardware, it goes from “budget-friendly” to “ooh, fancy,” but still usually costs less than buying a new statement storage piece.
Real-World Experience: What This Project Actually Feels Like
The funniest part of making an Arles and Aztec filing cabinet is how emotionally suspicious you become during the process. At first, the cabinet looks worse, not better. You clean it and discover dents you hadn’t noticed. You sand it and wonder whether you’ve just angered a harmless old office relic. Then you prime it and everything turns flat and ghostly, which is the exact moment many DIYers think, “Well, I’ve made a terrible decision.”
Then the yellow goes on.
The first coat usually looks a little streaky, and that can be unnerving. The second coat is where the personality kicks in. By the third coat, especially with a rich ochre tone, the cabinet starts looking warm, intentional, and weirdly charming. It no longer feels like storage; it feels like decor with paperwork benefits.
Stenciling is the part that teaches humility. You can measure carefully, tape everything down, use the world’s tiniest amount of paint, and still hold your breath while lifting the stencil. That reveal is pure drama. A crisp pattern makes you feel like a genius. A slightly fuzzy edge makes you feel like a genius who now understands the value of touch-ups. Either way, you learn fast that a light hand beats a fast hand every single time.
One of the most useful lessons from this kind of project is that filing cabinets don’t need to stay in offices. Once finished, they work beautifully in entryways for mail, in craft rooms for supplies, in kids’ rooms for art paper, and even in dining spaces for linens and candles. The makeover changes not just the color, but the whole category of the furniture.
Another real-life observation: drawer weight matters. Filing cabinets are built to hold heavy things, and that’s excellent, but it also means the drawers can feel surprisingly clunky while you’re trying to paint around them. If they don’t come out easily, patience becomes part of the materials list. So does floor protection, because one awkward drawer slide can turn a calm DIY afternoon into a slapstick performance.
There’s also something satisfying about pairing a very structured object with a more artistic finish. The cabinet starts out all function, no charm. The Arles paint softens it. The Aztec pattern gives it rhythm. The topcoat makes it feel finished instead of fragile. And the new hardware is the final little wink that says, “Yes, I used to hold tax forms in a break room, but look at me now.”
If you make one yourself, expect people to ask where it came from. Expect to say, “Oh, that old thing?” in your best fake-casual voice. And expect to feel unusually proud every time you open a drawer and find organized files inside something that actually makes the room look better. That’s the secret win of this project: it turns practical storage into a piece you enjoy seeing every day.
Conclusion
If you want a furniture makeover that is practical, creative, and genuinely fun, an Arles and Aztec filing cabinet is a fantastic choice. The project takes patience, but not a professional shop. With the right prep, a strong primer, a warm yellow paint, a crisp stencil, and a durable sealer, you can transform an ordinary filing cabinet into a custom-looking storage piece with serious personality. It’s useful, eye-catching, and just rebellious enough to make organizing paperwork feel slightly less rude.


