
Table of Contents >> Show >> Hide
- What skirting boards actually do
- Before you start: plan like a patient carpenter, not a caffeine-powered squirrel
- Tools and materials you will want nearby
- How to fit skirting boards step by step
- Step 1: Remove old trim carefully
- Step 2: Mark studs and establish a level reference
- Step 3: Measure every wall and plan the cut sequence
- Step 4: Cut the first piece with a square end
- Step 5: Use coped joints for inside corners
- Step 6: Miter outside corners
- Step 7: Join long runs with scarf joints
- Step 8: Fasten the boards securely
- How to handle common trouble spots
- Finish work: where the project actually becomes pretty
- Mistakes to avoid when fitting skirting boards
- Is this a beginner-friendly DIY project?
- Experience notes: what fitting skirting boards really feels like in the real world
- Conclusion
Fitting skirting boards is one of those jobs that looks ridiculously simple from across the room. You buy the trim, cut the trim, nail the trim, admire yourself, done. Then reality walks in wearing muddy boots. Suddenly you are dealing with corners that are not square, floors that are not level, walls that wave like they are auditioning for the ocean, and one mysteriously short board that somehow used to be long enough five minutes ago.
The good news is that fitting skirting boards is absolutely a manageable DIY project if you slow down, measure carefully, and understand a few trim-carpentry basics before you start swinging the nail gun like you are in an action movie. In American homes, these boards are more commonly called baseboards, but the job is the same: cover the joint where the wall meets the floor, protect the wall from scuffs, and make the whole room look finished instead of “almost done since last fall.”
This guide walks you through how to fit skirting boards step by step, from choosing materials and planning cuts to handling awkward corners, uneven floors, and those tiny finishing details that separate “solid DIY job” from “why does that corner look nervous?”
What skirting boards actually do
Skirting boards are not just decorative. Yes, they frame a room beautifully and make paint lines look crisp, but they also hide expansion gaps at the edge of many flooring installations, protect drywall from vacuum collisions and shoe scuffs, and create a clean transition where wall and floor materials meet. In practical terms, they are part armor, part cover-up, part design detail.
That is why getting them fitted well matters. A slightly messy shelf can pass as “casual styling.” A baseboard joint with a glaring gap just sits there all day judging you.
Before you start: plan like a patient carpenter, not a caffeine-powered squirrel
Choose the right material
For most DIYers, pre-primed MDF is the easiest skirting-board material to work with. It is affordable, smooth, stable, and easy to paint. Solid wood is tougher and can be stained, but it costs more and can split if you are careless near the ends. PVC or moisture-resistant trim can make sense in bathrooms, basements, and laundry areas where humidity is a regular guest.
Match the style and height to your home. A simple flat board works in modern spaces, while more detailed profiles suit traditional rooms. As a rule of thumb, taller walls usually look better with taller trim, but you do not need to turn every room into a courthouse lobby.
Decide whether you need shoe molding
If your floors are wavy, old, or not perfectly flush to the wall, shoe molding or quarter-round can help cover small gaps at the bottom of the skirting board. Shoe molding tends to look sleeker, while quarter-round looks a bit more rounded and obvious. If your skirting board profile has a flat lower edge, adding shoe molding can be a smart finishing move.
Check your walls and floors
Do not skip this. If the floor slopes or dips, a perfectly straight board may leave a visible gap underneath. If the wall bows, the board may not sit flat. Walk the room, put a long level on the floor, and identify problem areas. On older houses especially, “square” is sometimes more of a suggestion than a measurement.
Tools and materials you will want nearby
Set yourself up before you start cutting. Running around the room looking for a pencil while a freshly cut board balances on your knee is not elite craftsmanship.
- Skirting boards or baseboards
- Tape measure
- Pencil
- Stud finder
- Level or laser level
- Miter saw or miter box and fine-tooth saw
- Coping saw
- Construction adhesive, if needed
- Finish nailer or hammer and finish nails
- Nail set
- Wood filler or spackling compound
- Paintable caulk
- Sandpaper
- Primer and paint or stain
- Safety glasses and hearing protection
If you are using power tools, follow the manufacturer’s instructions and work carefully. Clean cuts are great. Keeping all ten fingers is even better.
How to fit skirting boards step by step
Step 1: Remove old trim carefully
If the room already has old skirting boards, score along the top edge with a utility knife first so you do not tear the paint or drywall paper. Then pry the trim off gently with a flat bar. Work slowly, especially near corners and door casings. Remove leftover nails, scrape off old caulk, and clean the wall.
The cleaner the surface, the better the new boards will sit. Fresh trim over crusty old caulk is like putting a tuxedo jacket over a wrinkled T-shirt.
Step 2: Mark studs and establish a level reference
Use a stud finder and mark stud locations lightly on the wall. These marks tell you where your nails should go later. If the floor is uneven, do not blindly follow it. Instead, find the highest point in the room and use a scrap of the skirting board plus a level to mark a consistent reference line around the walls. That line gives you a better visual target for the top edge of the trim.
This matters because a level top edge usually looks right to the eye, while a board that rises and falls with the floor can make the whole room feel off.
Step 3: Measure every wall and plan the cut sequence
Measure each wall individually. Do not assume opposite walls are the same. They often are not. Write the measurements down and note where each piece goes. Also note whether each end will meet an inside corner, outside corner, door casing, or another board in a long run.
On long walls, you may need two pieces joined together. That is where a scarf joint comes in. Instead of butting two square ends together, cut matching angled ends so the seam is longer, less visible, and easier to hold tight.
Example: if a wall measures 11 feet 4 inches and your trim comes in 8-foot lengths, do not panic and invent modern art. Plan one longer piece and one shorter piece joined with a scarf joint over a stud if possible.
Step 4: Cut the first piece with a square end
Start on an easy wall. In many rooms, that means beginning at a door casing or an inside corner where the first board can have a simple square cut on one end. Measure, mark, and cut slightly long if you are unsure. You can always trim a whisper more off. You cannot reattach wood fibers with optimism.
Dry-fit the piece before fastening it. Hold it in place and check the fit at both ends. Tiny adjustments now save much louder words later.
Step 5: Use coped joints for inside corners
Inside corners are where most beginners reach for 45-degree miters. Sometimes that works. Often it does not, because many inside corners are not perfectly 90 degrees. That is why trim carpenters love a coped joint.
Here is the basic method:
- Install one board into the corner with a square-cut end.
- Take the board that will meet it from the adjacent wall.
- Cut a 45-degree inside miter on that end to reveal the profile.
- Use a coping saw to cut along the profile line, slightly back-beveling the cut.
- Test-fit, trim as needed, and then press the coped end against the face of the first board.
The beauty of a coped joint is that it hides small wall-angle imperfections better and is less likely to open up visually over time. It takes a bit longer to learn, but once it clicks, it feels like a trim superpower.
Step 6: Miter outside corners
Outside corners usually get mitered. That means cutting each meeting piece at complementary angles so they form a neat corner. In a perfectly square world, that is usually 45 degrees on each board. In the real world, outside corners may need minor adjustments after dry-fitting.
Hold both pieces in place before nailing. If the tips do not meet cleanly, do not force them and hope paint will become a licensed therapist. Recut the angle slightly or fine-tune the length. A small dab of wood glue on the joint can help keep the corner closed, especially on painted trim.
Step 7: Join long runs with scarf joints
When one piece is not long enough, use a scarf joint instead of a butt joint. Cut the first board with a 30- to 45-degree angle, then cut the mating board with the opposite angle so the two overlap neatly. Try to position the joint over or near a stud. That gives the seam better support and makes it less likely to shift.
Place scarf joints so they face away from the room’s main line of sight when possible. The seam is then less noticeable because the overlap visually tucks in rather than sticking out.
Step 8: Fasten the boards securely
Once a piece fits well, fasten it to the wall at the studs. A finish nailer makes life easier, but a hammer and finish nails will do the job too. Add nails near the lower portion of the board as needed so it sits tight against the wall. If a section wants to pull away because the wall bows, a bit of construction adhesive can help, but use it sparingly. You want support, not a forever chemical romance.
Keep nails back from the very ends of the boards to avoid splitting, especially on small outside-corner pieces or delicate profiles.
How to handle common trouble spots
Uneven floors
If a level top line leaves a visible gap under the board, you have options. Small gaps can often be hidden later with shoe molding. Larger gaps may require scribing the bottom edge of the skirting board to follow the contour of the floor. That involves holding the board in place, marking the floor profile onto it, and trimming to the line. It is fussy work, but it can make an old room look dramatically better.
Walls that are not flat
If the board rocks or bows away from the wall, check whether the drywall has bulges or the studs are misaligned. Sometimes strategic nailing is enough. Sometimes a shim behind the trim helps. Sometimes the wall simply wants to be difficult because houses, like people, have character flaws.
Door casings and end returns
Where the skirting board runs into a door casing, a square cut is often fine. Where a board ends without meeting another surface, such as at an open-ended return, you can create a tiny mitered return piece so the exposed end looks finished instead of blunt. These are small details, but they give the installation a polished look.
Finish work: where the project actually becomes pretty
Even well-fitted skirting boards do not look finished until you do the final cleanup work. This is the stage many impatient DIYers rush through, then spend the next five years staring at nail holes in quiet regret.
- Fill nail holes: Use wood filler or spackling compound and let it dry fully.
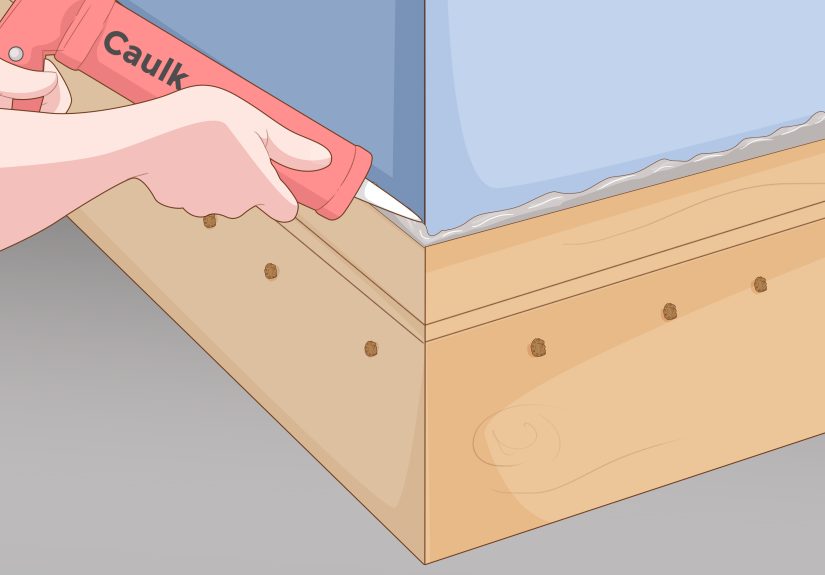
- Caulk the top edge: Apply a thin bead of paintable caulk where the board meets the wall, then smooth it for a seamless transition.
- Sand lightly: Knock down filler, rough edges, and any fuzz on cut MDF.
- Prime if needed: Especially important for raw wood, cut ends, patched areas, and MDF edges.
- Paint or stain: Use smooth, controlled strokes and do not overload the brush.
If you are installing shoe molding too, fit the baseboard first, then add the shoe molding afterward. Nail shoe molding into the baseboard or wall area behind it, not into the floor, especially over floating floors that need room to expand and contract.
Mistakes to avoid when fitting skirting boards
- Measuring only once: The old saying exists for a reason. Measure twice, cut once, and then still stare at the saw for a second before committing.
- Mitering every inside corner: Fast, yes. Foolproof, no. Coped joints often look better.
- Ignoring floor level: A beautiful cut cannot fix a bad reference line.
- Nailing too close to the end: Split trim is the opposite of fun.
- Skipping dry fits: Test the piece before fastening. Always.
- Using too much caulk: Caulk is for subtle finishing, not for inventing architecture.
- Forgetting cut-end prep on MDF: Seal and smooth those edges before painting or they will drink paint like they just crossed a desert.
Is this a beginner-friendly DIY project?
Yes, with a caveat. Installing skirting boards is beginner-friendly if you have patience, are willing to practice a few cuts on scrap first, and do not expect your first inside corner to deserve a standing ovation. Straight runs and simple square cuts are easy. Coped joints, outside corners, and uneven rooms add complexity, but none of it is beyond a careful DIYer.
If you are working in a single small room, that is the perfect training ground. A bedroom or home office lets you learn the process without turning your whole house into a trim experiment. By the second or third board, most people improve fast. By the end of the room, you will either feel proud, mildly obsessed, or both.
Experience notes: what fitting skirting boards really feels like in the real world
One of the most common first-time experiences with skirting-board installation is the shock of discovering that almost nothing in a room is perfectly straight, square, or level. On paper, the process sounds wonderfully mathematical. A wall is a wall, a corner is 90 degrees, and a 45-degree miter should solve everything. In an actual house, especially one with a little age and personality, corners can be off, drywall can bow, and the floor can dip just enough to make a gap appear exactly where your eye goes first. That is why so many DIYers say the real lesson is not cutting wood. It is learning how to read the room.
Another common experience is that confidence rises and falls in a hilarious pattern. The first measurement feels serious. The first cut feels dramatic. The first successful dry-fit makes you feel like a trim genius. Then the next corner appears and humbles you instantly. That emotional roller coaster is normal. Fitting skirting boards is one of those jobs where progress is built from tiny corrections. You trim a hair off one end, recheck the fit, cope a profile a little cleaner, hold the board up again, and suddenly it clicks. The job rewards patience more than bravado.
Many DIYers also notice that the best-looking results rarely come from rushing. The people who end up happiest with the finished room are usually the ones who label every board, stage the cuts carefully, and dry-fit nearly everything before fastening it. They do not assume the saw setting is automatically right. They do not trust the wall to be square just because walls have legal representation in our imagination. They check, adjust, and test again. That slower rhythm can feel tedious in the moment, but it saves a ridiculous amount of frustration.
There is also a very real moment, almost universal, when the finishing phase changes everything. Before filler, caulk, sanding, and paint, even a decent installation can look a little rough. Tiny seams catch the light. Nail holes stand out. A cut edge looks more dramatic than it really is. Then you fill, sand, caulk, and paint, and suddenly the room looks intentional. That transformation surprises a lot of first-time DIYers. It is the point where the project stops looking like “boards attached to walls” and starts looking like finished trim work.
Finally, people often come away from the project with the same conclusion: skirting boards seem small, but they have an oversized effect on how complete a room feels. A freshly painted wall without trim can still look unfinished. Add neatly fitted skirting boards, and the space feels sharper, cleaner, and more expensive. It is one of those rare DIY upgrades that does not require changing the whole room to make the whole room feel changed. And once you fit one room successfully, the next room gets less intimidating. You may even catch yourself looking at random corners and thinking, “I could cope that better now,” which is either growth or the beginning of a very specific home-improvement personality.
Conclusion
If you want your room to look finished, fitting skirting boards is a high-impact DIY project worth learning. The secret is not magic and it is not expensive equipment. It is careful measuring, smart joint choices, patient dry-fitting, and proper finishing. Use square cuts where they make sense, cope your inside corners, miter your outside corners, join long runs with scarf joints, and do not underestimate the power of caulk and paint to pull the whole thing together.
Take your time, practice on scrap, and remember that even pros occasionally recut a piece. The goal is not perfection on the first try. The goal is a clean, durable installation that makes the room look sharp and makes you grin every time you walk past it.


