Table of Contents >> Show >> Hide
- What Is a Pottery Barn Teen-Inspired Bulletin Board System?
- Why Make a DIY Version Instead of Buying One?
- Best Materials for a DIY Bulletin Board System
- Tools and Supplies You May Need
- Plan the Layout Before You Cut Anything
- Step-by-Step: How to Make a DIY Pottery Barn Teen-Inspired Bulletin Board System
- Design Ideas for a High-End Look
- Budget Breakdown
- Best Places to Use This Bulletin Board System
- Common Mistakes to Avoid
- How to Keep the System Organized
- of Real-Life Experience: What I Learned Making a DIY Bulletin Board System
- Conclusion
A good bulletin board system can do more than hold a lonely permission slip and three pushpins from 2014. When designed well, it becomes a mini command center, a study zone, a mood board, a calendar, a photo display, and a “please stop losing your charger” headquarters all in one. That is why the Pottery Barn Teen-inspired bulletin board system has become such a popular look for bedrooms, dorm rooms, homeschool corners, and small study spaces. It feels polished, modular, stylish, and organized without looking like it escaped from a corporate conference room.
The even better news? You do not need a designer budget to create one. With cork tiles, fabric, foam board, thin plywood, inexpensive frames, dry-erase sheets, wall pockets, and a little weekend energy, you can build a custom bulletin board system that gives the same upscale teen-room vibe for much less. This guide walks you through the design plan, materials, layout ideas, step-by-step instructions, budget tips, and real-life lessons learned from making a DIY version that actually works after the photos are taken.
What Is a Pottery Barn Teen-Inspired Bulletin Board System?
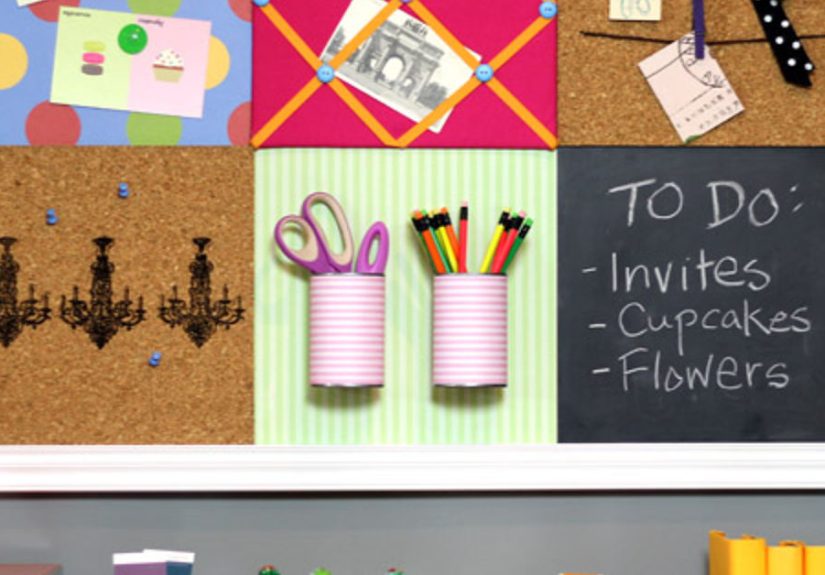
A Pottery Barn Teen-inspired bulletin board system is usually a coordinated wall organization setup made of multiple panels. Instead of one basic corkboard, the system may include a pinboard, dry-erase calendar, memo board, fabric-covered cork panel, letter holder, shelf, hooks, magnetic board, or photo display. The overall look is clean, modular, and decorative, which is what makes it so useful for teen bedrooms and study spaces.
The appeal is simple: everything has a place. Homework reminders are not hiding under a hoodie. Concert tickets are not buried in a backpack. The weekly calendar is visible. Favorite photos can be swapped out. Small supplies stay off the desk. It is organization with personality, which is exactly what a teen room needs because “organized chaos” usually means the floor is doing unpaid storage work.
Why Make a DIY Version Instead of Buying One?
Store-bought wall organizers are beautiful, but a full bulletin board system can become expensive quickly, especially when you add multiple panels, matching accessories, and mounting supplies. A DIY version lets you copy the best design ideas while customizing the size, color, materials, and layout for your room.
DIY Gives You Full Control
Maybe your wall is narrow. Maybe your desk is tiny. Maybe your teen wants sage green linen, black trim, gold clips, and a place for Polaroids. A DIY bulletin board system can be built around the exact needs of the room. You can create a large center corkboard, add a dry-erase monthly calendar on one side, install a mail pocket below, and finish it with hooks for headphones or keys.
It Can Be Renter-Friendly
If the room is a dorm, rental, or shared space, you can design the system with lightweight panels and removable hanging strips. For heavier pieces, use proper wall anchors or studs. The safest choice depends on the weight of your materials and what you plan to hang on the board. A cork tile holding notes is one thing; a framed board with shelves and metal cups is another. Gravity has no respect for cute design.
Best Materials for a DIY Bulletin Board System
The key to getting the Pottery Barn Teen-inspired look is mixing function with a neat, intentional finish. You want materials that feel more “boutique study wall” and less “emergency office supply aisle.”
Core Board Options
Cork tiles are affordable, easy to cut, and great for modular layouts. Foam board is lightweight and helpful for fabric-covered panels, though it is not as durable for heavy pinning. Thin plywood or hardboard creates a stronger backing and works well if you want framed panels. MDF is another smooth, sturdy option, but it can be heavier, so plan your mounting method carefully.
Surface Materials
Cork is the classic choice for pinning notes, photos, schedules, and inspiration images. Fabric-covered cork gives the board a softer designer look. Linen, canvas, cotton duck, or neutral upholstery fabric can instantly upgrade a basic board. Felt tiles are another good option for a modern dorm-style setup, especially when you want a softer texture and a little sound absorption.
Frame and Trim Ideas
Thin wood trim makes the whole project look more finished. You can use pine lattice strips, square dowels, picture frames, or painted molding. White, natural wood, black, and brass-inspired finishes all work well. For a Pottery Barn Teen-inspired style, aim for clean lines, balanced colors, and materials that coordinate with the desk, bedding, or wall decor.
Tools and Supplies You May Need
You do not need a professional workshop to make this project. Most versions can be completed with beginner-friendly tools.
- Cork tiles, cork roll, foam board, plywood, or MDF backing
- Fabric, felt, peel-and-stick dry-erase film, or magnetic sheet
- Wood trim, picture frames, or lattice strips
- Staple gun, hot glue gun, or strong craft adhesive
- Craft knife, ruler, pencil, measuring tape, and level
- Paint, stain, or spray paint for the frame
- Wall pockets, clips, hooks, small bins, or label holders
- Hanging strips, D-rings, sawtooth hangers, anchors, or screws
Plan the Layout Before You Cut Anything
The biggest mistake in a DIY bulletin board system is starting with the materials before planning the wall. Measure the space above the desk, bed, dresser, or study nook. Decide how wide and tall the full system should be. Then sketch the layout on paper or use painter’s tape on the wall to test the size.
A balanced layout usually works best. For example, place one large fabric corkboard in the center, a dry-erase calendar on the right, and two smaller square pinboards on the left. Add a narrow wall pocket below for papers. Another option is a grid of six same-size tiles: two cork, two fabric, one whiteboard, and one photo panel. The modular look is what makes the system feel intentional.
Good Layout Formulas
Try a 3-panel layout for a small room: one corkboard, one calendar, and one pocket organizer. For a larger study wall, try a 2-by-3 grid with six matching frames. For a dorm, keep it lightweight with peel-and-stick cork squares, removable hooks, and a dry-erase decal. For a craft-loving teen, include ribbon strips, mini clothespins, and a small inspiration board for fabric swatches, sketches, or color palettes.
Step-by-Step: How to Make a DIY Pottery Barn Teen-Inspired Bulletin Board System
Step 1: Measure the Wall and Choose a System Size
Start by measuring the available wall space. Leave breathing room around the edges so the board does not feel crammed. If the system will hang above a desk, keep the bottom edge high enough that it will not interfere with a laptop screen, lamp, or stacked books. A good rule is to center the system above the desk and keep the most-used section at eye level.
Step 2: Choose Your Board Combination
Pick the functions you actually need. A teen who tracks homework deadlines may need a weekly calendar and corkboard. A creative teen may prefer a large inspiration board and photo clips. A small dorm space may need a combination of pinning, writing, and storage. Do not add features just because they look cute. Every piece should earn its spot on the wall.
Step 3: Build the Cork Panels
Cut the cork, foam board, or backing board to your desired size. If using cork tiles, glue them to a thin board for extra stability. For a fabric-covered board, place batting over the cork first, then wrap fabric tightly around the front. Staple or glue the fabric to the back, keeping the corners neat like a wrapped gift. If the corners look bulky, trim excess fabric before securing.
Step 4: Add Frames or Trim
Frames are what make the project look polished. Cut wood trim to size, paint or stain it, and attach it around each panel. If cutting wood feels intimidating, use ready-made picture frames and replace the glass with cork, fabric board, or dry-erase backing. This shortcut creates a clean, store-bought look with much less measuring drama.
Step 5: Create a Dry-Erase Calendar Panel
For the calendar, use a small whiteboard, acrylic sheet, glass from a picture frame, or peel-and-stick dry-erase film. Draw calendar lines on paper and place them behind glass, or use vinyl tape directly on the surface. A monthly calendar is great for deadlines, sports, appointments, and social plans. A weekly layout works better for daily homework and chores.
Step 6: Add Storage Accessories
Wall pockets are perfect for school papers, permission forms, notebooks, and mail. Small hooks can hold keys, headphones, lanyards, or lightweight accessories. Clipboards are useful for rotating schedules and checklists. Magnetic cups can work if you include a magnetic board, but keep the weight light. The goal is to reduce desk clutter, not move the clutter vertically and pretend it is decor.
Step 7: Mount Everything Securely
Lay the panels on the floor first and measure the spacing between them. Mark the wall lightly with pencil or painter’s tape. Use a level because even a slightly crooked grid will bother you every time you walk by. For lightweight panels, removable hanging strips may work. For heavier framed boards, use wall anchors, screws, or studs. Always follow the weight limits of your mounting hardware.
Design Ideas for a High-End Look
The Pottery Barn Teen-inspired style is not about copying every detail. It is about capturing the clean, coordinated, slightly grown-up look. Choose a color palette before buying supplies. Popular combinations include white and natural cork, black and linen, blush and gold, navy and white, or sage green with warm wood.
Use Repeated Shapes
Repetition makes the system look expensive. Use all square panels, all rectangular panels, or frames with the same trim color. Even if the surfaces are different, the matching shapes will make the wall feel cohesive.
Layer Function and Personality
A bulletin board system should not look sterile. Add personality with photos, postcards, stickers, mini art prints, favorite quotes, school colors, or a small mood board. Keep the background neutral if you want the decorations to change with the season.
Choose Better Pushpins and Clips
Tiny details matter. Swap basic plastic pushpins for wood, brass-tone, clear, or fabric-covered pins. Use matching binder clips or mini clothespins. Coordinated accessories make an inexpensive board feel much more custom.
Budget Breakdown
A simple DIY bulletin board system can be made for around $30 to $60 if you use cork tiles, foam board, fabric remnants, and removable strips. A more polished version with wood frames, dry-erase panels, wall pockets, and hardware may cost $75 to $150 depending on the size and materials. That is still often less than buying multiple ready-made wall organizers, especially if you already have tools, paint, or leftover fabric.
To save money, check craft store sales, use thrifted frames, buy fabric remnants, or repurpose an old bulletin board. You can also cover mismatched boards with the same fabric so they look like a coordinated set. This is the DIY equivalent of giving everything a blazer and telling it to act professional.
Best Places to Use This Bulletin Board System
This project works beautifully in teen bedrooms, dorm rooms, study corners, homeschool spaces, craft rooms, entryways, and small home offices. In a bedroom, it can organize school life while doubling as wall decor. In a dorm, it can create a mini command center without taking up desk space. In a family command center, it can hold calendars, reminders, chore charts, and weekly meal plans.
For a Teen Bedroom
Use a mix of cork, photo display, and dry-erase calendar panels. Add a few personal touches, but keep the layout clean enough that it still helps with studying. A board that is too crowded becomes visual noise.
For a Dorm Room
Choose lightweight materials and renter-friendly hanging options. Felt tiles, cork squares, adhesive pockets, and removable hooks are practical. Avoid heavy frames unless the dorm rules allow secure mounting.
For a Study Nook
Focus on productivity. Include a monthly calendar, a weekly task list, a cork section for reminders, and a small pocket for papers. Keep supplies within reach, but do not overload the wall.
Common Mistakes to Avoid
The first mistake is making the system too small. If the board cannot hold real papers, calendars, and reminders, it becomes decoration instead of organization. The second mistake is using weak adhesive on heavy materials. If a board falls at 2 a.m., everyone in the house will wake up and blame the cat. The third mistake is choosing fabric that is too thin or stretchy. Medium-weight cotton, linen, canvas, or upholstery fabric usually looks cleaner.
Another common issue is forgetting how the board will be used. A gorgeous white fabric board may not stay gorgeous if it is handled daily with pencil-smudged fingers. A blackboard calendar may look stylish but require chalk markers that are easy to lose. Build for real life, not just the reveal photo.
How to Keep the System Organized
Once the board is finished, give each section a purpose. Use the calendar only for dates. Use the corkboard for current reminders, not every paper ever printed since sixth grade. Use pockets for active documents only. At the end of each week, remove outdated notes and refresh the board. This five-minute reset keeps the system useful.
A good rule is “pin it, plan it, purge it.” Pin what matters, plan what is coming, and purge what is done. That rhythm keeps the bulletin board from becoming a museum of expired coupons, old math worksheets, and mysterious sticky notes that say “remember!!!” with no further explanation.
of Real-Life Experience: What I Learned Making a DIY Bulletin Board System
The biggest lesson from making a DIY Pottery Barn Teen-inspired bulletin board system is that the planning stage matters more than the crafting stage. At first, it is tempting to buy the cute cork tiles, the pretty fabric, the gold clips, and the tiny wall pockets immediately. That is the fun part. But if you skip the layout planning, you may end up with pieces that look great individually and awkward together. Before cutting anything, I recommend taping the full shape on the wall with painter’s tape and living with it for a day. Walk past it. Sit at the desk. Open the laptop. Check whether the board feels too high, too low, too wide, or too visually heavy.
Another experience worth sharing: fabric choice can make or break the final look. Thin quilting cotton can work, but it may show bumps underneath. Stretchy fabric can pull unevenly and make the corners frustrating. A medium-weight linen-look fabric is much more forgiving. It hides small flaws, photographs beautifully, and gives the board that relaxed designer style. If the board is for a teen who changes room colors often, neutral fabric is the safest base. The accessories can change later without rebuilding the whole system.
Mounting is where patience pays off. A modular wall system looks best when the spacing is consistent. I like using a cardboard spacer cut to the exact gap I want between panels. Instead of measuring the gap again and again, you place the spacer between boards while hanging them. It is simple, but it prevents the “why does this look slightly haunted?” problem that happens when one panel is a quarter inch off.
I also learned that not every section should be decorative. At least one panel needs to be purely practical. A dry-erase weekly board is surprisingly helpful because it gives structure to the week without requiring a planner to be opened. A paper pocket is also more useful than expected. It catches forms, class schedules, and random handouts before they migrate to the desk, floor, or backpack black hole.
The best part of this project is how personal it becomes. A store-bought organizer may look perfect, but a DIY version can match a room, a personality, and a routine. One teen might use it for college inspiration, sports schedules, and photos. Another might use it for art sketches, color swatches, and project deadlines. The board grows with the person using it. That is the real win: not just a prettier wall, but a system that helps daily life feel a little less scattered.
Conclusion
A DIY Pottery Barn Teen-inspired bulletin board system is one of those projects that looks impressive but is completely manageable with basic supplies and a clear plan. By combining cork panels, fabric-covered boards, dry-erase calendars, pockets, hooks, and coordinated trim, you can create a wall organizer that feels stylish, useful, and custom-made. It is perfect for teen bedrooms, dorm rooms, study spaces, and family command centers.
The secret is balance. Make it pretty enough to enjoy, sturdy enough to use, and simple enough to maintain. When every note, date, photo, and paper has a place, the room feels calmer and the desk gets a fighting chance. And honestly, any project that makes homework look more organized deserves applause, snacks, and maybe a few very fancy pushpins.
Note: This HTML article is written for web publication, with no source links or citation placeholders included as requested.