Table of Contents >> Show >> Hide
- Why Air Bubbles Happen (And Why They’re Weirdly Confident About It)
- Tools That Make You Look Like a Sticker Wizard
- Prep Like a Pro (Because Bubbles Love Dirty Surfaces)
- How to Apply Stickers Without Bubbles (Prevention = Less Poking With Sharp Objects)
- How to Remove Existing Air Bubbles from Stickers (Fix Mode)
- Surface-Specific Tips (Because Not Every Sticker Lives the Same Life)
- Common Mistakes That Create Bubbles (And How to Avoid Them)
- Quick FAQ
- Conclusion
- Real-World Sticker Bubble Stories (and What They Taught People the Hard Way)
Air bubbles under a sticker are like that one friend who shows up uninvited, eats all the chips, and then refuses to leave.
The good news? You can evict themcleanly, safely, and without turning your decal into modern art.
This guide walks you through bubble-proof sticker application and the best ways to fix bubbles that already moved in.
Whether you’re smoothing a laptop sticker, a vinyl car decal, a window graphic, or a product label on a curved bottle,
you’ll learn what actually works (and what just feels satisfying but makes things worse).
Why Air Bubbles Happen (And Why They’re Weirdly Confident About It)
Most sticker bubbles are simply trapped air that didn’t get pushed out as the adhesive made contact. But air usually has help.
The usual suspects include:
- Dust, lint, or crumbs (yes, even the microscopic ones) creating little “tents” under the sticker.
- Skin oils from your fingersgreat for moisturizing, terrible for adhesion.
- Rushing the application and slapping the sticker down all at once.
- Curves and seams that force the sticker to stretch and trap air as it conforms.
- Cold surfaces that make adhesives less cooperative (adhesive gets stiff; bubbles throw a party).
- Textured surfaces where the sticker can’t fully “wet out” into all the tiny valleys.
Translation: bubbles are rarely “bad luck.” They’re usually a sign that air didn’t get a clear exit route.
Give it one, and bubbles stop acting like they pay rent.
Tools That Make You Look Like a Sticker Wizard
The essentials
- Microfiber cloth (cleaning without leaving lint behindyour future self says thanks).
- Isopropyl alcohol (for removing oils and residue on most hard surfaces).
- Squeegee or scraper (a craft scraper, vinyl squeegee, or even a credit card in a pinch).
- Masking tape or painter’s tape (for hinge method alignment on large stickers).
- A pin or fine needle (for controlled bubble “venting,” not chaos).
Nice-to-haves (especially for vinyl decals)
- Felt-edge squeegee (helps reduce scratching on glossy vinyl).
- Heat source (hair dryer or heat gun on lowgentle is the vibe).
- Spray bottle (for wet application on glass or large decals).
Prep Like a Pro (Because Bubbles Love Dirty Surfaces)
If you do nothing else, do this: clean the surface properly. Most “mysterious” bubbles are really “hello, I’m dust” in disguise.
- Wash or wipe off grime if needed (soap and water works; dry thoroughly).
-
Degrease with isopropyl alcohol on a lint-free cloth for hard, non-porous surfaces (glass, metal, many plastics).
Let it fully evaporate. -
Check the texture and curvature. If it’s heavily textured or sharply curved, you’ll need slower application,
firmer burnishing, and sometimes heat. - Mind the temperature. Room-temp surfaces are sticker-friendly. Ice-cold garage doors? Less so.
Bonus tip: avoid touching the adhesive with your fingers. Adhesive is basically a gossip columnistit remembers everything.
How to Apply Stickers Without Bubbles (Prevention = Less Poking With Sharp Objects)
Method 1: The “Edge-Down” Dry Apply (Best for small-to-medium stickers)
This is the classic technique that works on laptops, notebooks, storage bins, phone cases, and most flat surfaces.
- Test the placement before peeling anything. Hover it, align it, commit emotionally.
- Peel a small section of backing (about 1/2 inch to 1 inch). Don’t fully peel yet.
- Anchor one edge lightly. If it’s crooked, fix it nowfuture you will not forgive you.
- Slowly pull the backing away while you smooth the sticker down from the anchored edge toward the opposite edge.
- Burnish from the center outward with a squeegee/credit card using overlapping strokes.
Method 2: The Hinge Method (Best for large decals and straight alignment)
If your sticker is large enough to have its own ZIP code, use this. It keeps alignment steady while you apply in a controlled way.
- Position the sticker exactly where you want it.
- Tape a “hinge” along one edge (top edge is common) with painter’s tape, securing sticker to the surface.
- Flip the sticker up on the hinge, then peel the backing away.
- Lower the sticker slowly while squeegeeing from the hinge edge outward in firm, overlapping passes.
- Remove transfer tape (if using vinyl) at a sharp angle, slowly, keeping pressure on the vinyl underneath.
Method 3: The Wet Method (Best for glass and some large decals)
Wet application is popular for windows, glass doors, and big decals where you want repositioning time.
The idea is simple: a thin film of liquid lets you slide and squeegee out trapped air more easily.
Important: Wet method is not for every sticker type. Paper labels and some adhesives can fail if you introduce moisture.
Use it primarily for window decals and vinyl graphics designed for that approach.
- Clean the glass and dry it.
- Mist the surface lightly with water plus a tiny amount of dish soap (think: a couple drops in a spray bottle, not a bubble bath).
- Apply the decal and slide it into place while the surface is still wet.
- Squeegee from center outward to push out water and air in smooth strokes.
- Let it dry before tugging, peeling transfer tape aggressively, or testing your patience by “checking if it’s stuck yet.”
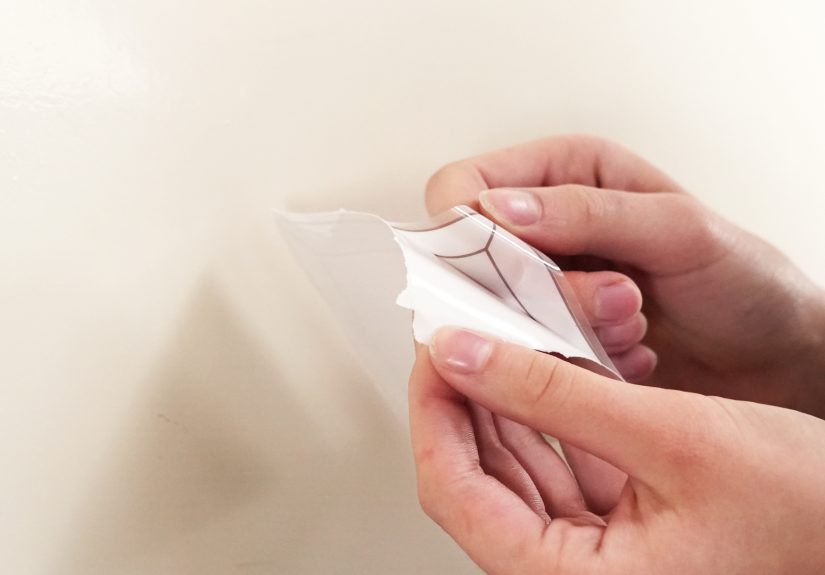
How to Remove Existing Air Bubbles from Stickers (Fix Mode)
Already have bubbles? No shame. Stickers are sneaky. Here’s how to fix them without wrecking the finish.
Start with the gentlest method and level up only if needed.
Level 1: Push the bubble to the edge
For small, fresh bubbles, you can often push the trapped air out without puncturing anything.
- Use a squeegee or a plastic card wrapped in a soft cloth (to avoid scratches).
- Start just outside the bubble and push toward the nearest edge using firm, steady pressure.
- Use short, overlapping strokes instead of one dramatic shove (this isn’t a sumo match).
Level 2: Add gentle heat, then re-squeegee
Heat makes vinyl more flexible and helps adhesive settle. Use low heat and keep the airflow moving.
- Warm the area for a few seconds (hair dryer on low is plenty for most small decals).
- Immediately squeegee from the center outward to encourage air to escape.
- Don’t overdo it. Too much heat can stretch vinyl or distort print.
Level 3: The pin-prick vent (for stubborn or larger bubbles)
When a bubble refuses to budge, you can vent itcarefully. The goal is a tiny exit hole, not a slash.
- Use a fine pin or needle (clean it first).
- Puncture at the edge of the bubble, not the center. One tiny hole is enough.
- Press the air toward the hole using your thumb or a squeegee until it flattens.
- Burnish the area gently so the adhesive re-bonds smoothly.
What not to do: Don’t use a razor blade or knife “because it’s faster.” It’s also faster to break a glass by throwing it.
The pin method is controlled and far less visible when done right.
Level 4: When lifting and reapplying is (maybe) okay
Some stickers and vinyl films tolerate repositioning, especially early on. But many pressure-sensitive adhesives grab quickly,
and lifting can stretch the material or weaken adhesion. If you try this:
- Lift slowly from a corner using a plastic scraper (not your fingernail rage).
- Reapply using light pressure first, then firm pressure once aligned.
- If the material stretches, stop. A stretched sticker is basically a permanent wrinkle with confidence.
Surface-Specific Tips (Because Not Every Sticker Lives the Same Life)
Laptops, tablets, and smooth plastic
Electronics are usually easy: clean surface, apply slowly, and smooth as you go.
For larger laptop stickers, apply in sectionspeel a little backing, press lightly, then smooth edge-to-edge.
If bubbles appear, work them out with a card wrapped in microfiber.
Curved water bottles and jars
Curves trap air because you’re effectively wrapping a flat thing around a round thing (geometry always wins).
The trick is to start from one edge and “roll” the label on, smoothing as you go.
If you slap the whole label down first, you’ll trap air in the middle like it’s being sealed in a time capsule.
Windows and glass doors
Wet method shines here. Light mist, position, then squeegee center-out to remove water and air.
Work slowly and watch for “silvering” (tiny trapped pockets) that often disappears as moisture evaporates and adhesive settles.
Cars and outdoor vinyl decals
Outdoor decals are where patience becomes a personality trait. Use firm, overlapping squeegee strokes.
If you must puncture a bubble, do it cleanly and press air out through the hole.
For professional-grade films, controlled heat can help reduce stress and improve final adhesionespecially on channels, curves, and recesses.
Common Mistakes That Create Bubbles (And How to Avoid Them)
- Applying over residue from cleaners that leave a film (cleaner ≠ degreaser).
- Skipping the “light tack” stage and pressing hard immediately (no room to correct, maximum bubble potential).
- Using too much soap in wet application, which can interfere with adhesion and slow drying.
- Trying to “fix” bubbles with a blade (it’s a sticker, not a grilled cheese).
- Applying in cold temperatures where adhesive doesn’t flow and vinyl doesn’t flex nicely.
Quick FAQ
Do small sticker bubbles go away on their own?
Sometimes. Minor bubbles can lessen as adhesive settles and finishes bondingespecially within the first day or two.
If bubbles are tiny and not caused by debris, give it a little time before you go into full “pin-prick surgeon” mode.
Can I use a hair dryer to remove air bubbles from vinyl stickers?
Yesuse low heat, keep it moving, and don’t roast the sticker. You’re aiming for “warm and flexible,” not “crispy and regretful.”
What if the bubble is caused by dust under the sticker?
If a speck is trapped under there, you can often see a tiny dot in the center of the bubble. Air won’t fully disappear because the speck keeps the sticker lifted.
In that case, carefully lifting and reapplying (if possible) is usually the cleanest fix. If it’s not possible, a tiny vent + firm burnish is your best compromise.
What’s the best tool if I don’t have a squeegee?
A credit card, gift card, or plastic membership card works wellwrap it in a soft cloth to avoid scratching glossy vinyl.
Conclusion
Removing air bubbles from stickers isn’t magicit’s controlled pressure, smart prep, and the occasional tiny pin-prick performed with the calm energy of someone who owns matching Tupperware lids.
Clean the surface, apply slowly (edge-down or hinge method), use firm center-out strokes, and save puncturing for the bubbles that truly earned it.
Do that, and your stickers will look smooth, professional, and suspiciously expensiveeven if you applied them while wearing pajama pants. (No judgment. That’s peak craftsmanship.)
Real-World Sticker Bubble Stories (and What They Taught People the Hard Way)
Let’s talk about the kinds of sticker-bubble “experiences” that keep showing up in homes, print shops, and maker spacesbecause the fastest way to learn is to watch someone else make the mistake first.
Think of this as the sticker version of reading restaurant reviews before picking a place for a first date.
1) The Laptop Sticker That Looked Perfect… Until the Next Morning
A common scenario: someone applies a large sticker to a laptop lid, smooths it once with their hand, and calls it done.
It looks great under warm indoor lighting. Then the next day, a few bubbles appear like they were waiting for dramatic effect.
What happened? Usually, the adhesive didn’t get evenly pressed (“burnished”) across the whole surface, so a few pockets never fully bonded.
The fix is almost always simple: use a plastic card wrapped in microfiber and push from the center outward with overlapping strokes.
If the bubbles are stubborn, a few seconds of gentle heat softens the sticker so it lays flatter.
Lesson: hands are great for applause, but a card/squeegee is better for consistent pressure.
2) The Water Bottle Label That Turned Into a Wrinkle Festival
Curved bottles humble everyone eventually. People try to apply a rectangular label straight-on, press the center first, and then chase bubbles outward.
On a curve, that often creates tension and wrinkles because the label needs to wrap gradually, not “teleport” around the cylinder.
The people who get it right tend to start at one edge, tack lightly, and then slowly roll the label around the bottle while smoothing as they go.
When a bubble forms near the end, they don’t panicthey lift just a hair (if the material allows), re-align, and continue rolling.
Lesson: on curves, slow application beats heroic bubble-fighting later.
3) The Window Decal That Needed Patience (and Didn’t Get Any)
Window decals are where wet application can feel like a cheat codeuntil someone uses way too much soap, squeegees once, and immediately yanks the transfer tape.
Then the vinyl lifts, stretches, or traps milky-looking moisture pockets. The fix is usually: slow down, squeegee more thoroughly, and let drying happen.
Many tiny “cloudy” spots are simply moisture that clears as it evaporates and the adhesive finishes bonding.
People who treat it like paintapply, smooth, then let it cureget cleaner results.
Lesson: the decal isn’t failing; it’s drying. Give it time.
4) The Car Decal Applied in the Cold (A Tragedy in Several Acts)
Outdoors in chilly weather, vinyl gets stiffer and adhesives get less eager to bond. People apply anyway, bubbles appear, and then they press harder.
Pressing harder can help, but cold makes it harder for the vinyl to conform and for adhesive to “wet out” across the surface.
The better approach is to warm the surface (and the vinyl) gently, apply with firm overlapping strokes, and finish with careful burnishing.
If a bubble survives, a tiny pin-prick near the edge plus pressure toward the vent often solves it.
Lesson: temperature matterswarm vinyl behaves like a team player; cold vinyl behaves like a cat in a bathtub.