Table of Contents >> Show >> Hide
- What Does “Plywood Grade” Actually Mean?
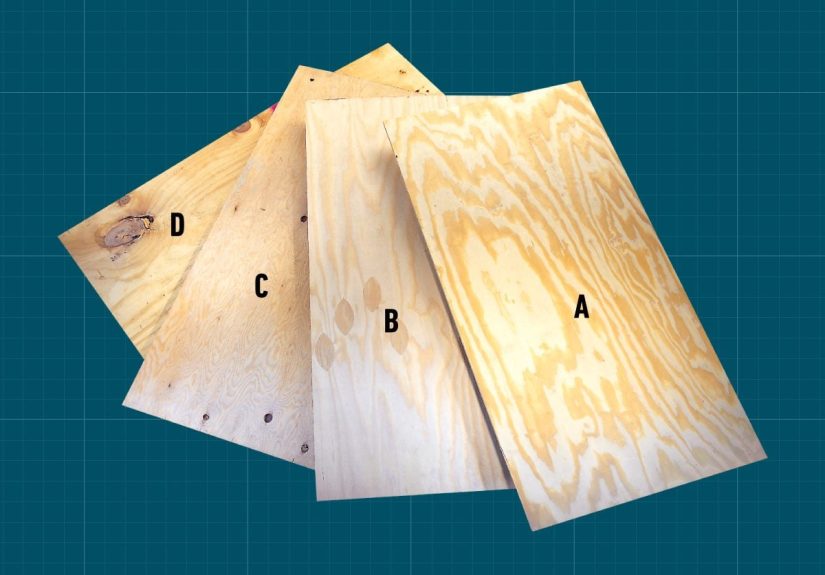
- The Main Softwood Plywood Grades: A, B, C, and D
- How to Read Two-Letter Plywood Grades
- What Does CDX Plywood Mean?
- ACX and BCX Plywood: Better Faces, Exterior-Type Bond
- Exposure Ratings: Interior, Exposure 1, and Exterior
- Hardwood Plywood Grades: A Different System
- Common Types of Plywood and Where They Work Best
- How to Choose the Right Plywood Grade
- Best Plywood Grades by Project
- Common Mistakes When Buying Plywood
- Practical Experience Notes: Lessons From Choosing Plywood in Real Projects
- Conclusion: The Best Plywood Grade Is the One That Fits the Job
Plywood looks simple at first glance: a flat sheet of wood, usually stacked in a leaning tower at the home center, waiting for someone with a tape measure and too much optimism. But the moment you read the stamp or labelA-C, B-C, CDX, Exposure 1, Exterior, marine, underlayment, hardwood A-1things start to feel like a secret lumberyard language.
The good news? Plywood grades are not nearly as mysterious as they look. Once you understand what the letters mean, how exposure ratings work, and which grade fits which project, choosing plywood becomes much easier. The wrong plywood can warp, delaminate, show ugly knots through paint, or fail where strength matters. The right plywood can save money, finish beautifully, and keep your project from becoming a very expensive lesson in “I should have read the stamp.”
This guide breaks down the different plywood grades, common plywood types, exposure ratings, and real-world buying tips so you can pick the right panel for cabinets, subfloors, wall sheathing, outdoor projects, furniture, shop builds, and more.
What Does “Plywood Grade” Actually Mean?
Plywood is made by bonding thin layers of wood veneer together, usually with the grain direction alternating from layer to layer. That cross-laminated construction helps plywood resist splitting and gives it more stability than a single board of solid wood. However, not every sheet is built for the same job.
A plywood grade usually tells you two things: how good the visible surface looks and what kind of performance you can expect. For many softwood plywood panels, the grade uses two letters. The first letter describes the front face, and the second letter describes the back. For example, A-C plywood has a smoother, higher-quality A-grade face and a rougher C-grade back. That is useful when one side will be visible and the other side will hide against a wall, frame, or cabinet box.
In other words, plywood grading is partly about beauty and partly about practicality. A cabinet door cares deeply about appearance. A roof deck under shingles? Not so much. It just wants to be strong, properly rated, and not embarrassed by rain during construction.
The Main Softwood Plywood Grades: A, B, C, and D
Softwood plywood is often used for construction, sheathing, subfloors, roofing, shop furniture, utility cabinets, and general DIY projects. The face and back veneers are graded from A through D, with A being the smoothest and most appearance-friendly, and D allowing the most visible defects.
A-Grade Plywood
A-grade plywood is the top visual grade in common softwood panels. It has a smooth, sanded surface with minimal defects. Any repairs are usually neat and limited, making it a good choice for painted cabinets, shelves, furniture parts, built-ins, wall panels, and projects where the face will be seen.
Choose A-grade plywood when appearance matters and you want less sanding, filling, and apologizing. It costs more than lower grades, but it can save time during finishing. If you plan to paint a bookcase, build a closet system, or make a workbench top that you want to look clean, an A-grade face is often worth the upgrade.
B-Grade Plywood
B-grade plywood is still relatively smooth, but it may include more repaired patches, small knots, or minor surface variations. It can often be painted or finished nicely, especially if you are willing to sand and use filler where needed.
This grade is a smart middle ground for projects where appearance matters but perfection is not required. Think garage cabinets, painted shelving, utility furniture, storage benches, craft tables, or cabinet interiors. It is the “presentable but not wearing a tuxedo” option.
C-Grade Plywood
C-grade plywood allows more knots, repairs, discoloration, and surface imperfections. It is commonly used where the panel will be covered or where appearance is secondary. You might find C-grade faces in sheathing, subfloors, crates, temporary structures, and utility builds.
C-grade plywood can be useful and strong, but do not expect it to become a flawless dining room sideboard without a heroic amount of sanding and filler. It is practical, affordable, and perfectly happy living behind siding, under roofing, or inside a project where nobody will inspect it with a flashlight.
D-Grade Plywood
D-grade plywood is the roughest common veneer grade. It allows larger knots, open defects, and more visible irregularities. You typically see D-grade plywood on the back side of construction panels, especially in C-D or CDX plywood.
D-grade is not the choice for a finished surface. It is best reserved for hidden structural or utility uses where the panel rating, span, thickness, and exposure classification matter more than looks. If plywood grades were school photos, D-grade would be the one that forgot picture day was happening.
How to Read Two-Letter Plywood Grades
Most plywood labels make more sense once you know that the first letter is the face grade and the second letter is the back grade. Here are common examples:
- A-A plywood: High-quality faces on both sides; useful when both sides are visible.
- A-B plywood: Excellent front face with a slightly lower-grade back; good for furniture and cabinets.
- A-C plywood: Smooth front face and rougher back; common for painted projects and panels with one visible side.
- B-C plywood: Decent face with utility-grade back; useful for shop projects, shelving, and general construction.
- C-D plywood: Rough construction-grade panel; common for sheathing and structural uses where appearance is not important.
This face/back system helps you avoid overbuying. If only one side of your project will be seen, you probably do not need premium faces on both sides. Spend the savings on better screws, sharper blades, or snacks. Every successful DIY project needs at least one of those.
What Does CDX Plywood Mean?
CDX is one of the most common plywood labels in home centers. The “C” means the front face is C-grade. The “D” means the back face is D-grade. The “X” is commonly used to indicate exterior-type glue or an exposure-rated bond suitable for temporary moisture during construction.
The important warning: CDX does not mean “waterproof forever.” It is commonly used for roof sheathing, wall sheathing, subfloors, sheds, and utility projects, but it is generally intended to be covered by roofing, siding, housewrap, flooring, or another protective layer. Leaving CDX exposed to constant weather is asking a construction panel to do a marine panel’s job. That usually ends with swelling, checking, delamination, and regret.
Use CDX when you need an economical structural panel and appearance is not a priority. Do not use it for fine furniture, smooth painted surfaces, or long-term exposed outdoor applications unless it is properly protected and the panel rating fits the job.
ACX and BCX Plywood: Better Faces, Exterior-Type Bond
ACX and BCX plywood are similar in concept to CDX, but they have better face veneers. ACX has an A-grade face and a C-grade back, while BCX has a B-grade face and a C-grade back. The “X” again points to exterior-type bonding or exposure suitability, depending on the panel specification.
ACX is often chosen for outdoor projects where one side needs to look better, such as painted exterior panels, soffits, signs, utility doors, or weather-protected trim projects. BCX is a more affordable option when the face should look decent but does not need to be furniture-grade.
These panels still need proper sealing, finishing, and installation. Exterior-type glue helps the panel survive moisture exposure better than interior-only plywood, but it does not make the wood fibers immune to swelling or decay. Glue is not a force field.
Exposure Ratings: Interior, Exposure 1, and Exterior
Plywood grade letters describe veneer appearance. Exposure ratings describe moisture durability and intended use. This distinction matters because a beautiful panel with the wrong exposure rating can fail in a damp location, while a rough-looking panel with the right rating may perform perfectly.
Interior Plywood
Interior plywood is meant for dry, protected spaces. It can be used for furniture, cabinetry, wall paneling, shelving, and decorative projects inside the home. It should not be used where it will face repeated moisture, weather, or high humidity unless the manufacturer specifically rates it for that condition.
Exposure 1 Plywood
Exposure 1 panels are designed to handle temporary moisture during construction. For example, roof sheathing may get rained on before shingles are installed, or wall sheathing may sit exposed briefly before siding goes up. Exposure 1 is useful, but it does not mean permanent outdoor exposure.
This is one of the biggest plywood-buying mistakes: assuming Exposure 1 means “fine outside forever.” It does not. It means the panel can tolerate limited construction moisture before being protected.
Exterior Plywood
Exterior-rated plywood is designed for more demanding moisture exposure. It uses waterproof adhesive and has stricter requirements for veneers and construction. It is a better choice for outdoor projects, signs, exterior panels, soffits, siding-related work, and other applications where moisture is a continuing concern.
Even exterior plywood usually benefits from paint, stain, sealant, flashing, ventilation, and smart design that sheds water. The best outdoor plywood project is one that does not invite water to sit on it like a tiny backyard pond.
Hardwood Plywood Grades: A Different System
Hardwood plywood is commonly used for cabinets, furniture, built-ins, wall panels, shelving, and decorative woodworking. It may have a hardwood face veneer such as maple, birch, oak, cherry, walnut, or poplar over a plywood, MDF, particleboard, or combination core.
Hardwood plywood grading can use face grades such as AA, A, B, C, and D, along with back grades often shown as numbers such as 1, 2, 3, or 4. A panel labeled A-1, for example, generally indicates a high-quality face and a high-quality back. A-4 may have a good face with a lower-grade back that is not meant to be seen.
For cabinet doors, visible panels, furniture sides, and stained finishes, choose a higher face grade and inspect the veneer carefully. For cabinet interiors, drawer bottoms, shop cabinets, or painted utility pieces, you can often use a lower grade and save money.
Common Types of Plywood and Where They Work Best
Sanded Plywood
Sanded plywood has a smoother surface and is often used for cabinets, shelving, furniture, paneling, and painted projects. It may come in grades such as A-C or B-C. Choose sanded plywood when the surface will be visible or finished.
Sheathing Plywood
Sheathing plywood is made for structural coverage on roofs, walls, and floors. It is usually rated for span and exposure, and it is not designed to be pretty. It is the hardworking plywood that shows up in boots, not dress shoes.
Underlayment Plywood
Underlayment plywood is designed to create a smooth, stable layer beneath finished flooring. It should be flat, properly fastened, and compatible with the flooring material above it. For vinyl, tile, and thin flooring, surface quality matters because bumps and gaps can telegraph through.
Marine Plywood
Marine plywood is built with waterproof adhesive and higher-quality veneers with fewer core voids. It is commonly associated with boats, docks, exterior furniture, and high-moisture projects. However, marine plywood is not a magic waterproof board. It still needs proper sealing and finishing, especially at edges.
Pressure-Treated Plywood
Pressure-treated plywood is infused with preservatives to resist decay, insects, and rot. It is useful for outdoor construction, decks, sheds, and areas where moisture or ground contact may be an issue. Because treated plywood can be wetter and heavier when purchased, allow for drying time when needed and use fasteners approved for treated lumber.
Hardwood Veneer Plywood
Hardwood veneer plywood is the go-to for cabinets, furniture, shelves, and decorative panels. The face veneer gives the appearance of solid hardwood while the plywood core adds stability and reduces cost. For stained projects, inspect color, grain, veneer thickness, and patching before buying.
Baltic Birch and Multi-Ply Panels
Baltic birch and similar multi-ply panels are popular for drawers, jigs, furniture, laser-cut projects, and shop fixtures because they often have more plies, fewer voids, and attractive exposed edges. They can cost more, but for precise woodworking, they are often worth it.
How to Choose the Right Plywood Grade
1. Start With the Project, Not the Price
The cheapest plywood is only cheap if it works. For a roof, choose a structural panel with the correct span rating and exposure classification. For a painted bookcase, choose a smooth sanded face. For a cabinet side that will be stained, choose hardwood plywood with an attractive veneer. For a shed floor, consider thickness, treatment, and moisture exposure.
2. Decide Whether Appearance Matters
If the plywood will be visible, buy for appearance. A-grade or B-grade faces reduce sanding and finishing work. If the panel will be hidden behind siding, roofing, laminate, or flooring, appearance matters less. That is where C-D sheathing can make sense.
3. Match the Exposure Rating to Moisture Conditions
Dry indoor project? Interior plywood may be fine. Temporary construction exposure? Exposure 1 may be appropriate. Permanent or repeated outdoor moisture? Look for Exterior-rated, pressure-treated, or marine plywood depending on the situation.
4. Check Thickness and Span Rating
Thickness matters. A thin panel may sag on a shelf, flex under flooring, or fail to hold fasteners well. For structural projects, follow building code, span tables, manufacturer recommendations, and local requirements. For furniture, choose thickness based on stiffness, joinery, and design.
5. Inspect the Sheet Before Buying
Look for flatness, edge voids, delamination, damaged corners, football patches, veneer splits, warping, and surface quality. Sight down the panel like you are judging a very flat surfboard. If it already looks like a potato chip in the store, do not expect it to become perfectly flat in your garage.
6. Think About the Finish
Paint hides more than stain. If you plan to stain plywood, the face veneer quality and grain matching are extremely important. If you plan to paint, you can often use a lower grade, but you still want a smooth, stable surface. For clear finishes, buy the best face you can reasonably afford.
7. Do Not Forget the Edges
Plywood edges reveal the layers. That can look beautiful on Baltic birch, but rough on construction plywood. For cabinets and furniture, plan to use edge banding, solid wood edging, trim, or a design that celebrates the layered look.
Best Plywood Grades by Project
Cabinets and Built-Ins
Use hardwood plywood with an A or B face for visible areas. For painted cabinets, high-quality sanded plywood can work well. For stain-grade cabinets, choose a hardwood veneer that matches your desired finish. Cabinet interiors can often use a lower back grade to reduce cost.
Furniture
Choose A-A, A-B, A-1 hardwood plywood, Baltic birch, or high-quality veneer-core panels depending on the design. Avoid rough sheathing unless your furniture style is “temporary jobsite chic,” which is rarely what guests mean when they compliment your living room.
Subfloors
Use structural plywood rated for flooring applications, with the correct thickness and span rating. Tongue-and-groove panels are often used because they help reduce movement between sheets. Follow local code and flooring manufacturer requirements.
Roof and Wall Sheathing
Use rated sheathing, commonly C-D or similar construction-grade plywood, with the proper thickness, span rating, and exposure classification. Appearance is not the priority; structural performance is.
Outdoor Furniture
Use exterior-rated plywood, marine plywood, or pressure-treated plywood depending on design and exposure. Seal all faces and especially the edges. Water sneaks into plywood edges like it has a backstage pass.
Garage Shelves and Shop Projects
B-C plywood, sanded plywood, or even CDX can work depending on the finish and strength needed. For shelves, thicker panels or added front edging can reduce sag. For workbench tops, choose panels that are flat, strong, and replaceable.
Common Mistakes When Buying Plywood
The first mistake is buying only by price. Low-grade plywood can be perfect for hidden sheathing but frustrating for visible furniture. The second mistake is misunderstanding the “X” in CDX or ACX. It does not mean the panel is fully waterproof. The third mistake is ignoring the core. A beautiful face veneer over a weak or void-filled core can still cause problems with screws, edges, and long-term stability.
Another common mistake is forgetting that plywood moves with moisture. It is more stable than solid wood, but it is still wood. Store panels flat, keep them dry, allow them to acclimate when necessary, and seal exposed edges in moisture-prone projects.
Practical Experience Notes: Lessons From Choosing Plywood in Real Projects
After working with plywood across cabinets, shop shelves, wall panels, outdoor projects, and quick “this will only take an hour” builds that absolutely did not take an hour, one lesson stands out: the right plywood grade is less about buying the “best” sheet and more about buying the right sheet for the job.
For example, using cabinet-grade hardwood plywood for garage wall sheathing is usually overkill. It will work, of course, but your wallet may quietly file a complaint. On the other hand, using CDX plywood for a smooth painted cabinet door is a shortcut that often turns into extra sanding, filling, priming, and muttering. The surface defects, patches, and knots that are acceptable in construction plywood become very noticeable when light hits a painted finish.
One practical habit is to choose plywood backward from the final surface. If the surface will be stained and admired, start with veneer quality. Look at grain, color consistency, patches, and whether the face veneer is thick enough for light sanding. If the surface will be painted, focus on smoothness, flatness, and filled defects. If the panel will be hidden, shift attention to strength, rating, thickness, and moisture classification.
Another useful habit is to inspect edges before faces. The face may look fine, but the edge can reveal core gaps, uneven plies, or voids that make joinery harder. This matters when you are screwing into edges, cutting dados, routing profiles, or leaving the edge exposed. A panel with fewer voids usually behaves better under tools and fasteners.
For shelving, stiffness matters more than many beginners expect. A thin sheet can look strong in the store and then sag sadly once loaded with paint cans, books, or kitchen appliances. A thicker panel, a solid wood front edge, or closer support spacing can make a big difference. The grade controls surface appearance, but thickness and structure control how the shelf performs.
For outdoor projects, the biggest real-world lesson is to respect water. Even good plywood can fail if water sits on flat surfaces or enters unsealed edges. Exterior-rated plywood, marine plywood, or pressure-treated plywood should still be designed with drainage, airflow, sealant, and protective finishes. A small bevel, overhang, or sealed edge can extend the life of a project far more than people expect.
Finally, do not assume every sheet in the stack is equal. Home center plywood can vary from panel to panel. Pull a few sheets if allowed, check for warping, inspect both faces, and reject panels with crushed corners or visible delamination. You are not being picky; you are preventing future headaches. Plywood is much easier to choose carefully at the store than to fix after it has been cut into twelve very confident but very warped pieces.
Conclusion: The Best Plywood Grade Is the One That Fits the Job
Plywood grades are not just random letters stamped on a sheet. They tell you how smooth the face is, how rough the back may be, and whether the panel belongs in a cabinet, on a roof, under a floor, or outside in the weather. A-grade and B-grade faces are best for visible, paintable, or decorative work. C-grade and D-grade panels are more practical for structural and hidden uses. CDX is useful for construction, but it is not a forever-outdoor miracle board. Hardwood plywood uses its own appearance-focused grading system, especially important for cabinets and furniture.
To choose the right plywood, match the grade to the project, check the exposure rating, inspect the sheet, consider the finish, and do not pay for beauty where nobody will see it. When in doubt, remember this simple rule: buy appearance for visible surfaces, buy ratings for structural performance, and buy moisture resistance when water might join the party.