Table of Contents >> Show >> Hide
- What Exactly Is a Landscape Ring (and Why It Works)
- Plan Like a Pro Before You Lift a Shovel
- Pick Your Materials: Mulch, Stone, or a Hybrid
- Tools & Supplies Checklist
- Step-by-Step: Build a Landscape Ring That Looks Intentional
- Step 1: Mark the ring
- Step 2: Cut the edge (the crisp edge is the secret sauce)
- Step 3: Remove sod and clear the bed
- Step 4: Shape the surface for drainage and curb appeal
- Step 5 (Optional): Install hard edging
- Step 6: Plant (if you’re making a planting ring)
- Step 7: Mulch correctly (no mulch volcanoes allowed)
- Step 8: Water and settle everything in
- Common Landscape Ring Mistakes (and How to Fix Them Fast)
- Three “Perfect Ring” Recipes You Can Copy
- Maintenance: Keep It Looking “Just Installed”
- Experience-Based Lessons: What Usually Happens After You Build a Landscape Ring (and How to Win Anyway)
- Lesson 1: The edge is everything (and it’s worth redoing)
- Lesson 2: Small rings don’t stay smallthey just look smaller
- Lesson 3: Mulch looks calm until you pile it (then it looks like trouble)
- Lesson 4: Rock rings are not maintenance-free (they’re maintenance-different)
- Lesson 5: Plants under trees will humble you (choose wisely)
- Lesson 6: The ring becomes a routineand that’s the real secret
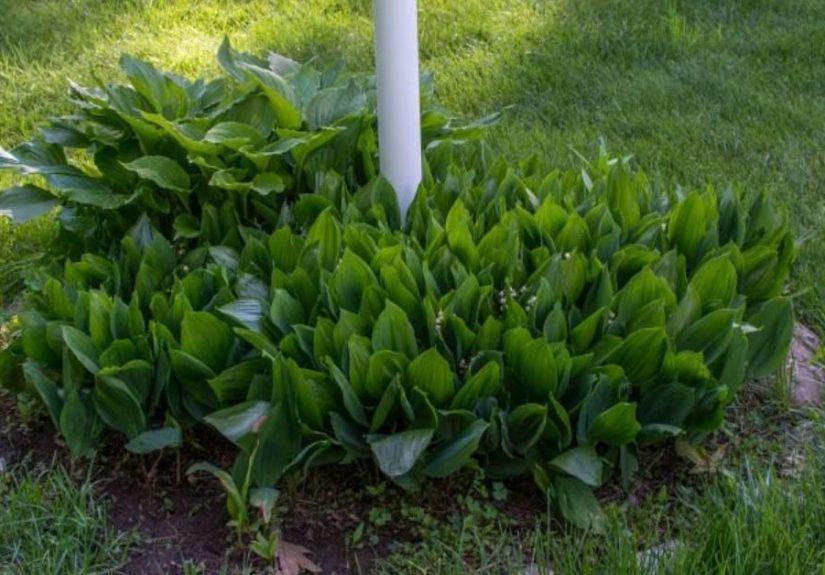
A “landscape ring” is the simplest makeover your yard will ever get: a clean, circular (or gently curved) border that frames a focal pointusually a tree, mailbox, birdbath, flagpole, or even a boulder with main-character energy. Done well, it looks intentional, keeps grass from invading, reduces weed headaches, and makes your whole landscape feel “designed,” not “I mowed in a hurry and hoped for the best.”
This guide walks you through planning, sizing, edging, planting, and mulching a landscape ring that looks sharp on Day 1and still looks sharp after the first thunderstorm, the first heat wave, and the first time your neighbor asks, “Who did your landscaping?” (Answer: “Me.” Optional follow-up: finger guns.)
What Exactly Is a Landscape Ring (and Why It Works)
A landscape ring is a defined bedmost often circularbuilt around a focal point. It can be:
- A mulch ring (classic for trees and shrubs)
- A planting ring (mulch + perennials/annuals/groundcovers)
- A stone or rock ring (decorative, but needs smarter planning)
- A mixed-material ring (edge + mulch + a small “accent” band of stone)
The “perfect” ring isn’t about fancy materialsit’s about clean edges, correct depth, and proportions that match your yard. If you nail those, even budget mulch looks upscale.
Plan Like a Pro Before You Lift a Shovel
1) Pick your focal point and decide the vibe
First, decide what the ring is framing. A mature shade tree needs a generous ring; a mailbox can look great with a smaller, tidy circle. Then choose a style:
- Formal: crisp circle, minimal plants, symmetrical look
- Cottage: softer curve, layered plants, lots of texture
- Modern: steel edging, simple plants, high contrast
- Natural: trench edge, shredded bark, native groundcovers
2) Safety first: check what’s below
If you’re digging more than a couple inches (or adding edging stakes), treat it like a real project. In the U.S., you can request utility marking before you dig so you don’t “discover” a cable the dramatic way. It’s free, and it’s the opposite of regrettable.
3) Choose the right size (this is where “perfect” lives)
Most disappointing rings have one thing in common: they’re too small. A ring that’s only a few inches wider than the trunk tends to look like a tiny hat for a very large head.
A more balanced approach:
- For trees: aim for a ring that extends outward toward the canopy’s drip line when possible (or at least several feet across).
- For small focal points (mailbox/birdbath): size it so there’s room for plants to mature without swallowing the focal point.
- For visual balance: stand back 20–30 feet and see if the ring reads as a “feature,” not a “coaster.”
Pick Your Materials: Mulch, Stone, or a Hybrid
Option A: Organic mulch (the most forgiving, most tree-friendly)
Organic mulch (shredded bark, wood chips, leaf mulch) is popular for good reasons: it helps conserve moisture, reduces weeds, and moderates soil conditions. It also breaks down over time, improving the soil. Translation: it’s doing chores while you do literally anything else.
Option B: Rock or gravel (pretty, but not “set it and forget it”)
Rock rings can look clean and modern, but they can also raise soil temperatures and make plants (especially trees and shrubs) less happy over time. If you love the look, consider using rock as an accent band with organic mulch where plant roots actually live.
Option C: A hybrid ring (often the “best of both worlds”)
A common pro move is: clean edge + organic mulch for plant health + a narrow decorative stone strip near the outside edge for contrast. You get the style without cooking your root zone.
Tools & Supplies Checklist
- Garden hose or string + stake (for outlining the circle)
- Flat spade or half-moon edger (for cutting a crisp edge)
- Hand trowel and rake
- Wheelbarrow (optional but back-saving)
- Mulch (and plants if you’re planting the ring)
- Edging material (optional): steel, brick, stone, composite, etc.
- Cardboard (optional): for weed-smothering beneath mulch
Step-by-Step: Build a Landscape Ring That Looks Intentional
Step 1: Mark the ring
For a clean circle, use a simple “compass” method: tie string around a stake at the center (or around the trunk for small rings), measure your radius, and walk the circle to mark your outline. For an organic shape, lay a garden hose in the curve you want and adjust until it looks right from multiple angles.
Step 2: Cut the edge (the crisp edge is the secret sauce)
Cut along your outline with a spade or edger. For a long-lasting edge between lawn and bed, many gardeners use a shallow V-shaped trench that acts like a mini “moat,” slowing grass creep and keeping mulch from washing onto the lawn. Take your time herethis is the part that makes your ring look professionally installed.
Step 3: Remove sod and clear the bed
Peel back the turf inside the ring. If your ring is around a tree, avoid aggressive digging that damages roots. Instead, remove grass and loosen the top layer lightly. If you’re converting lawn to bed, you can also smother grass with overlapping cardboard (no glossy coating), then top it with mulch.
Step 4: Shape the surface for drainage and curb appeal
A perfect ring isn’t a bowl that collects water at the trunk or foundation. Aim for a gentle, natural grade. If the ring is near your house, keep mulch from piling against siding and make sure water drains away from the structure.
Step 5 (Optional): Install hard edging
You don’t need edging material to have a beautiful ringcut edges can look fantastic. But edging can help keep lines clean longer, especially in high-traffic areas. If you choose hard edging:
- Steel edging = modern, crisp, flexible for curves
- Brick/stone = classic, heavier, more permanent
- Composite/plastic = budget-friendly, varies in durability
Step 6: Plant (if you’re making a planting ring)
A planting ring looks best when it has layers. Think like a movie poster: big shapes in back, medium in the middle, and small in front.
If the ring is under a tree, choose plants that tolerate shade and often drier conditions, and keep planting shallow to avoid damaging tree roots. Great “ring-friendly” plant categories include:
- Shade-tolerant groundcovers: for a neat, filled-in base
- Low perennials: for color without blocking the focal point
- Ornamental grasses: for texture and movement
- Seasonal annuals: for quick pop (especially mailbox rings)
Step 7: Mulch correctly (no mulch volcanoes allowed)
This is where many rings go from “beautiful” to “tree trouble.” The goal is a donut shape, not a volcano.
- Keep mulch off the trunk and leave the root flare visible.
- Spread mulch evenly in a wide ring.
- Keep depth moderate (usually a few inches), and refresh by rakingnot by piling endlessly.
If you only remember one sentence, make it this: Mulch should never touch the trunk. Trees are not cupcakes. They do not need frosting.
Step 8: Water and settle everything in
After planting and mulching, water slowly so the moisture reaches the root zone (instead of skating across the top). Over the next week or two, watch for low spots and fluff the mulch if it mats down.
Common Landscape Ring Mistakes (and How to Fix Them Fast)
Mistake 1: The ring is too small
Fix it by expanding the radius and re-cutting the edge. A bigger ring usually looks more intentional, reduces mowing stress, and gives roots a healthier zone with less turf competition.
Mistake 2: Mulch volcanoes
Fix it by pulling mulch back from the trunk until the root flare is clear. Then re-spread the mulch outward in a flat, donut-shaped layer.
Mistake 3: Rock everywhere around living plants
Fix it by switching to organic mulch in the main root zone and using rock only as a thin decorative accent. If you keep rock, be extra thoughtful about plant selection and irrigation.
Mistake 4: Mulch pushed against the house
Fix it by pulling mulch back and keeping a visible gap near siding/foundation areas. This helps reduce moisture problems and can make your exterior less inviting to pests.
Mistake 5: Landscape fabric under mulch (in the wrong place)
Fabric can seem like a weed-proof miracle, but in many beds it becomes a debris collector: organic matter builds up on top, weeds root into that layer, and you end up weeding anywayjust with bonus frustration. If you want a simple weed-smothering layer, cardboard under mulch is often more DIY-friendly and breaks down over time.
Three “Perfect Ring” Recipes You Can Copy
1) The Classic Tree Ring (clean + healthy)
- Wide donut-shaped ring sized toward the drip line if possible
- Organic mulch (even depth, moderate thickness)
- No plants right up against the trunk
- Optional: a crisp cut trench edge for a pro finish
2) The Mailbox Ring (instant curb appeal)
- Ring sized to leave room for mature plant width
- One “anchor” plant (like a compact shrub or ornamental grass)
- Two to three lower plants for balance
- Seasonal annuals for color rotation
- Mulch to unify the look and reduce weeds
3) The Birdbath/Boulder Ring (the low-maintenance focal halo)
- Hard edge (brick/stone/steel) for crisp geometry
- Organic mulch base with a narrow rock accent band
- Drought-tolerant perennials around the outside edge
Maintenance: Keep It Looking “Just Installed”
- Weekly (growing season): pull small weeds before they become emotionally attached to your garden
- Monthly: re-crisp the edge with a quick touch-up cut if needed
- Seasonally: rake mulch to break up matted spots; top-dress lightly instead of dumping a new mountain
- Annually: reassess sizetrees and plants grow, and your ring should keep up
Experience-Based Lessons: What Usually Happens After You Build a Landscape Ring (and How to Win Anyway)
Once a landscape ring is in, the yard starts teaching you thingsquietly, slowly, and occasionally through the medium of weeds. Below are real-world “this is what people notice” lessons that can help your ring stay perfect longer.
Lesson 1: The edge is everything (and it’s worth redoing)
Most DIY rings look amazing right after installation because fresh mulch hides a lot of chaos. Two heavy rains later, the truth arrives. A crisp, well-cut edge is what keeps your ring looking sharp even when life gets busy. If your ring looks “fuzzy,” it’s usually not the mulchit’s the border. People who redo the edge (even just once) are often shocked at how much more professional the whole yard feels.
Lesson 2: Small rings don’t stay smallthey just look smaller
A tiny ring around a growing tree is like buying jeans “one size smaller for motivation.” The tree will not be motivated. The tree will simply outgrow the ring. Homeowners often end up expanding their rings within a season or two, especially when they realize the bigger ring means less trimming and fewer awkward mower gymnastics. If you’re debating between “okay size” and “generous size,” the generous size usually ages better.
Lesson 3: Mulch looks calm until you pile it (then it looks like trouble)
The most common “I didn’t know” moment is mulch depth and trunk clearance. People add mulch yearly, then add more, and more… until the ring becomes a mulch mountain. The ring may look tidy at a glance, but over time that piled mulch can hold moisture against bark and create stress for the tree. Homeowners who switch to a flatter, donut-shaped application tend to notice fewer issues and a cleaner lookand they stop buying quite so many bags of mulch every year.
Lesson 4: Rock rings are not maintenance-free (they’re maintenance-different)
Rock rings photograph well. They also collect leaves, petals, and tiny bits of soil that eventually create a thin layer where weeds can sproutright on top of the rock. Many people end up blowing debris out regularly or pulling weeds that root between stones. And in hot weather, rock can heat the soil around plants. A common “best compromise” people land on is using organic mulch where roots live, and using rock only as a narrow accent band where it’s easy to clean.
Lesson 5: Plants under trees will humble you (choose wisely)
Under-tree rings are beautiful, but they’re also a special environment: shade, root competition, and uneven moisture. The “experience” many homeowners share is that sun-loving flowers struggle there, while shade-tolerant groundcovers and tough perennials quietly thrive. Another big win: planting fewer varieties, repeating them, and giving each plant room. The ring ends up looking intentional rather than crowded.
Lesson 6: The ring becomes a routineand that’s the real secret
The most consistently “perfect” rings aren’t the ones built with the fanciest materials. They’re the ones that get a five-minute check-in: pull a couple weeds, rake the mulch back into place, and re-crisp a small section of edge. It’s the landscaping equivalent of wiping down the kitchen countersmall effort, big payoff.
If you want a simple rule for long-term success: build it wide, edge it clean, mulch it correctly, and maintain it lightly. Your yard will do the restand your mower will stop giving you that “we need to talk” vibe.