Table of Contents >> Show >> Hide
- What Is a Sawtooth Hanger (and When Should You Use One)?
- Tools and Materials: Your “One Hole Is Enough” Kit
- Step-by-Step: How to Hang Sawtooth Picture Hangers
- Accuracy Tricks That Save You From Extra Holes
- Wall Types and How to Handle Each One
- Common Sawtooth Hanger Mistakes (and the Quick Fixes)
- Make It Look Professional: Height, Spacing, and “Why Does This Feel Off?”
- Troubleshooting: When the Frame Slips, Tilts, or Wobbles
- Safety Notes (a.k.a. “Protect Your Toes and Your Treasures”)
- Conclusion
- Real-World Experiences: What Actually Happens When You Hang Sawtooth Frames
Sawtooth hangers are the “I just want this on the wall already” heroes of the picture-hanging world. They’re fast,
forgiving, and quietly smuguntil your frame ends up one degree off and suddenly your living room feels like it’s
judging you.
This guide will show you exactly how to hang sawtooth picture hangers so your frames sit straight,
stay put, and don’t turn your wall into a Swiss cheese audition. We’ll cover tools, wall types, measurement tricks,
and a few pro “save-your-sanity” hacksplus some real-world lessons at the end.
What Is a Sawtooth Hanger (and When Should You Use One)?
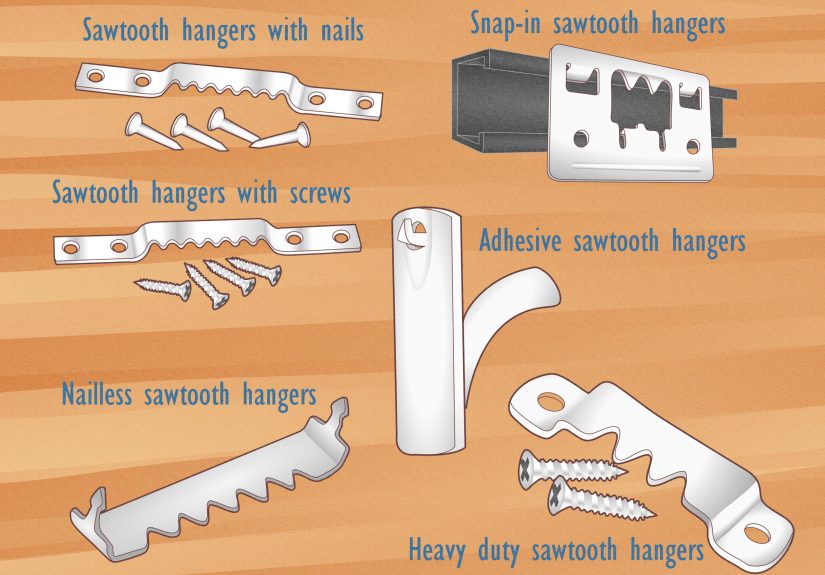
A sawtooth hanger is that little metal strip on the back of many frames with tiny notches (the
“teeth”). It’s designed to hook onto a single nail or screw head in the wall. Because the teeth give you multiple
bite points, you can nudge the frame left or right to fine-tune the levelno re-drilling required.
Best Uses for Sawtooth Hangers
- Light to medium frames (think small prints, photos, simple wood frames)
- Quick installs where you want clean alignment without complex hardware
- Gallery wall fillerssmaller pieces that don’t need heavy-duty support
When to Choose Different Picture Hanging Hardware
Sawtooth hangers are not the right tool for every job. Consider upgrading the hardware if your situation looks like
any of these:
- Heavy art or large frames (especially anything you’d cry about if it fell)
- Wide frames that tend to tilt or swing (one hanging point can be unstable)
- High-traffic areas where a bump is likely (hallways, kids’ zones, doors that slam)
- Precious or irreplaceable itemsuse sturdier support for peace of mind
Tools and Materials: Your “One Hole Is Enough” Kit
You don’t need a workshop. You need the basics, and you need them within arm’s reach so you’re not holding a frame
in one hand while searching for a pencil like a cartoon character.
Essentials
- Tape measure or ruler
- Pencil (or painter’s tape if you hate pencil marks)
- Level (small level works; laser level is a flex)
- Hammer (for nails) or screwdriver/drill (for screws)
- Stud finder (helpful for heavier pieces)
- Wall fastener: nail, screw, or a picture hook
- Drywall anchor (if you’re not hitting a stud and the frame has any real weight)
- Optional but life-changing: felt bumpers (to stop wobble and protect paint)
Pick the Right Fastener (Because Walls Have Feelings)
For a sawtooth hanger, you want a fastener that leaves a slightly proud head for the teeth to catch.
A nail is fine for small frames. A screw (especially a pan-head) is often better for control and grip.
- Into a wood stud: nail or screw directly into the stud for solid hold.
- Drywall without a stud: use a drywall anchor + screw, or a weight-rated picture hook.
- Masonry (brick/concrete): use masonry anchors and screws, not a random nail and optimism.
Step-by-Step: How to Hang Sawtooth Picture Hangers
This is the clean, repeatable method that works for one frame or twenty. The key idea:
you don’t guess where the nail goesyou measure where the sawtooth sits.
-
Choose your location and rough height.
Stand back and pick the spot. If you’re hanging a single piece on an open wall, many decorators use the “gallery
rule”: center of the art around eye level (often near 57–60 inches from the floor). If you’re hanging above a sofa,
keep it visually connected to the furniture instead of floating near the ceiling. -
Mark the top-center of the frame on the wall.
Hold the frame where you want it and lightly mark the wall at the frame’s top center. This is just a
reference point; it’s not where the nail will go. -
Measure the “drop” from hanger to top.
Flip the frame around. Measure from the middle of the sawtooth to the top edge of the frame.
This is your drop measurement. (It’s often small, but small things can make your frame look “mysteriously wrong.”) -
Transfer that measurement to the wall.
From your top-center mark, measure down by the drop amount and make a clearer mark. This second mark is where the
nail or screw head should land. -
Install the fastener.
Hammer in a nail or drive a screw at your mark. Leave the head sticking out just enough for the sawtooth to grab.
If the head is too flush, the teeth can’t bite. If it’s too far out, the frame may wobble. -
Hang the frame and fine-tune.
Place the sawtooth over the nail head. Gently nudge left or right tooth-by-tooth until it’s level. If you’re
leveling by feel, your eyes will lie to youuse the level. -
Add bumpers (optional but recommended).
Stick felt bumpers on the bottom corners of the frame’s back. This prevents wall scuffs and stops that tiny tilt
that slowly drives you into a mild decorating spiral.
A Quick Example (So the Math Doesn’t Get to Be the Boss)
Let’s say you want the top of your frame at 64 inches from the floor.
You measure the drop from the sawtooth to the top edge and it’s 0.75 inches.
Your nail mark should be at 64 − 0.75 = 63.25 inches.
That’s it. No guessing. No “close enough.” Close enough is how you end up with three holes and a new hobby: spackling.
Accuracy Tricks That Save You From Extra Holes
Professionals don’t have magic powers. They just cheat better. Here are a few friendly cheats.
The Painter’s Tape Transfer Trick
Put a strip of painter’s tape across the back of the frame (straight and level). Mark the center of the sawtooth on
the tape. Then move that tape to the wall where the frame will go, level it, and mark your fastener point through
the tape. Peel tape off laterno pencil marks, no drama.
The Toothpaste Dot Trick (Yes, Really)
Put a tiny dab of white toothpaste on the sawtooth (or the spot that will touch the wall). Hold the frame exactly
where you want it, then press lightly so the toothpaste transfers to the wall. That dot becomes your fastener mark.
It’s weirdly effectiveand somehow makes you feel like a DIY wizard who also brushes twice a day.
Paper Templates for Gallery Walls
Trace the frame on paper, cut it out, and tape it to the wall. Mark where the hanger sits on the paper.
Step back. Adjust. Only then make the hole. This method is especially good if you’re doing multiple frames and want
spacing to look intentional instead of “I panicked and started hanging.”
Wall Types and How to Handle Each One
Drywall (No Stud)
Drywall alone can be deceptively weak for anything beyond very light frames. If your piece has weight,
use a drywall anchor or a weight-rated picture hook system. Choose the anchor type based on weight and wall
conditions, and always follow the rating on the package.
Tip: If you’re using an anchor + screw, a screw head is often easier than a nail head for sawtooth
hangers because you can dial in exactly how far it sticks out.
Drywall (Stud Available)
If you can hit a stud where you want the picture, do it. A fastener into wood gives the best long-term stability.
If your ideal spot doesn’t align with a stud, you can often still hang safely using anchorsjust don’t pretend drywall
is the same thing as wood. Drywall is basically chalk with ambition.
Plaster Walls (Old Houses, Big Personality)
Plaster can crack if you hammer aggressively. Pre-drilling a small pilot hole is usually safer than brute force.
If you’re unsure what’s behind the wall (and plaster loves surprises), start gently and upgrade hardware as needed.
Brick or Concrete
You’ll need masonry-specific anchors and a drill bit meant for masonry. Once installed, a screw head makes a stable
landing spot for a sawtooth hanger. This is the “measure twice, drill once” zonebecause “drill twice” is not fun in
concrete.
Common Sawtooth Hanger Mistakes (and the Quick Fixes)
-
Mistake: The nail head is too flat/flush for the teeth to grab.
Fix: Back the nail out a touch or switch to a screw with a broader head. -
Mistake: Hanging a heavy or wide frame on a single sawtooth and hoping for the best.
Fix: Upgrade to D-rings with two hooks, or use wire hardware for better stability. -
Mistake: The sawtooth isn’t centered on the frame back.
Fix: Reposition the hanger (if possible) or measure from the actual hanger position, not “where it
looks centered.” -
Mistake: The frame keeps tilting because the bottom isn’t supported.
Fix: Add felt bumpers on the lower corners or adjust the fastener depth. -
Mistake: You ignored what’s inside the wall.
Fix: Use caution when drilling or nailingpipes, wires, and mysterious renovations exist.
Make It Look Professional: Height, Spacing, and “Why Does This Feel Off?”
The 57-Inch Rule (A Gallery Favorite)
A common guideline is to hang art so the center of the piece sits around 57 to 60 inches
from the floorroughly average eye level. This works especially well on open walls. If you’re hanging above furniture,
you can bend the rule so the art relates to the furniture instead of the ceiling.
Above Furniture: Keep It Connected
For art above a sofa, console, or bed, avoid leaving a giant empty gap. A tighter vertical relationship looks more
intentional and “designed” rather than accidental.
Gallery Walls: Treat the Group Like One Big Piece
When hanging multiple frames, aim to center the entire group as a unit. If you want consistency, keep spacing uniform
and use templates or tape lines. If you want eclectic, mix sizesbut still plan it so it feels curated, not chaotic.
Troubleshooting: When the Frame Slips, Tilts, or Wobbles
If It Slips Down a Tooth
- Use a slightly larger nail or a screw head that offers more “ledge.”
- Make sure the sawtooth is fully seated on the headnot perched on the edge like a nervous cat.
- If the frame is heavier than expected, upgrade hardware (anchors, hooks, or a different hanger system).
If It’s Crooked Even After Adjusting
- Confirm the hanger is installed level on the frame.
- Check the wall fastener isn’t angled or drifting in soft drywall.
- Add bumpers to stop the bottom from sliding on textured paint.
If It Swings or Tilts Forward
- Install felt bumpers.
- Reduce the fastener “stand-off” so the frame sits closer to the wall.
- Consider switching to two-point hardware for wide frames.
Safety Notes (a.k.a. “Protect Your Toes and Your Treasures”)
If the item is valuable or irreplaceable, take the conservative route: use studs when possible, use properly rated
anchors when not, and choose hardware built for the weight. Adhesive solutions can be convenient, but they’re not
always the best match for heavier or sentimental pieces.
Also: if you’re drilling, be mindful that walls can contain more than emptiness. A little caution up front beats a
surprise repair bill later.
Conclusion
Hanging a sawtooth frame isn’t hardit’s just easy to do “almost right,” which is how you get the slightly-crooked
masterpiece that haunts you every time you walk past it.
Measure the drop, mark precisely, leave the nail or screw head proud enough to catch the teeth, and finish with a
level check (plus bumpers for stability). Do that, and your art will look clean, straight, and professionally placed
without the bonus hobby of patching extra holes.
Real-World Experiences: What Actually Happens When You Hang Sawtooth Frames
Let’s get honest: most people don’t mess up sawtooth hangers because they’re “bad at DIY.” They mess up because they
try to eyeball the nail location while holding a frame, squinting at the wall, and doing mental geometry that hasn’t
been exercised since high school. Here are a few real-life scenarios that come up over and overand what you can learn
from them.
1) The “It Was Level… Until I Let Go” Moment
You hold the frame up. It’s perfect. You let go. It rotates just a hair and suddenly looks like it’s trying to escape
the room. The culprit is usually bottom drift: the frame’s lower edge slides on the wall surface, or
the nail head sits too far out, creating a tiny pivot point.
The fix is ridiculously simple: felt bumpers. Two little dots on the bottom corners can stop the
micro-slide and make the whole setup feel “locked in.” Also, don’t be shy about adjusting how far your nail or screw
protrudes. Sawtooth teeth like a stable ledge, not a diving board.
2) The “My Stud Finder Is Gaslighting Me” Scenario
Sometimes you want the frame centered, but the stud is… not cooperating. In older homes, studs can be spaced oddly.
In newer homes, they’re usually predictable, but your perfect placement might land right between them. That’s when
people panic and either (a) hammer a nail into drywall and hope, or (b) give up and hang the frame somewhere it looks
slightly wrong forever.
The grown-up solution is to use a drywall anchor + screw (or a weight-rated hook) and move on with your
life. Bonus: a screw head is often easier to fine-tune for sawtooth hangers than a nail head. You can adjust it by a
quarter turn and feel like a precise, calibrated adult.
3) The Crooked Hanger You Didn’t Know You Had
Here’s the sneaky one: the hanger on the back of the frame is installed slightly off-level. You hang it perfectly and
it still looks a little “meh.” Before you blame the wall, flip the frame over and check that the sawtooth is straight.
If it’s off, your wall marks can be flawless and the result will still look wrongbecause your hardware is lying.
If the hanger is replaceable, re-center it. If it’s not, measure from the actual hanger position and accept that this
frame came into your life with some baggage.
4) The “One Frame Turns Into a Gallery Wall” Cascade
You hang one frame. It looks lonely. You add another. Now you’re on your third frame and you’ve started using words
like “spacing” and “visual weight” as if you’re hosting a home design show. This is where templates and painter’s tape
become your best friends.
A paper template lets you experiment without commitment. It’s basically “try before you drill.” If you’ve ever made a
hole, patched it, repainted it, and then realized the frame still isn’t where you want ittemplates will feel like
personal redemption.
5) The Rental-Friendly Compromise
In rentals, people often reach for adhesive solutions. They can work well for light items, but the stakes go up with
heavier frames, humidity, and textured walls. If you truly need no-nail hanging, use products that have clear weight
ratings and follow prep instructions like cleaning the surface first. And if the art is valuable? Consider making one
tiny, well-placed hole with proper hardware instead of risking a crash landing.
The big takeaway from all of this: hanging sawtooth frames isn’t about strength or special talent. It’s about
measurement, the right fastener, and a couple of small tricks that stop tiny problems from turning into
big annoyances. Do it once the right way, and your walls will look like you hired help. (You didn’t. But your walls
don’t need to know that.)