Table of Contents >> Show >> Hide
- What Is a Pi-Based LiDAR Scanner?
- How LiDAR Works Without Making Your Brain Overheat
- Why Use a Raspberry Pi for LiDAR?
- Common Hardware Options for a Pi-Based LiDAR Scanner
- Basic Architecture of a Pi-Based LiDAR Scanner
- Software: From Raw Readings to Useful Maps
- What Can You Build With a Pi-Based LiDAR Scanner?
- Important Safety and Reliability Notes
- Common Problems and How to Think About Them
- SEO-Friendly Summary: Why This Project Matters
- Experience Notes: What Building a Pi-Based LiDAR Scanner Teaches You
- Conclusion
A Pi-based LiDAR scanner sounds like something a tiny robot would proudly wear as a hat. In reality, it is one of the most practical, affordable, and surprisingly powerful projects you can build with a Raspberry Pi. By combining a compact LiDAR sensor with the Pi’s Linux-friendly brain, USB ports, GPIO header, and Python ecosystem, you can create a scanner that measures distance, maps rooms, detects obstacles, and turns invisible geometry into actual data. That is a very fancy way of saying: your project can finally “see” the room without bumping into the furniture like a sleepy raccoon.
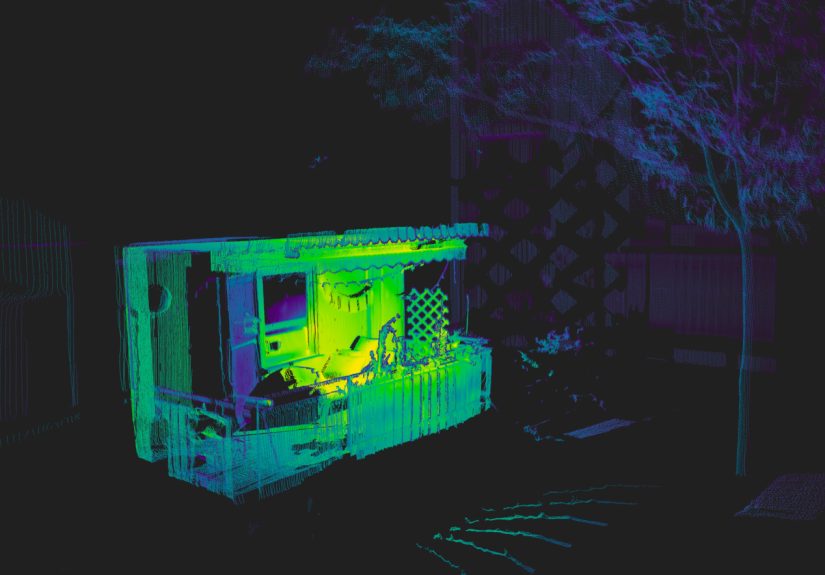
LiDAR, short for Light Detection and Ranging, uses laser light to measure distance. A LiDAR sensor emits light, waits for the reflected signal to return, and calculates how far away an object is. With repeated measurements, the system can build a point cloud or a two-dimensional scan of the surrounding space. When paired with a Raspberry Pi, LiDAR becomes accessible to students, makers, robotics hobbyists, indoor mapping experiments, smart carts, security prototypes, and anyone who has ever looked at a blank wall and thought, “I wonder what that wall looks like as polar coordinates.”
What Is a Pi-Based LiDAR Scanner?
A Pi-based LiDAR scanner is a scanning system where a Raspberry Pi collects, processes, and often visualizes LiDAR distance data. The sensor may be a 360-degree 2D scanner, such as an RPLIDAR-style module, or a single-point time-of-flight sensor mounted on a servo for sweeping measurements. The Raspberry Pi acts as the control center. It powers or communicates with the sensor, reads the distance measurements, converts raw values into useful coordinates, and can display the results as a map, chart, robot navigation layer, or saved dataset.
The appeal is simple: a Raspberry Pi is small, affordable, and flexible. It can run Python scripts, communicate over USB, UART, I2C, or SPI, and connect to displays, cameras, motors, and networks. That makes it a strong platform for robotics and scanning projects where a full desktop computer would be overkill and a tiny microcontroller might feel like sending a calculator to do a cartographer’s job.
How LiDAR Works Without Making Your Brain Overheat
LiDAR measures distance by analyzing reflected light. Many modules use time-of-flight principles, where the sensor measures how long it takes for emitted light to return. Some compact 2D scanners use laser triangulation, comparing the reflected spot position to estimate distance. The exact method depends on the sensor, but the goal is always the same: turn light into distance data.
A 360-degree scanner rotates its measurement head and records distance at many angles. Each reading can be represented as a pair: angle and distance. With a little math, those polar coordinates can become X and Y points on a map. After enough rotations, the scanner produces a useful picture of walls, furniture, doorways, boxes, chair legs, and whatever mystery object someone left in the hallway.
Why Use a Raspberry Pi for LiDAR?
1. It Has Real Computing Power
Unlike many basic microcontrollers, the Raspberry Pi runs a full operating system. That means you can use Python, C++, ROS 2, OpenCV, visualization tools, web dashboards, databases, and networking libraries. For a LiDAR scanner, this is a big advantage. The project does not have to stop at “read distance.” It can grow into “draw a map,” “send data over Wi-Fi,” “avoid obstacles,” or “build a tiny robot that judges your room layout.”
2. It Supports Multiple Interfaces
Different LiDAR sensors communicate in different ways. Some use USB. Others use UART, I2C, or serial adapters. Raspberry Pi boards support several hardware interfaces, making them friendly to a wide range of sensors. A USB-based 360-degree LiDAR is often the easiest route because the Pi can treat it like a serial device. A single-point sensor may connect through UART or I2C and provide regular distance readings.
3. It Plays Nicely With Robotics Software
LiDAR becomes especially interesting when paired with robotics software such as ROS 2. ROS can help organize sensor data, coordinate robot movement, and support mapping or navigation workflows. A Pi may not replace a workstation for heavy 3D processing, but for 2D scanning, lightweight mapping, and educational robotics, it is a practical starting point.
Common Hardware Options for a Pi-Based LiDAR Scanner
360-Degree 2D LiDAR Scanner
A 360-degree 2D scanner is the most exciting option for room mapping and mobile robots. Sensors like the RPLIDAR A1 family rotate continuously and measure distances around the sensor. Typical models can collect thousands of samples per second and scan a full circle several times per second. The result is a top-down slice of the environment, which is perfect for identifying walls, obstacles, corridors, and open space.
This kind of scanner is ideal for robot vacuum-style mapping, indoor navigation experiments, and obstacle detection. It will not create a full 3D model by itself, but it can create an excellent 2D floor-level map. Think of it as a robot’s belt-level awareness. It may not admire the ceiling fan, but it will know where the sofa is.
Single-Point Time-of-Flight LiDAR
A single-point LiDAR sensor measures distance in one direction. Modules such as compact TF-Luna-style sensors are small, lightweight, and useful for distance detection. To turn one into a scanner, makers often mount it on a servo motor and sweep it left to right. This produces a simpler scan than a rotating 360-degree LiDAR, but it is cheaper and easier to understand.
This setup works well for learning, doorway detection, simple obstacle avoidance, tank-level measurement, and basic experiments. It is not as smooth as a dedicated 360-degree scanner, but it teaches the core idea beautifully: aim, measure, rotate, repeat, then try not to celebrate too loudly when the first graph looks vaguely like your desk.
Depth Cameras and Hybrid Systems
Some Pi-based projects combine LiDAR with a camera. The LiDAR provides reliable distance readings, while the camera adds visual context. This hybrid approach can improve robotics projects because cameras understand texture and color, while LiDAR understands distance and shape. A camera may recognize that an object is a chair; LiDAR tells the robot not to become personally acquainted with its legs.
Basic Architecture of a Pi-Based LiDAR Scanner
A practical scanner usually includes five parts: the Raspberry Pi, the LiDAR sensor, a stable power source, software to read data, and software to visualize or use the scan. If the scanner is mounted on a robot, you may also add a motor driver, wheels, encoders, battery management, and a frame sturdy enough to survive the occasional “learning experience.”
For a USB LiDAR, the physical setup can be straightforward. The sensor connects to the Raspberry Pi through USB, while the Pi runs a script that reads scan packets. For a UART or I2C sensor, wiring matters more. You need correct voltage levels, shared ground, and proper communication settings. Many sensors use 3.3V logic, which fits the Pi’s GPIO logic level, but power requirements vary. Always follow the sensor’s datasheet rather than the ancient maker tradition of “plug it in and see what smells warm.”
Software: From Raw Readings to Useful Maps
Reading the Sensor
Most LiDAR projects begin with reading raw data. Python is popular because it is easy to write, easy to debug, and has libraries for serial communication and plotting. A 360-degree scanner may output angle, distance, and quality values. A single-point sensor may output distance readings at a selected sample rate.
The first milestone is simple: print distance data in the terminal. It may not look glamorous, but it proves the Pi and sensor are speaking the same language. Once readings are stable, the next step is to convert them into a visual format.
Converting Distance to Coordinates
For a rotating scanner, each measurement contains an angle and a distance. The software converts those readings into X and Y positions. Points can then be drawn on a graph, displayed in a browser, or fed into a mapping algorithm. This is where the project starts feeling magical. A list of numbers becomes the outline of a room. The wall appears. The table appears. The backpack on the floor appears, silently accusing you of not putting it away.
Visualization
Visualization can be as simple as a live Matplotlib plot or as advanced as a ROS visualization tool. A web dashboard is another practical option. The Raspberry Pi can host a small local webpage that shows live scan data from any device on the same network. This is useful when your scanner is mounted on a robot and you do not want to chase it around with a monitor, keyboard, and all the dignity you had left.
What Can You Build With a Pi-Based LiDAR Scanner?
Indoor Room Mapping
One of the most popular uses is indoor mapping. A stationary scanner can create a rough outline of a room. A mobile robot can collect scans from multiple positions and use algorithms to estimate its location while building a map. This process is known as SLAM, or simultaneous localization and mapping. SLAM is the reason robots can explore a space without needing a preloaded map.
Obstacle Detection
For a small robot, LiDAR can detect obstacles before collision. A forward-facing single-point sensor can warn the robot when something is too close. A 360-degree scanner can provide a wider awareness field. This is useful for autonomous carts, educational robots, and prototypes that need to move safely through indoor spaces.
Security and Presence Detection
A LiDAR scanner can detect movement or object changes in a defined area. Unlike a regular camera, LiDAR does not depend on visible images, which can be useful for privacy-conscious sensing. For example, a scanner can detect whether an object crossed a boundary or whether a room layout changed without recording faces or personal visual details.
Smart Measurement Tools
A Pi-based LiDAR scanner can become a digital measuring assistant. It can estimate room dimensions, detect openings, measure object distances, or help create rough floor plans. It will not replace professional surveying equipment, but it can be surprisingly useful for workshops, classrooms, robotics labs, and DIY experiments.
Important Safety and Reliability Notes
Many consumer LiDAR modules are designed as Class 1 laser products, which are considered safe under normal use. Even so, safety still matters. Do not modify the optics, do not use unknown high-powered laser parts, and do not stare directly into any laser emitter. Buy reputable modules, read the datasheet, and keep the sensor within its intended operating conditions.
Reliability also depends on the environment. Glossy black surfaces, glass, mirrors, direct sunlight, angled objects, and very thin chair legs can cause strange readings. LiDAR is powerful, but it is not magic. It is more like a very fast, very serious tape measure with trust issues around reflective surfaces.
Common Problems and How to Think About Them
No Data Appears
First, check the connection. USB devices should appear as serial ports. UART sensors need correct TX and RX wiring, shared ground, and matching baud rates. Also check permissions on the Raspberry Pi. Sometimes the problem is not the sensor; it is Linux politely refusing to let your script access the port.
Readings Are Noisy
Noise is normal. Filter the data by removing zero readings, ignoring low-quality points, and smoothing values over time. For mapping, multiple rotations often produce better results than a single scan. One scan is a snapshot. Several scans are a conversation.
The Map Looks Warped
If the scanner is moving, motion can distort the scan. Robot projects often need odometry, wheel encoders, or inertial data to understand how the platform moved while scanning. Without motion compensation, a straight wall may look like it had a rough day.
SEO-Friendly Summary: Why This Project Matters
A Raspberry Pi LiDAR scanner is more than a fun maker project. It is a compact introduction to robotics, spatial computing, embedded Linux, sensor fusion, mapping, and automation. It teaches how machines perceive physical space and how raw sensor data becomes useful information. Whether the goal is a room mapper, a small autonomous robot, an obstacle detection system, or a classroom demonstration, a Pi-based LiDAR scanner offers a practical path into modern sensing technology.
The best part is that the project can scale. Beginners can start with a single-point LiDAR and a basic Python script. Intermediate builders can move to a 360-degree scanner and live plotting. Advanced users can integrate ROS 2, SLAM, navigation stacks, web dashboards, and mobile robot platforms. The same core idea grows with the maker: measure the world, process the data, and use it to make smarter decisions.
Experience Notes: What Building a Pi-Based LiDAR Scanner Teaches You
Working with a Pi-based LiDAR scanner is one of those projects that looks clean in diagrams and then immediately introduces you to the real personality of hardware. On paper, the system is simple: connect the scanner, install a library, run a script, and enjoy a beautiful live map. In practice, the first lesson is patience. Maybe the USB port name changed. Maybe the sensor needs a separate motor command. Maybe the Pi is underpowered because the battery pack promised greatness but delivered mild disappointment. These small problems are not failures. They are the unofficial welcome ceremony of robotics.
The second lesson is that data is messy. A wall is not always a perfect line. A chair leg may appear for one scan and vanish in the next. A shiny cabinet can bounce light in strange ways. A black backpack may look farther away than it really is. When you first see the point cloud flicker and wiggle, it is tempting to blame the sensor. Sometimes that is fair. More often, the sensor is telling the truth in the awkward language of real-world physics. Learning to filter readings, average measurements, and ignore bad points is where the project becomes genuinely educational.
Another useful experience is learning how important mounting is. A LiDAR scanner needs a clear view. If you mount it too low, chair legs and cables dominate the scan. If you mount it too high, it may miss objects that matter to a small robot. If the scanner is tilted, your beautiful map may look like it was drawn by a cartographer riding a shopping cart. A level mount, good cable management, and vibration control can make a bigger difference than upgrading software too early.
Power is also a teacher. A Raspberry Pi, a spinning LiDAR unit, motors, and Wi-Fi can draw more current than expected. Weak power causes random disconnects, corrupted readings, or sudden reboots. The scanner may appear broken when the real villain is a tired power supply. A stable power design, short cables, and proper current capacity are not glamorous, but they are the difference between a reliable robot and a dramatic desk ornament.
The most satisfying moment comes when the scan begins to resemble the room. You rotate the device or let the scanner spin, and suddenly the invisible becomes visible: the wall, the doorway, the table, the corner you forgot existed. That moment explains why LiDAR is so popular in robotics. It turns space into numbers, and numbers into decisions. A Pi-based LiDAR scanner does not just teach electronics or coding. It teaches perception. It shows how machines build a simplified version of the world, one measurement at a time. And yes, it may also teach you that your room has too many cables on the floor. The robot noticed. It is trying not to be judgmental.
Conclusion
A Pi-based LiDAR scanner is a powerful project for anyone interested in robotics, mapping, automation, or sensor technology. It combines affordable hardware with serious concepts: laser distance measurement, coordinate conversion, real-time visualization, obstacle detection, and indoor mapping. With a Raspberry Pi and the right LiDAR module, you can build a scanner that sees structure where humans see ordinary rooms.
The project is approachable, but it still rewards careful thinking. Choose the right sensor, respect laser safety, provide stable power, mount the scanner properly, and expect the real world to be noisy. Start simple, then expand. Today it draws dots on a screen. Tomorrow it maps a room. Next week it may guide a robot around the house like a tiny laser-powered tour guide with excellent spatial awareness and questionable social skills.